
After years of testing every ratio under the sun, I’ve found that the secret to a truly spectacular sourdough discard English muffin isn’t just the discard itself, but the slow, patient overnight ferment that allows the flavors to truly marry.
There is a common misconception that discard is a waste product, something to be tossed away once the “real” baking is done.
In my kitchen, we treat discard like liquid gold, for it carries a depth of flavor that a fresh starter simply hasn’t developed yet.
You see, dear reader, the magic of this recipe lies in how the acidity of the older starter interacts with a touch of baking soda right before the muffins hit the griddle.
This reaction is what creates those iconic “nooks and crannies” that catch every golden pool of melted butter.
I want you to take a deep breath and realize that you don’t need to be a professional baker to master this; you just need a little bit of time and a warm heart.
Making your own bread at home is one of the most rewarding ways to care for your family.
When the house fills with the scent of toasted grain and tangy sourdough, everything feels just a little bit more settled.
These muffins are far superior to anything you can buy in a plastic sleeve at the grocery store, and I am here to show you exactly why.
Behind the Flavor
- The Overnight Rest: Allowing the dough to sit in the refrigerator overnight breaks down the starches and makes the final muffin much easier on your digestion.
- The Griddle Method: Traditional English muffins are cooked on a stovetop, not in an oven, which creates that beautiful dark crust and soft, pillowy interior.
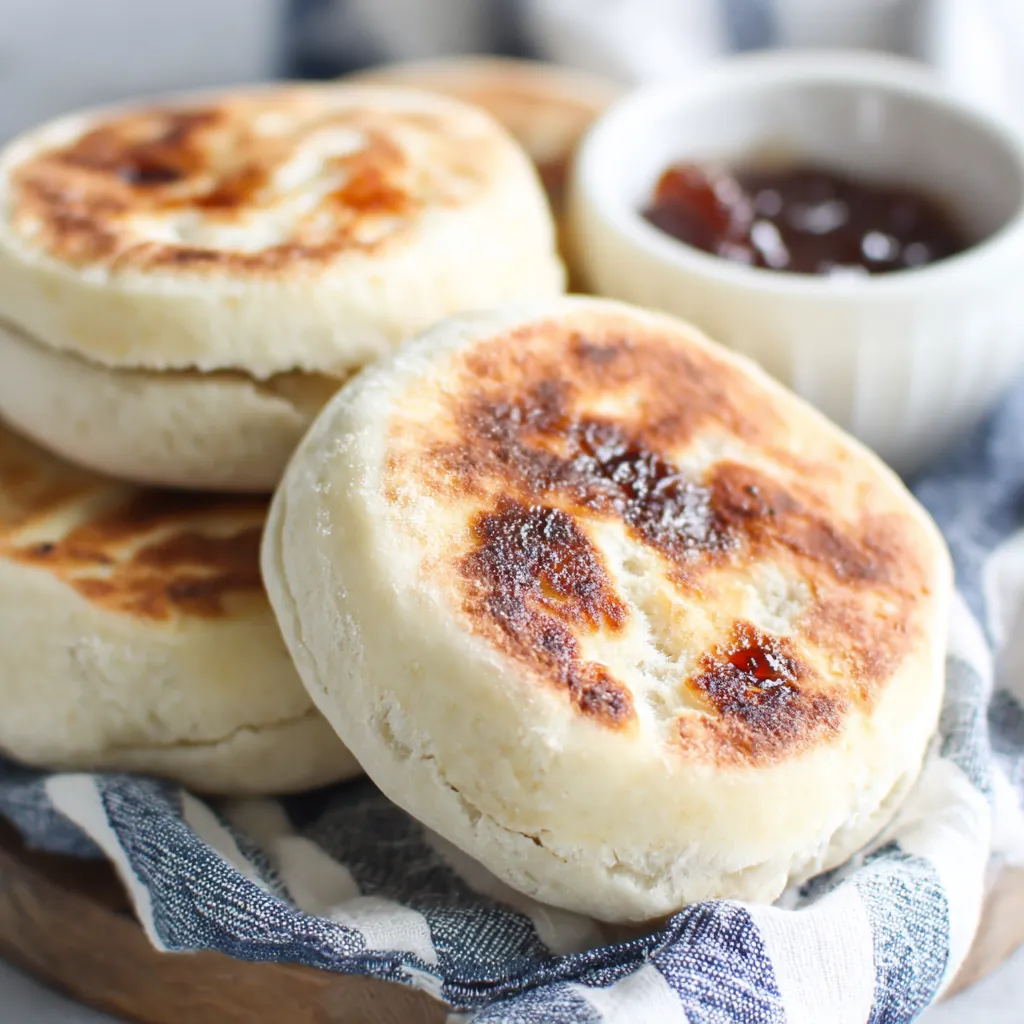
- Fork-Splitting Only: Never, ever use a knife to slice these open, as you will crush the air pockets; always use a fork to preserve the texture.
The History of the Muffin
Before we get our hands into the flour, it’s lovely to think about where these little treasures come from.
While they share a name with the sweet, cake-like American muffins, the English variety is actually a “griddle bread” with roots going back centuries.
They were originally sold by “muffin men” who walked the streets of London, ringing bells to let everyone know the fresh bread had arrived.
In the old days, they were a way to use up leftover bread dough scraps, much like how we are using our sourdough discard today.
It is a beautiful tradition of thriftiness and resourcefulness that I find very grounding.
When you make these, you are participating in a long line of bakers who refused to let anything go to waste.
The sourdough twist is a more modern adaptation, but it feels as though it was always meant to be.
The natural tang of the ferment complements the salty butter and sweet jams we usually spread on top.
It turns a simple breakfast item into a gourmet experience that feels special every single time.
Gather Your Ingredients

In my experience, the quality of what you put in determines the quality of what you get out.
You don’t need fancy, expensive flours, but do try to use fresh ingredients whenever you can.
Each component has a specific job to do in this recipe, and understanding those jobs makes you a better baker.
- Sourdough Discard: (Provides that signature fermented tang and helps with the tender crumb).
- All-Purpose Flour: (The backbone of the recipe, providing enough gluten for structure without being too tough).
- Whole Milk: (Adds fat and sugars that result in a softer texture and better browning on the griddle).
- Honey or Sugar: (A tiny amount feeds the yeast and helps create that beautiful golden-brown color).
- Butter: (Provides a rich mouthfeel and keeps the muffins moist for days).
- Salt: (Crucial for regulating the fermentation and making all the other flavors pop).
- Baking Soda: (Reacts with the sourdough acid to create instant lift and those beautiful air bubbles).
- Cornmeal: (Used for dusting the outside to provide a crunch and prevent sticking to the pan).
If you find yourself running low on bread flour, don’t worry, as all-purpose works wonderfully here.
I often think about how my mother used to make Buttery Breakfast Rolls using similar pantry staples.
It’s all about the love you put into the mixing, not just the labels on the bags.
Easy Alternatives
- Dairy-Free: You can easily swap the milk for almond or oat milk and use a neutral oil instead of butter.
- Sweetener: If you don’t have honey, maple syrup or simple granulated sugar works perfectly fine.
- Flour Varieties: You can replace up to half of the flour with whole wheat for a nuttier, heartier muffin.
- Acid: If your discard isn’t very sour, add a teaspoon of apple cider vinegar to help the baking soda react.
- Cornmeal Substitute: If you lack cornmeal, semolina flour or even a little extra dusting of regular flour will do.
Ways to Change It Up
Once you have mastered the basic recipe, I encourage you to play with the flavors.
A kitchen should be a place of exploration, and these muffins are the perfect canvas for your creativity.
I have spent many Sunday mornings trying different additions to see what makes my grandchildren smile the most.
One of my favorite variations is adding a tablespoon of cinnamon and a handful of raisins to the dough.
The aroma reminds me so much of my Cinnamon Swirl Bread, filling the kitchen with warmth.
It makes for a breakfast that feels like a warm hug on a cold winter morning.
For a savory twist, try folding in some finely grated sharp cheddar cheese and a pinch of dried chives.
These are incredible when used for breakfast sandwiches with a fried egg and a slice of thick-cut bacon.
You can even add a bit of cracked black pepper to the dough to give it a sophisticated edge.
If you’re feeling particularly adventurous, try a “herbed” version with rosemary and sea salt on top.
These pair beautifully with a bowl of soup for lunch, acting as a sophisticated side dish.
The sourdough base is incredibly forgiving, so don’t be afraid to experiment with what you have in your pantry.
The Process
Now, let’s get down to the actual making, which is the most peaceful part of the day.
I like to start this process in the evening so the dough can sleep in the fridge while I do.
This long rest is non-negotiable if you want that deep, complex flavor we talked about earlier.
Step 1: The Initial Mix
In a large glass bowl, whisk together your sourdough discard, warm milk, and honey until it’s a smooth slurry.
Gently stir in your melted butter, then fold in the flour and salt until a shaggy dough forms.
Don’t worry if it looks a bit messy at this stage; bread dough often has an “ugly” phase before it becomes beautiful.
Step 2: The First Rise
Cover your bowl with a damp cloth or plastic wrap and let it sit at room temperature for about an hour.
After that hour, move it to the refrigerator to ferment for at least 8 hours, though 24 hours is even better.
The cold environment slows down the yeast, allowing the bacteria to create more organic acids and flavor.
Step 3: Adding the Lift
The next morning, take the cold dough out and sprinkle the baking soda evenly over the top.
You’ll need to knead this in gently by hand for just a minute or two until it’s fully incorporated.
You might feel the dough start to puff up slightly in your hands as the soda reacts with the sourdough.
Step 4: Shaping the Muffins
Roll the dough out on a lightly floured surface until it’s about an inch thick.
Use a round biscuit cutter or even a glass jar to cut out your circles, placing them on a tray dusted with cornmeal.
Let these rounds rest for about 45 minutes to an hour until they look puffy and feel light to the touch.
Step 5: The Griddle Dance
Heat a large skillet or griddle over low-medium heat; you want a gentle heat so the centers cook before the outsides burn.
Cook each muffin for about 7 to 9 minutes per side, watching for that deep, golden-brown crust to form.
If they seem to be browning too fast, turn your heat down; patience is your best friend at the stove.
Notes from My Kitchen
Why is it important to use a fork instead of a knife to open the muffins?
You should only use a fork to split the muffins because a knife will crush the internal air pockets. Fork-splitting preserves the texture and the iconic ‘nooks and crannies’ that hold melted butter and toppings.
What role does baking soda play in this sourdough discard recipe?
Baking soda reacts with the natural acidity of the older sourdough starter to provide instant lift. This reaction is responsible for creating the air bubbles that form the traditional nooks and crannies inside the muffins.
Can these English muffins be made dairy-free?
Yes, you can easily adapt the recipe by swapping the whole milk for almond or oat milk and using a neutral oil in place of the butter.
Why does the dough require an overnight rest in the refrigerator?
The overnight rest allows the flavors to develop and marry, resulting in a deeper taste. It also slows down the fermentation process, which helps break down starches and makes the muffins easier to digest.
Perfect Sourdough Discard English Muffins
Ingredients
Equipment
Method
- In a large glass bowl, whisk together the sourdough discard, warm milk, and honey until the mixture is a smooth slurry.
- Stir in the melted butter, then fold in the flour and salt until a shaggy dough forms.
- Cover the bowl with a damp cloth or plastic wrap and let it sit at room temperature for 1 hour.
- Move the dough to the refrigerator and ferment for at least 8 hours (up to 24 hours) to develop flavor and aid digestion.
- Remove the cold dough from the fridge and sprinkle the baking soda evenly over the top.
- Knead the baking soda into the dough gently by hand for 1 to 2 minutes until it is fully incorporated and the dough begins to puff.
- Roll the dough out on a lightly floured surface to a 1-inch thickness.
- Cut out rounds using a biscuit cutter or glass jar and place them on a baking sheet dusted with cornmeal.
- Let the rounds rest at room temperature for 45 to 60 minutes until they appear puffy and feel light.
- Heat a large skillet or griddle over low-medium heat; test the temperature by flicking a drop of water to see if it sizzles.
- Cook the muffins for 7 to 9 minutes per side until a deep golden-brown crust forms and the internal temperature reaches 200°F (93°C).
- Cool the muffins on a wire rack and use a fork to split them open to preserve the internal texture.


