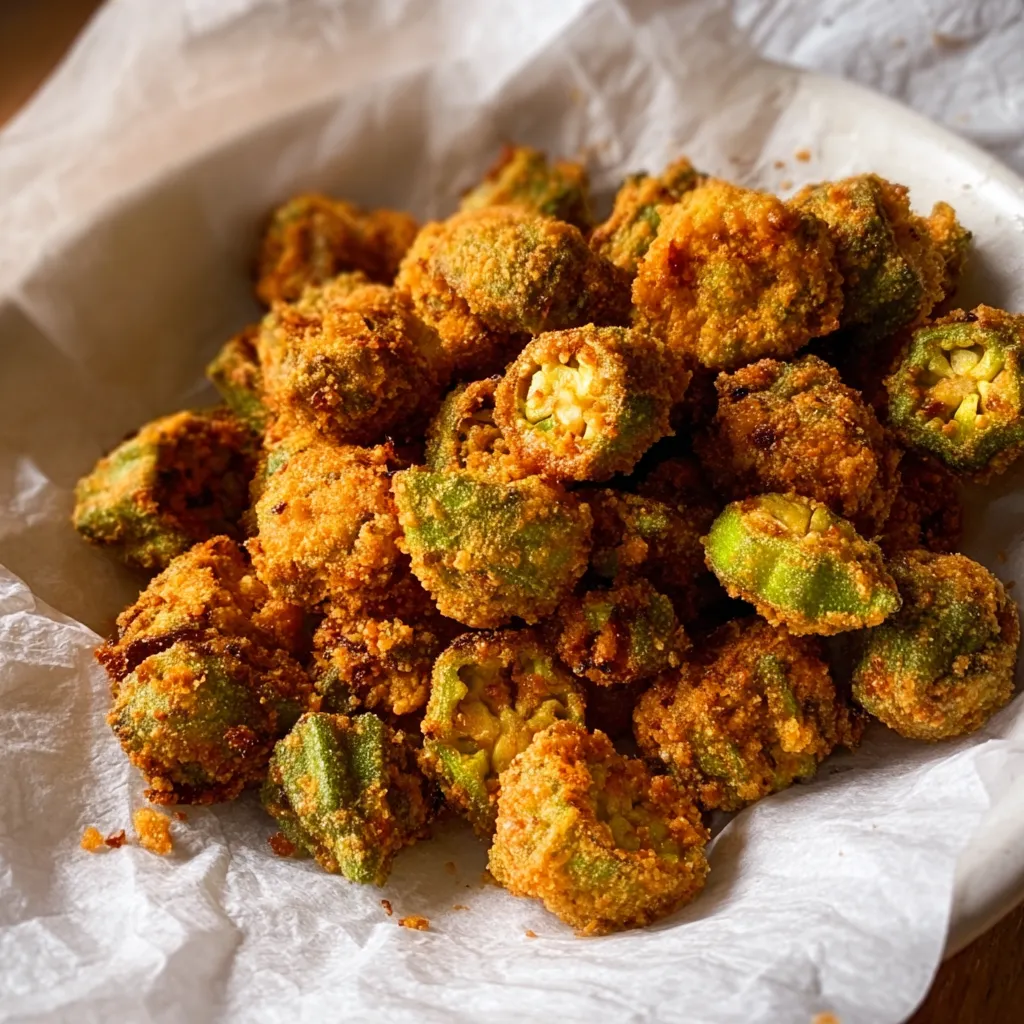
I remember summer evenings at my grandmother’s house, the air thick with humidity and the irresistible aroma of fried okra wafting from the kitchen. It was a staple, a true Southern comfort food. But after discovering my gluten intolerance, I thought those crispy, golden-brown delights were a thing of the past. Thankfully, I was wrong! Today, I’m sharing all my secrets for the most amazing Gluten-Free Fried Okra: The Crispy, Guilt-Free Snack You Need to Try you’ll ever make!
The Joy of Gluten-Free Fried Okra

Let’s be honest, fried okra is already pretty amazing. That satisfying crunch, the slightly sweet, almost grassy flavor of the okra itself… it’s a match made in culinary heaven. But for those of us who avoid gluten, finding a way to recreate that magic can be a challenge. Many gluten-free flours just don’t deliver the same crispy texture as traditional wheat flour. But fear not! I’ve experimented extensively, and I’ve cracked the code. This recipe will give you perfectly crispy, golden-brown fried okra that’s completely gluten-free and utterly delicious. Plus, we’ll explore some tips to keep it as “guilt-free” as possible without sacrificing any of that incredible flavor.
Why Gluten-Free Fried Okra?
Beyond the obvious benefits for those with celiac disease or gluten sensitivity, there are other compelling reasons to choose gluten-free options. Many people find that cutting back on gluten reduces bloating and improves digestion. Plus, exploring different gluten-free flours opens up a whole new world of flavors and textures in your cooking. This recipe is a fantastic way to enjoy a classic Southern dish without compromising your dietary needs or your taste buds!
The Ultimate Gluten-Free Fried Okra Recipe
Alright, let’s get down to business! This recipe is straightforward, but following these steps carefully will guarantee the best possible results. Don’t be intimidated – I’m here to guide you every step of the way.
Ingredients You’ll Need:
- 1 pound fresh okra, washed and sliced into ½-inch rounds
- 1 cup gluten-free all-purpose flour blend (I recommend one that contains rice flour, tapioca starch, and potato starch for the best texture)
- ½ cup cornmeal (for added crunch and flavor)
- 1 teaspoon salt
- ½ teaspoon black pepper
- ½ teaspoon garlic powder
- ½ teaspoon onion powder
- ¼ teaspoon cayenne pepper (optional, for a little kick)
- 1 cup buttermilk (or dairy-free buttermilk substitute – see notes below)
- Vegetable oil, for frying (about 2-3 inches deep in your skillet)
Buttermilk Substitute: If you don’t have buttermilk on hand, or if you’re dairy-free, you can easily make a substitute. Simply add 1 tablespoon of lemon juice or white vinegar to a measuring cup, then fill the rest of the cup with milk (dairy or non-dairy) until it reaches 1 cup. Let it sit for 5 minutes to curdle slightly before using.
Step-by-Step Instructions:
- Prepare the Okra: Wash the okra thoroughly and pat it completely dry. This is crucial for achieving crispy okra. Then, slice the okra into ½-inch rounds.
- Combine Dry Ingredients: In a large bowl, whisk together the gluten-free flour, cornmeal, salt, pepper, garlic powder, onion powder, and cayenne pepper (if using). Make sure everything is evenly distributed.
- Soak the Okra: Place the sliced okra in a separate bowl and pour the buttermilk (or buttermilk substitute) over it. Toss to coat evenly. The buttermilk helps the flour adhere and adds a tangy flavor.
- Dredge the Okra: Working in batches, remove the okra from the buttermilk, letting any excess drip off. Then, transfer the okra to the bowl with the dry ingredients. Toss to coat thoroughly, ensuring each piece is evenly covered. Don’t overcrowd the bowl; work in batches to prevent clumping.
- Heat the Oil: Pour vegetable oil into a large, heavy-bottomed skillet or Dutch oven until it reaches a depth of about 2-3 inches. Heat the oil over medium-high heat until it reaches a temperature of 350°F (175°C). Use a thermometer to ensure accurate temperature control. If you don’t have a thermometer, you can test the oil by dropping a small piece of okra into it; if it sizzles immediately and floats to the top, the oil is ready.
- Fry the Okra: Carefully add the dredged okra to the hot oil in a single layer. Avoid overcrowding the skillet, as this will lower the oil temperature and result in soggy okra. Fry for 2-3 minutes per side, or until golden brown and crispy.
- Drain and Serve: Use a slotted spoon to remove the fried okra from the oil and place it on a wire rack lined with paper towels to drain any excess oil. Season with a little extra salt, if desired. Serve immediately and enjoy!
Success Tips for Perfect Gluten-Free Fried Okra
Want to guarantee crispy, delicious gluten-free fried okra every single time? Here are my top tips for success:
- Dry Okra is Key: The drier the okra is before you dredge it, the crispier it will be when fried. After washing, pat the okra dry with paper towels, and then let it air dry for a few minutes before slicing.
- Don’t Overcrowd the Skillet: Frying in batches is essential to maintain the oil temperature and prevent the okra from steaming instead of frying. Overcrowding will result in soggy okra.
- Use the Right Oil: Vegetable oil, canola oil, or peanut oil are all good choices for frying okra. Avoid using olive oil, as it has a lower smoke point and can burn easily.
- Temperature Control is Crucial: Maintaining a consistent oil temperature of 350°F (175°C) is key to achieving perfectly crispy okra. Use a thermometer to monitor the temperature and adjust the heat as needed.
- Serve Immediately: Fried okra is best served immediately while it’s still hot and crispy. It tends to lose its crispness as it sits.
Variations and Add-ins
Once you’ve mastered the basic recipe, feel free to get creative and experiment with different variations and add-ins. Here are a few ideas to get you started:
- Spicy Fried Okra: Add a pinch of cayenne pepper, red pepper flakes, or your favorite hot sauce to the dry ingredients for a spicy kick.
- Cajun Fried Okra: Use Cajun seasoning instead of salt, pepper, garlic powder, and onion powder for a flavorful twist. You might even enjoy Spicy Cajun Fried Okra!
- Herb-Infused Fried Okra: Add dried herbs like thyme, rosemary, or oregano to the dry ingredients for a more complex flavor.
- Parmesan Fried Okra: Add grated Parmesan cheese to the dry ingredients for a cheesy, savory flavor.
- Lemon Pepper Fried Okra: Add lemon pepper seasoning to the dry ingredients for a zesty, refreshing flavor.
Serving Suggestions
Gluten-free fried okra is a versatile snack or side dish that pairs well with a variety of meals. Here are a few serving suggestions:
- Serve it as a snack with your favorite dipping sauce, such as ranch dressing, blue cheese dressing, or remoulade sauce.
- Serve it as a side dish with grilled chicken, steak, or fish.
- Add it to salads or sandwiches for a crispy, flavorful topping.
- Serve it as part of a Southern-style meal with Fried Okra with Buttermilk Dip, collard greens, and cornbread.
Making it Healthier (Guilt-Free!)
While fried okra is undeniably delicious, it’s not exactly the healthiest food in the world. But there are a few things you can do to make it a little bit healthier without sacrificing too much flavor:
- Use a Healthier Oil: Opt for an oil with a higher smoke point and a healthier fat profile, such as avocado oil or coconut oil.
- Bake it Instead: While it won’t be quite as crispy as fried okra, baking it is a healthier alternative. Toss the dredged okra with a little oil and bake it at 400°F (200°C) for 20-25 minutes, or until golden brown and crispy. Consider trying the Crunchy Baked Okra Recipe or Crunchy Oven-Fried Okra for some great baked okra alternatives!
- Air Fry it: Air frying is another great way to achieve crispy okra with less oil. Toss the dredged okra with a little oil and air fry it at 400°F (200°C) for 10-12 minutes, or until golden brown and crispy.
- Don’t Over-Salt: Be mindful of the amount of salt you add to the okra. Too much salt can negate any health benefits.
Gluten-Free Flour Blend Considerations
Choosing the right gluten-free flour blend is crucial for achieving the best texture in your fried okra. Not all gluten-free flours are created equal! I’ve found that blends containing rice flour, tapioca starch, and potato starch tend to work best for frying. These flours provide a good balance of crispness and structure. Experiment with different blends to find one that you like best. You can also create your own blend by combining individual gluten-free flours.
If you’re looking for a lighter snack, you might also enjoy Crispy Baked Zucchini Chips as a delicious alternative.
Troubleshooting Tips
Even with the best recipe and instructions, sometimes things don’t go exactly as planned. Here are a few common problems and how to fix them:
- Soggy Okra: This is usually caused by overcrowding the skillet or not using hot enough oil. Make sure to fry the okra in batches and maintain a consistent oil temperature of 350°F (175°C).
- Okra Not Crispy Enough: This could be due to using the wrong gluten-free flour blend or not drying the okra thoroughly before dredging. Try using a blend that contains rice flour, tapioca starch, and potato starch, and make sure to pat the okra dry with paper towels before slicing.
- Okra Burning Too Quickly: This is usually caused by using oil that is too hot. Reduce the heat to medium and monitor the oil temperature closely.
- Flour Not Sticking to the Okra: Make sure the okra is well coated in buttermilk before dredging it in the flour mixture. The buttermilk helps the flour adhere to the okra.
Exploring Other Okra Recipes
Once you’ve fallen in love with this gluten-free fried okra, you might be curious to explore other ways to enjoy this versatile vegetable. Don’t be afraid to experiment with different cooking methods and flavor combinations! Maybe you’d like to try the Shortcut Fried Okra with Zatarain’s recipe for a quick and easy weeknight side dish.
Conclusion
So there you have it – my ultimate guide to making perfectly crispy, golden-brown, and completely gluten-free fried okra! This recipe is a game-changer for anyone who loves this classic Southern dish but needs to avoid gluten. With a few simple ingredients and a little bit of patience, you can enjoy this guilt-free snack anytime you want. I hope you enjoy this recipe as much as I do. Happy frying!
Salted Dark Chocolate Stout Cake
Ingredients
Equipment
Method
- Preheat oven to 350°F (175°C). Grease and flour two 9-inch round cake pans, or line with parchment circles.
- Cream butter, granulated sugar, and brown sugar until light and fluffy, about 3–5 minutes.
- Beat in eggs one at a time, then mix in vanilla extract until combined.
- In a saucepan, heat stout and cocoa powder until smooth. Let cool slightly.
- In another bowl, whisk buttermilk with vegetable oil.
- Whisk flour, baking soda, baking powder, and salt together in a separate bowl.
- Alternate adding dry mix with wet (stout mixture and buttermilk mixture) into butter mixture, beginning and ending with dry. Mix until just combined.
- Fold in chopped dark chocolate gently.
- Divide batter into pans and bake 30–35 minutes. Let cool 10 minutes, then turn out onto racks.
- Make ganache by heating cream, pouring over chopped chocolate. Add butter and salt, whisk until smooth. Let cool until spreadable.
- Optional: For caramel, melt sugar until amber, stir in butter, cream, and salt. Let cool slightly before drizzling.
- Assemble by leveling cakes, spreading ganache between and over, then drizzle with caramel. Sprinkle sea salt. Serve!