
The Science Behind the Crunch: Unlocking the Secrets
The pursuit of perfectly crispy chicken isn’t just about following a recipe; it’s about understanding the science at play. The Maillard reaction, the chemical reaction between amino acids and reducing sugars that gives browned food its distinctive flavor, is key. This reaction happens best at high temperatures and low moisture levels. Therefore, the drier the surface of your chicken before cooking, the better the browning and crisping. Furthermore, the type of fat you use matters. Fats with higher smoke points, like refined coconut oil or avocado oil, can reach higher temperatures without breaking down and imparting off-flavors. The size and consistency of the breading are also crucial. A fine, even coating will crisp up more uniformly than a thick, uneven one. Finally, don’t overcrowd the pan! Overcrowding lowers the oil temperature, leading to steaming instead of frying, and resulting in soggy chicken.The Crispy Dill Pickle Parmesan Chicken Recipe: A Symphony of Flavors and Textures

Ingredients:
- Chicken: 1.5 lbs boneless, skinless chicken breasts, cut into cutlets
- Dill Pickle Brine:
- 1 cup dill pickle juice
- 1 tbsp salt
- 1 tbsp sugar
- 1 tsp black pepper
- 1 tsp garlic powder
- Breading:
- 1 cup all-purpose flour
- 1 tsp salt
- 1 tsp black pepper
- 1 tsp garlic powder
- 1/2 tsp paprika
- 1/4 tsp cayenne pepper (optional)
- 2 large eggs, beaten
- 1 cup panko breadcrumbs
- 1/2 cup grated Parmesan cheese
- 1/4 cup finely chopped fresh dill
- Cooking Oil: 1/2 cup refined coconut oil or avocado oil
Instructions:
- Brine the Chicken: In a bowl, combine the dill pickle juice, salt, sugar, black pepper, and garlic powder. Add the chicken cutlets and ensure they are fully submerged. Cover and refrigerate for at least 2 hours, or up to 8 hours.
- Prepare the Breading Station: Set up three shallow dishes. In the first, combine the flour, salt, pepper, garlic powder, paprika, and cayenne pepper (if using). In the second, place the beaten eggs. In the third, combine the panko breadcrumbs, Parmesan cheese, and fresh dill.
- Bread the Chicken: Remove the chicken from the brine and pat it completely dry with paper towels. This is crucial for achieving maximum crispiness. Dredge each cutlet in the flour mixture, shaking off any excess. Dip it into the beaten eggs, allowing the excess to drip off. Finally, coat it thoroughly in the panko-Parmesan mixture, pressing gently to ensure the breadcrumbs adhere.
- Cook the Chicken: Heat the oil in a large skillet over medium-high heat. Once the oil is hot (it should shimmer), carefully add the breaded chicken cutlets, being careful not to overcrowd the pan. Cook for 3-4 minutes per side, or until golden brown and cooked through. Use a meat thermometer to ensure the internal temperature reaches 165°F (74°C).
- Drain and Serve: Remove the chicken from the skillet and place it on a wire rack to drain excess oil. This will help maintain its crispiness. Serve immediately.
The Investigation: My Quest for Crispy Perfection
My first few attempts were a disaster. The chicken was either soggy, burnt, or the breading fell off entirely. Like many of you, I initially thought it was just a matter of following the recipe. But I was wrong. There were subtle nuances that I needed to master.The Soggy Saga: Brine Woes
Initially, I skipped the brining step, thinking it was unnecessary. Big mistake! The chicken lacked flavor and remained somewhat tough. Then, I brined for too long – overnight – resulting in chicken that was overly salty and mushy. I learned that the sweet spot for brining is between 2 and 8 hours.The Breading Breakdown: A Coating Catastrophe
The breading was another challenge. My first attempts used regular breadcrumbs, which resulted in a soft, almost gummy texture. Then, I had an “Aha!” moment when I switched to panko breadcrumbs. Their larger, coarser texture created a much crispier coating. The addition of Parmesan cheese added a nutty, savory flavor and helped the breading adhere better.The Oil Ordeal: Temperature Tantrums
Maintaining the correct oil temperature was crucial. Too low, and the chicken would absorb too much oil and become soggy. Too high, and the breading would burn before the chicken was cooked through. A thermometer is your best friend here! Aim for a consistent temperature around 325-350°F (160-175°C). I also learned that cooking in batches prevents overcrowding and ensures the oil temperature remains stable. After this, I made some Parmesan Crusted Chicken Air Fryer which provided the same level of crispness but with a different cooking method.The Dill Dilemma: Balancing the Tang
The dill pickle flavor was initially overpowering. I experimented with different ratios of pickle juice to water, eventually settling on using straight pickle juice for maximum flavor. The key was to balance the tanginess with a touch of sweetness from the sugar in the brine. I also added fresh dill to the breading for an extra burst of flavor and aroma. I considered serving this over Garlic Parmesan Chicken Pasta!The Foolproof Method: Achieving Crispy Chicken Nirvana
Here’s the definitive, foolproof method for achieving crispy dill pickle Parmesan chicken every single time:- Brine Strategically: Brine the chicken cutlets for 2-8 hours in dill pickle juice, salt, sugar, pepper, and garlic powder. Don’t over-brine!
- Pat Dry Meticulously: This is the most crucial step! Thoroughly pat the chicken dry with paper towels before breading. Excess moisture is the enemy of crispiness.
- Bread Methodically: Use a three-stage breading process: flour, egg, then panko-Parmesan mixture. Ensure each cutlet is evenly coated.
- Heat Oil Perfectly: Use a thermometer to maintain a consistent oil temperature between 325-350°F (160-175°C).
- Cook in Batches Judiciously: Avoid overcrowding the pan. Cook the chicken in batches to prevent the oil temperature from dropping.
- Drain Thoroughly: Place the cooked chicken on a wire rack to drain excess oil. This will help maintain its crispiness.
- Serve Immediately: Crispy chicken is best enjoyed fresh and hot.
Why is patting the chicken dry so important in this recipe?
Thoroughly patting the chicken dry with paper towels before breading is crucial because excess moisture is the enemy of crispiness. A dry surface allows for better browning and crisping.
What’s the ideal temperature range for the oil when cooking the chicken?
The ideal oil temperature range is between 325-350°F (160-175°C). Using a thermometer to maintain this temperature is recommended for consistent results.
Why does the recipe call for a brine made with dill pickle juice?
The dill pickle brine tenderizes the chicken and infuses it with a tangy, savory flavor that perfectly complements the richness of the Parmesan crust.
How long should I brine the chicken for the best results?
The chicken should be brined for at least 2 hours, or up to 8 hours. Over-brining can result in chicken that is overly salty and mushy.
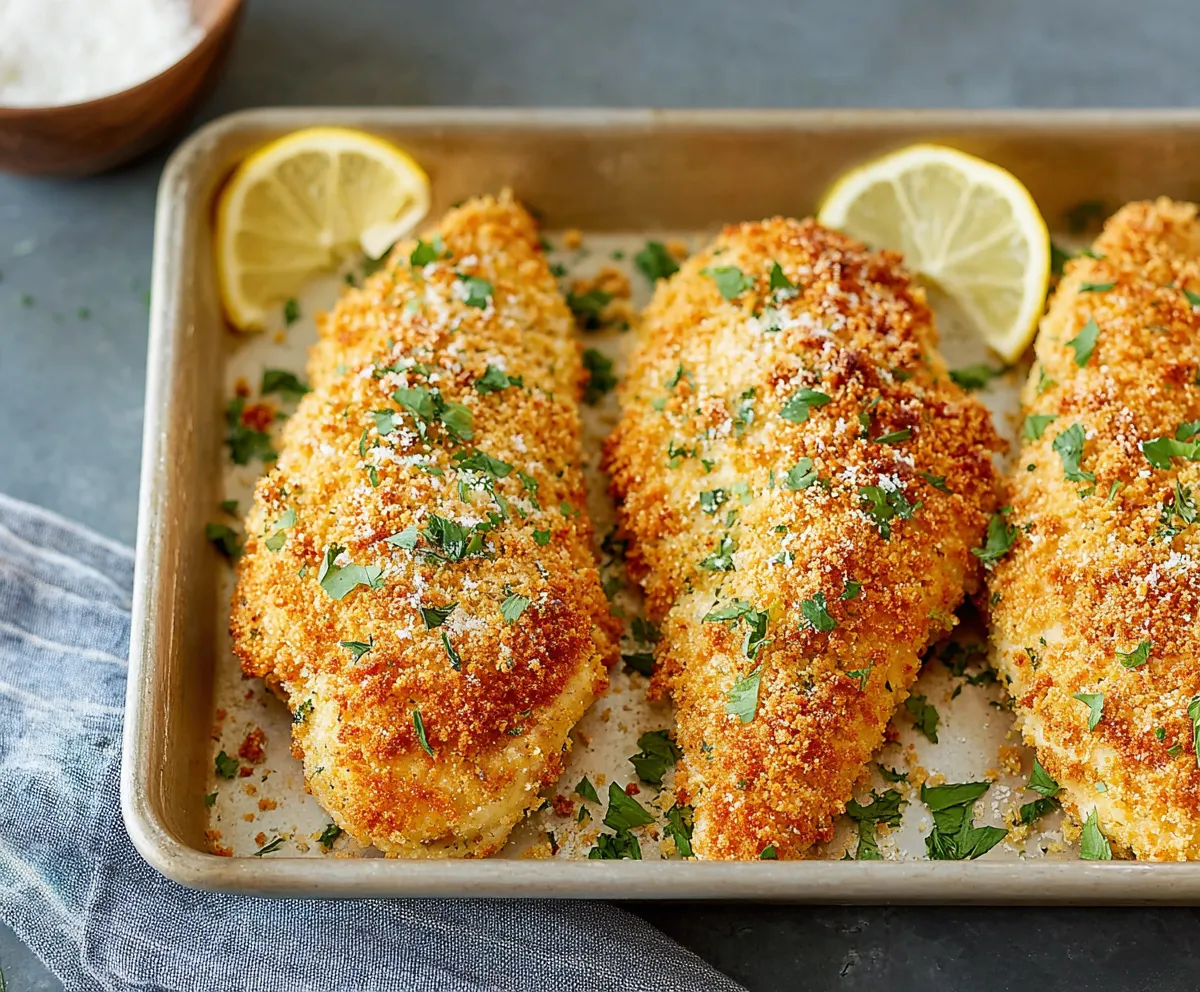
Crispy Dill Pickle Parmesan Chicken
This recipe delivers crispy chicken with a tangy dill pickle flavor and a savory Parmesan crust. The chicken is brined for tenderness and flavor, then coated in a panko-Parmesan mixture for ultimate crispiness. Serve immediately for the best experience.
Ingredients
Equipment
Method
- In a bowl, combine the dill pickle juice, salt, sugar, black pepper, and garlic powder.
- Add the chicken cutlets and ensure they are fully submerged. Cover and refrigerate for at least 2 hours, or up to 8 hours.
- Set up three shallow dishes. In the first, combine the flour, salt, pepper, garlic powder, paprika, and cayenne pepper (if using).
- In the second dish, place the beaten eggs.
- In the third dish, combine the panko breadcrumbs, Parmesan cheese, and fresh dill.
- Remove the chicken from the brine and pat it completely dry with paper towels.
- Dredge each cutlet in the flour mixture, shaking off any excess.
- Dip it into the beaten eggs, allowing the excess to drip off.
- Coat thoroughly in the panko-Parmesan mixture, pressing gently to ensure the breadcrumbs adhere.
- Heat the oil in a large skillet over medium-high heat.
- Once the oil is hot (it should shimmer), carefully add the breaded chicken cutlets, being careful not to overcrowd the pan.
- Cook for 3-4 minutes per side, or until golden brown and cooked through. Use a meat thermometer to ensure the internal temperature reaches 165°F (74°C).
- Remove the chicken from the skillet and place it on a wire rack to drain excess oil.
- Serve immediately.
Notes
Patting the chicken dry before breading is crucial for crispiness. Use a thermometer to ensure the oil temperature remains between 325-350°F (160-175°C). Cook in batches to avoid overcrowding the pan. Serve immediately for the best texture. Leftovers can be stored in an airtight container in the refrigerator for up to 3 days, but the breading will soften over time. Reheat in the oven or air fryer to restore some crispness.


