
That unmistakable scent of peanut butter caramelizing in the oven is more than just a smell; it’s a time machine. It zaps you straight back to childhood afternoons, to after-school snacks, and to the simple, profound joy of a cookie made with love. This recipe isn’t about reinventing the wheel; it’s about perfecting it, creating a peanut butter cookie so fundamentally good, so perfectly chewy and flavorful, that it becomes the new standard by which all others are judged.
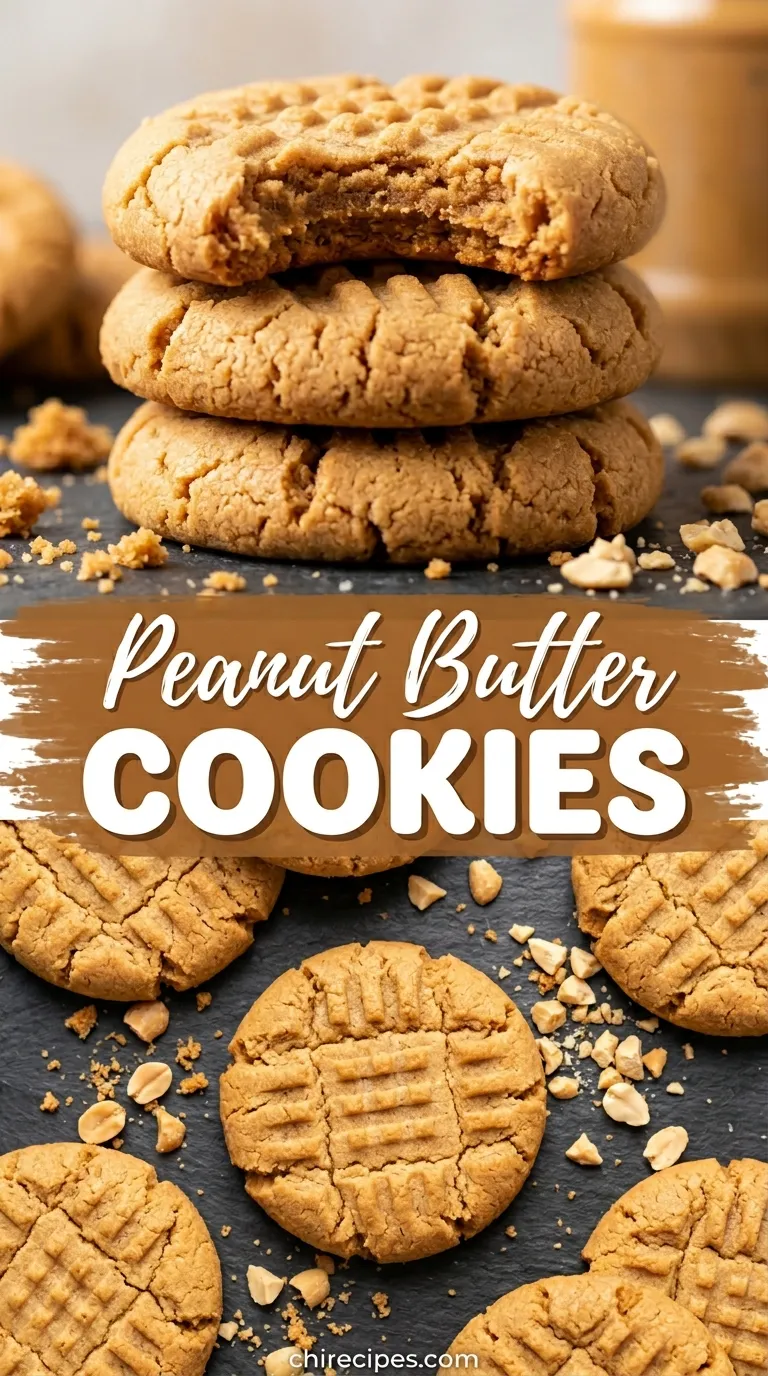
Prepare for a cookie that defines textural bliss. We’re talking about golden-brown edges with a satisfying crispness that gives way to a soft, deeply chewy center that melts in your mouth. Each bite is packed with an intense, nutty peanut butter flavor, balanced with just the right amount of sweetness and a hint of salt. This is the cookie you’ve been searching for, the one that crushes cravings and creates new, delicious memories.
The Chewy Classic Peanut Butter Cookies Difference
- The Perfect Chew: Using a combination of brown sugar for moisture and a touch of cornstarch for softness guarantees a cookie that stays chewy for days, avoiding that dreaded dry, crumbly texture.
- No-Chill Dough: This recipe is engineered for speed and convenience. The dough comes together perfectly without needing a long chill time, meaning you’re less than 30 minutes away from warm cookies.
- Intense Peanut Butter Flavor: We use a full cup of creamy peanut butter and a secret ingredient—a tiny bit of molasses—to amplify that nutty, slightly salty, and deeply satisfying taste you crave.
Ingredient Notes
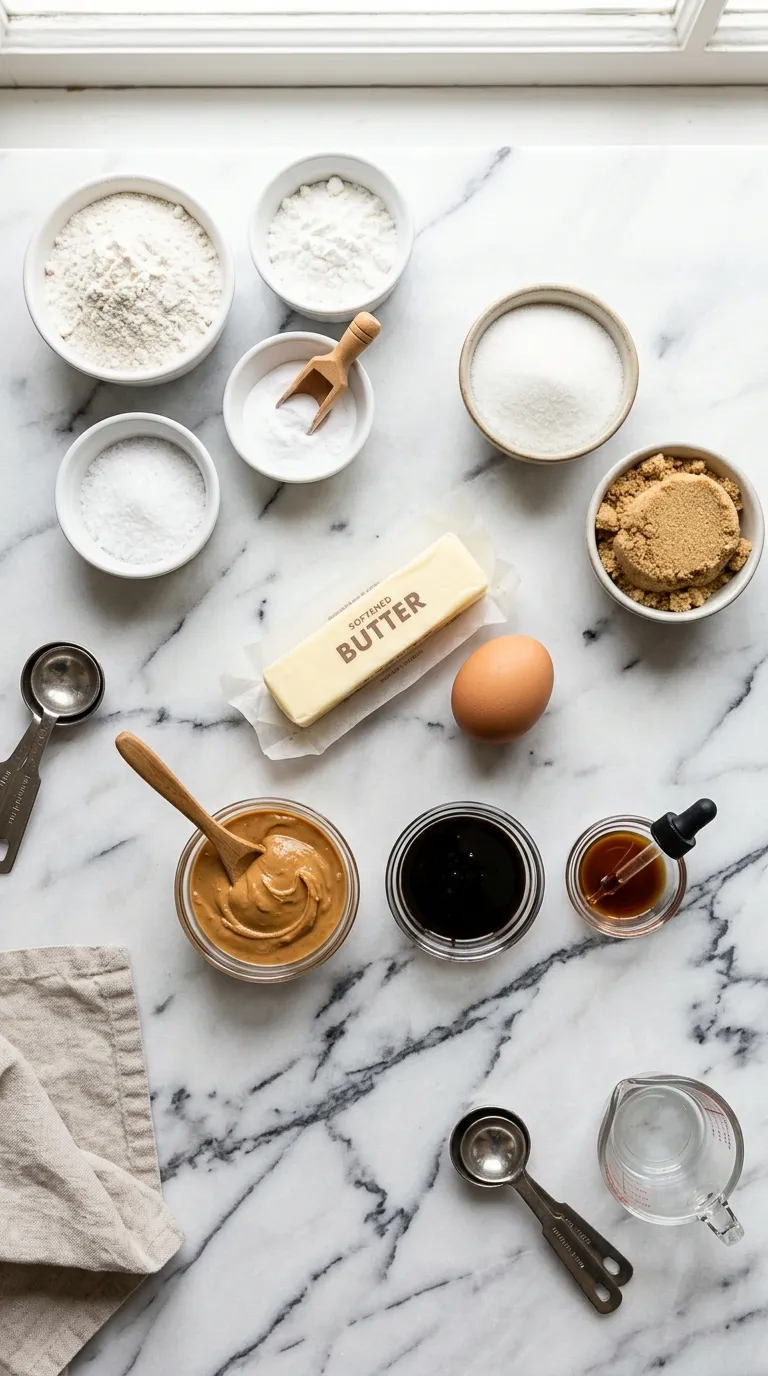
- All-Purpose Flour: The structural backbone of our cookies. Nothing fancy needed here, just your standard all-purpose flour will do the trick.
- Cornstarch: (The secret to softness!) Just a little bit of cornstarch makes the cookies incredibly tender and helps maintain that soft, chewy center.
- Baking Soda & Baking Powder: A combination of both gives us the perfect lift and spread, creating a cookie that’s substantial but not dense.
- Salt: Essential for balancing the sweetness and enhancing the nutty flavor of the peanut butter.
- Unsalted Butter: (Must be softened!) Using softened, room temperature butter is critical for a smooth, properly creamed base.
- Light Brown Sugar: (The key to chewiness!) The molasses content in brown sugar adds moisture and is the primary reason these cookies are so wonderfully chewy.
- Granulated Sugar: Provides sweetness and helps the edges get that delightful crispness.
- Creamy Peanut Butter: Use a standard commercial brand like Jif or Skippy. Avoid natural peanut butters that separate, as their oil content can make the cookies greasy and crumbly.
- Large Egg: Acts as the binder, holding everything together. Make sure it’s at room temperature for better incorporation.
- Vanilla Extract: A splash of pure vanilla extract adds warmth and depth to the overall flavor profile.
- Molasses: (Optional, but recommended!) Just one teaspoon deepens the flavor, enhances the chewiness, and gives the cookies a beautiful golden color.
Swaps & Alternatives
Don’t have everything on hand? No problem! Here are a few simple swaps you can make in a pinch.- Peanut Butter: While creamy is recommended for the classic texture, you can absolutely use crunchy peanut butter for some extra nutty bits throughout.
- Brown Sugar: If you only have dark brown sugar, you can use it. Your cookies will be slightly darker, moister, and have a more pronounced molasses flavor.
- Butter: If you only have salted butter, you can use it. Just be sure to reduce the added salt in the recipe by about half.
- Molasses: If you don’t have molasses, you can simply leave it out. The cookies will still be delicious, just slightly less rich in flavor.
Flavor Boosts
While these cookies are phenomenal on their own, sometimes you want to add a little extra flair. Think of this classic recipe as the perfect canvas for your culinary creativity.For a nutty, toasty depth, try browning your butter before you begin. Let it cool slightly before creaming it with the sugars. This one small step adds an incredible layer of caramel-like flavor that complements the peanut butter beautifully.
Another fantastic option is to play with spices. A half-teaspoon of cinnamon or a quarter-teaspoon of cardamom mixed in with your dry ingredients can add a warm, aromatic note that makes these cookies feel extra special, much like in our Soft Snickerdoodles.
And of course, you can never go wrong with additions. Fold in a cup of semi-sweet chocolate chips, peanut butter chips, or chopped Reese’s Peanut Butter Cups for an even more decadent treat. If you love stuffing cookies, you could even adapt the technique from our Rolo-stuffed Peanut Butter Cookies for a gooey, caramel center.
Step-by-Step Instructions
1. Preheat and Prep Your Dry Ingredients
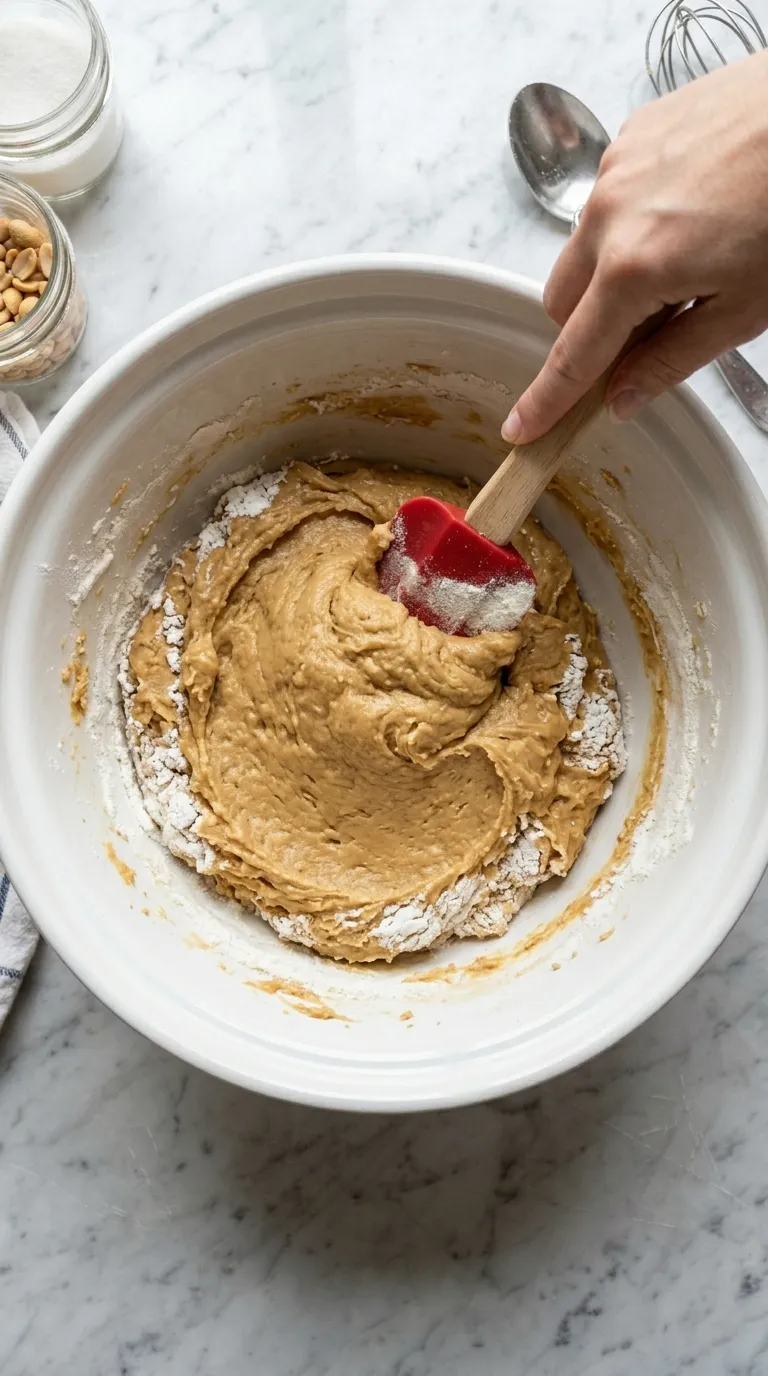
First things first, preheat your oven to 350°F (175°C) and line two large baking sheets with parchment paper. This prevents sticking and makes cleanup a breeze. In a medium bowl, whisk together the all-purpose flour, cornstarch, baking soda, baking powder, and salt. Whisking helps distribute everything evenly, which is key for a consistent cookie.2. Cream the Butter, Sugars, and Peanut Butter
In the bowl of a stand mixer fitted with the paddle attachment, or in a large bowl with a hand mixer, beat the softened butter until it’s smooth and creamy. Add the granulated sugar and light brown sugar and beat on medium-high speed for about 2-3 minutes, until the mixture is light, fluffy, and pale in color. Scrape down the sides of the bowl, then add the creamy peanut butter and beat again until it’s fully combined and smooth.3. Add the Egg, Vanilla, and Molasses
With the mixer on low speed, add the room temperature egg, pure vanilla extract, and the optional molasses. Mix just until everything is combined. Be careful not to overmix at this stage; you just want to see the egg fully incorporated into the wet ingredients. Scrape down the sides and bottom of the bowl one more time to ensure everything is mixed in.4. Combine Wet and Dry Ingredients
Turn the mixer to its lowest speed and gradually add the dry ingredient mixture to the wet ingredients. Mix only until the last streaks of flour have disappeared. Overmixing the dough after adding flour can develop too much gluten, leading to tough cookies instead of chewy ones. The final dough should be soft and easy to handle.5. Roll and Press the Cookies
Using a medium cookie scoop (about 1.5 tablespoons), portion out the dough and roll each piece into a smooth ball. Place the dough balls about 2 inches apart on your prepared baking sheets. Now for the fun part! Dip a fork in a little granulated sugar (to prevent sticking) and gently press down on top of each dough ball to create the classic crisscross pattern.6. Bake to Golden Perfection
Bake the cookies for 10-12 minutes. The key to a chewy cookie is to slightly underbake them. You’ll know they’re ready when the edges are set and lightly golden, but the centers still look a little soft and puffy. They will continue to bake on the hot pan after you remove them from the oven.7. Cool and Enjoy
Let the cookies cool on the baking sheet for about 5 minutes. This allows them to set up properly so they don’t fall apart when you move them. After 5 minutes, transfer them to a wire rack to cool completely. Or, if you can’t resist, enjoy one while it’s still warm and gooey!Avoid These Pitfalls
- Using Natural Peanut Butter: The natural oil separation in this type of peanut butter can throw off the fat ratio in the dough, often resulting in cookies that are greasy, spread too much, and are crumbly rather than chewy. Stick to conventional brands for the best results.
- Overbaking the Cookies: The number one enemy of a chewy cookie is an extra minute or two in the oven. Pull them out when the centers still look slightly underdone. They will firm up as they cool, locking in that perfect soft texture.
- Not Measuring Flour Correctly: Scooping flour directly from the bag with your measuring cup can pack it in, adding too much flour to your dough. This leads to dry, dense cookies. For best results, spoon the flour into your measuring cup and then level it off with a straight edge.
Serving Ideas
These chewy classic peanut butter cookies are a dream on their own, but they truly shine when paired with a tall, cold glass of milk. There’s a reason this combination is a timeless classic! For a more decadent treat, serve a warm cookie alongside a scoop of high-quality vanilla bean or rich chocolate ice cream.They also make a fantastic base for ice cream sandwiches. Simply sandwich a scoop of your favorite ice cream between two cookies, wrap in plastic wrap, and freeze for at least an hour. It’s a simple dessert that always wows.
If you’re a true peanut butter fanatic, you can explore other peanut butter desserts to serve alongside these cookies for a full-themed spread. Consider making a batch of our simple Peanut Butter Fudge or the ever-popular Peanut Butter Blossoms. For chocolate lovers, our Reese’s Mini Cup Peanut Butter Cookies are always a huge hit. It’s a fun way to compare different textures and flavors, all celebrating the same star ingredient.
If you tried this recipe and loved it, please leave a 5-star rating below. It helps us so much
What makes these peanut butter cookies so chewy and soft?
The recipe achieves its signature chewy and soft texture by using a combination of light brown sugar for moisture and a touch of cornstarch. The brown sugar is key for chewiness, while the cornstarch helps create an incredibly tender center that stays soft for days.
Can I use natural peanut butter in this recipe?
It is not recommended to use natural peanut butter. The article advises that the oil separation in natural varieties can make the cookies greasy and crumbly rather than chewy. For the best texture, you should use a standard commercial brand like Jif or Skippy.
Do I need to chill the cookie dough before baking?
No, this recipe features a no-chill dough. It is specifically designed for convenience, so you can mix the dough, roll the cookies, and bake them immediately, getting warm cookies in less than 30 minutes.
How can I tell when the cookies are done baking to ensure they stay chewy?
To ensure a chewy texture, you should slightly underbake the cookies. They are ready to be removed from the oven when the edges are set and lightly golden, but the centers still look a bit soft and puffy. They will finish setting up on the hot baking sheet after you take them out.

Chewy Classic Peanut Butter Cookies
Ingredients
Equipment
Method
- Preheat your oven to 350°F (175°C) and line two large baking sheets with parchment paper.
- In a medium bowl, whisk together the all-purpose flour, cornstarch, baking soda, baking powder, and salt. Set aside.
- In the bowl of a stand mixer with the paddle attachment, or in a large bowl with a hand mixer, beat the softened butter until smooth. Add the granulated sugar and light brown sugar and beat on medium-high speed for 2-3 minutes until light and fluffy. Scrape down the sides of the bowl.
- Add the creamy peanut butter and beat again until fully combined and smooth.
- With the mixer on low, add the room temperature egg, vanilla extract, and optional molasses. Mix just until combined, being careful not to overmix. Scrape down the bowl.
- Turn the mixer to its lowest speed and gradually add the dry ingredient mixture. Mix only until the last streaks of flour have disappeared. The dough will be soft.
- Using a medium cookie scoop (about 1.5 tablespoons), portion and roll the dough into smooth balls. Place them 2 inches apart on the prepared baking sheets.
- Dip a fork in granulated sugar and gently press down on top of each dough ball, then press again from the opposite direction to create a crisscross pattern.
- Bake for 10-12 minutes, until the edges are set and lightly golden but the centers still look slightly soft and puffy. Do not overbake.
- Let the cookies cool on the baking sheet for 5 minutes to set up, then transfer them to a wire rack to cool completely.


