Pure, unadulterated joy is a hard thing to capture in a dessert, but these bars absolutely nail it. They aren’t about fancy techniques or rare ingredients; they are about the simple, soul-satisfying magic that happens when you combine peanut butter, oats, and sugar in just the right way. This recipe is a direct line to those carefree childhood afternoons, a taste of pure comfort that feels both nostalgic and wonderfully present.
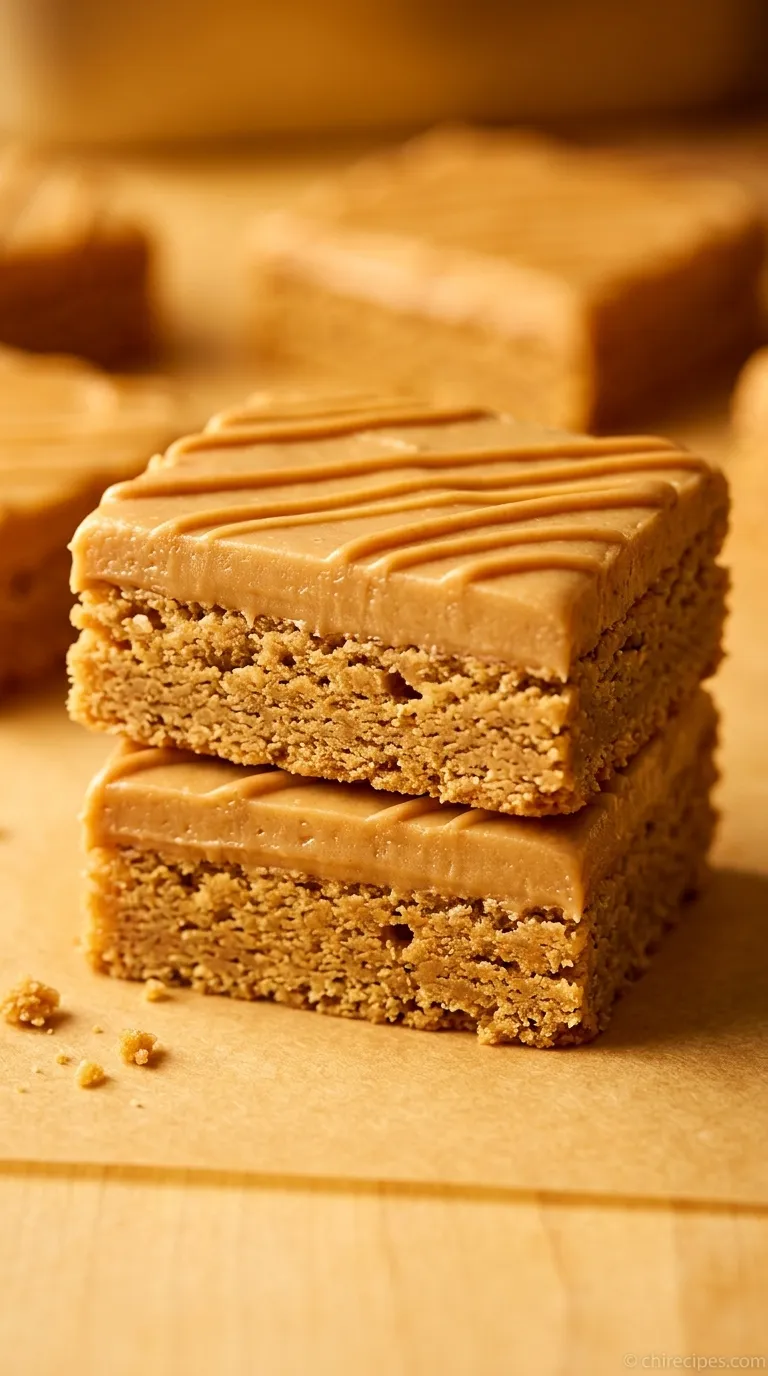
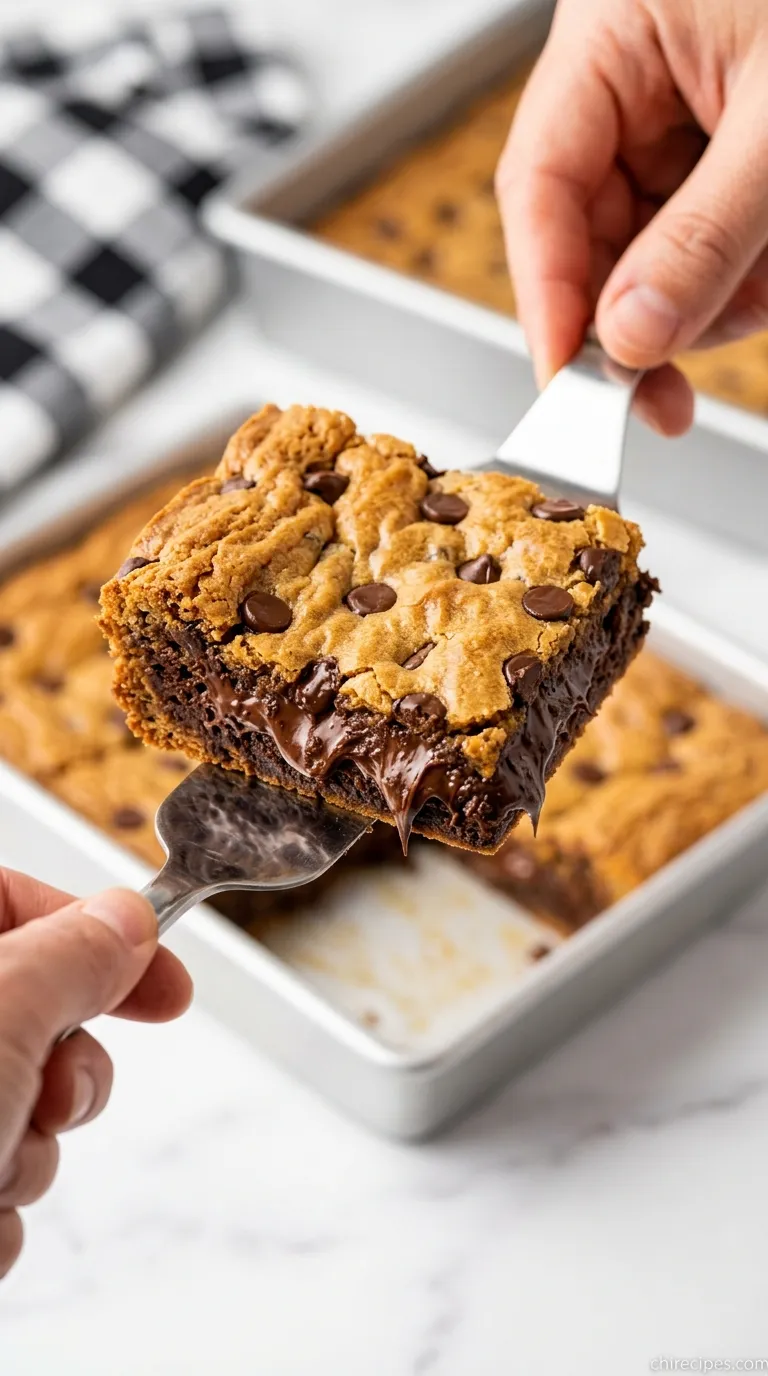
What you get is a bar with two distinct, perfect layers. The bottom is an incredibly dense and chewy oatmeal base, sweetened just enough to feel like a treat. On top, a thick, creamy, and ridiculously smooth peanut butter frosting melts in your mouth. It’s the ultimate texture and flavor combination, delivering a powerful peanut butter punch that is impossible to resist.
Why This Peanut Butter Lunch Lady Bars Works
- Incredibly Chewy Base: The specific method of boiling the butter, sugar, and milk creates a candy-like oat base that is dense, moist, and has the most satisfying chew.
- No-Bake Frosting: The frosting comes together in minutes with just a mixer—no extra cooking required. It’s silky, smooth, and packed with peanut butter flavor.
- Feeds a Crowd: Made in a 9×13 inch pan, this recipe yields a generous amount of rich, satisfying bars, making it perfect for potlucks, bake sales, or family gatherings.
What You’ll Need
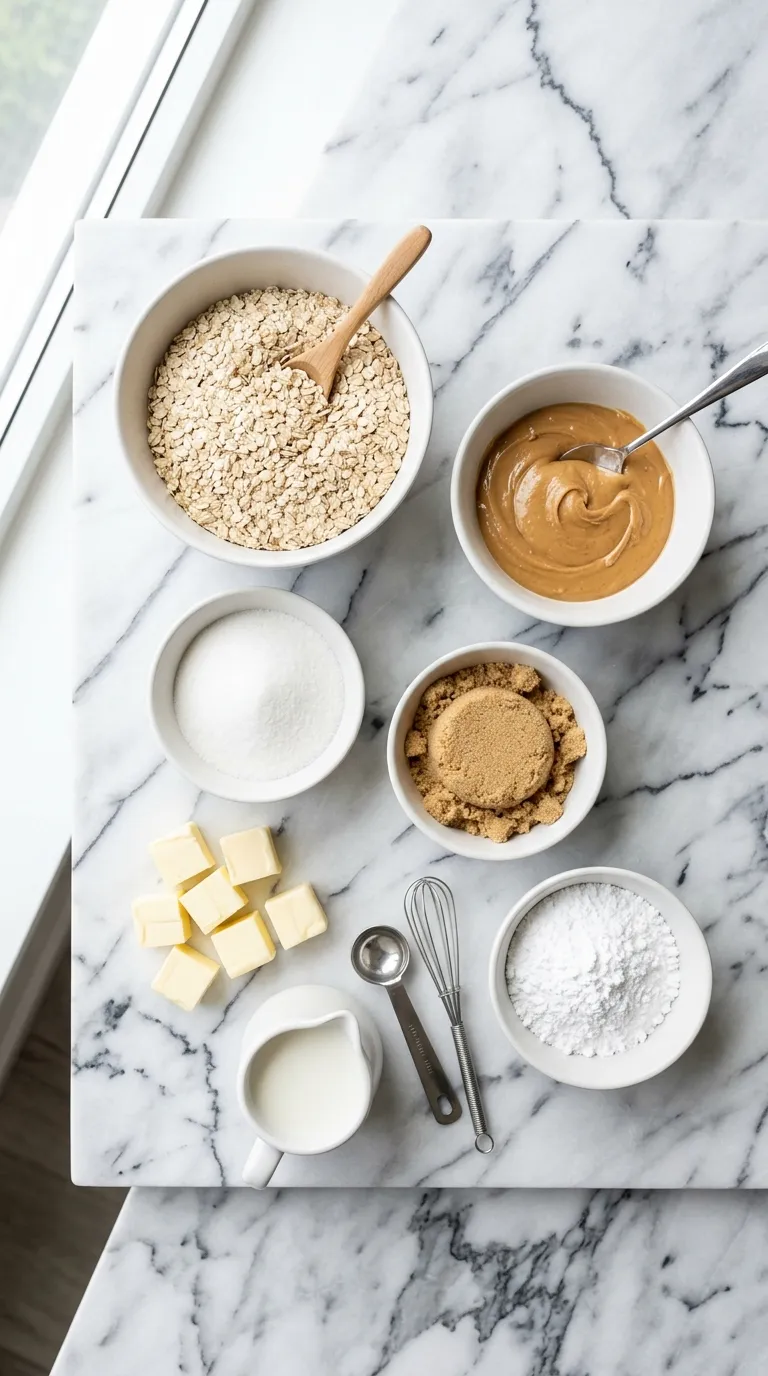
- Unsalted Butter: (Used in both the base and the frosting for richness and structure. Using unsalted gives you full control over the saltiness).
- Granulated Sugar: Provides the primary sweetness for the oat base.
- Light Brown Sugar: (Adds moisture and a subtle caramel note that complements the peanut butter perfectly).
- Milk: Any kind will do! This helps create the syrupy mixture that binds the oats.
- Creamy Peanut Butter: (The star of the show! Use a standard commercial brand like Jif or Skippy. Natural peanut butters can separate and make the bars oily).
- Vanilla Extract: Enhances all the other flavors.
- Quick-Cooking Oats: (These are essential for the classic texture. Do not use old-fashioned/rolled oats or steel-cut oats, as they won’t absorb the liquid correctly).
- Salt: A crucial ingredient that balances the sweetness.
- Powdered Sugar: (The key to a super smooth, no-grit frosting. It dissolves instantly into the butter and peanut butter).
Easy Substitutions
Don’t have everything on the list? No problem. Here are a few simple swaps you can make.- For Peanut Butter: You can use crunchy peanut butter for extra texture. Almond butter or cashew butter will also work, though the flavor profile will change significantly.
- For Gluten-Free Bars: Simply ensure you are using certified gluten-free quick-cooking oats. The rest of the ingredients are naturally gluten-free.
- For Butter: If you only have salted butter, you can use it. Just reduce the added salt in the recipe by about half. Plant-based butter sticks can also be used for a dairy-free version.
- For Milk: Whole, 2%, skim, or even dairy-free alternatives like almond or soy milk will work just fine in both the base and the frosting.
Fun Variations to Try
While the classic recipe is perfection, it’s also a fantastic canvas for your own creative twists. Here are a few ideas to get you started.Chocolate Lover’s Dream
Fold 1 cup of mini semi-sweet chocolate chips into the oat mixture right after you take it off the heat. The residual warmth will melt them slightly, creating gooey pockets of chocolate throughout the chewy base.Salty & Sweet
After spreading the frosting, sprinkle a light layer of flaky sea salt (like Maldon) over the top. The crunchy salt crystals provide a delightful textural contrast and cut through the richness, making the peanut butter flavor pop even more.Candy Bar Crunch
Gently press 1 cup of chopped Reese’s Pieces, M&M’s, or chopped peanut butter cups onto the frosting before it sets. This adds a fun, colorful crunch that kids and adults will love. It’s a similar idea to our famous Reese’s Mini Cup Peanut Butter Cookies but in bar form!Double Chocolate
Swap the peanut butter frosting for a simple chocolate ganache. Gently heat 1 cup of heavy cream until it’s just simmering, then pour it over 1 cup of semi-sweet chocolate chips in a bowl. Let it sit for 5 minutes, then whisk until smooth and pour over the cooled oat base.How to Make Peanut Butter Lunch Lady Bars
Step 1: Prepare the Pan
First things first, get your pan ready. Lightly grease a 9×13 inch baking pan with butter or non-stick spray. For extra-easy removal, line the pan with parchment paper, leaving a couple of inches of overhang on the two long sides to act as “handles.” This will allow you to lift the entire slab of bars out later for clean, easy cutting.Step 2: Make the Oat Base
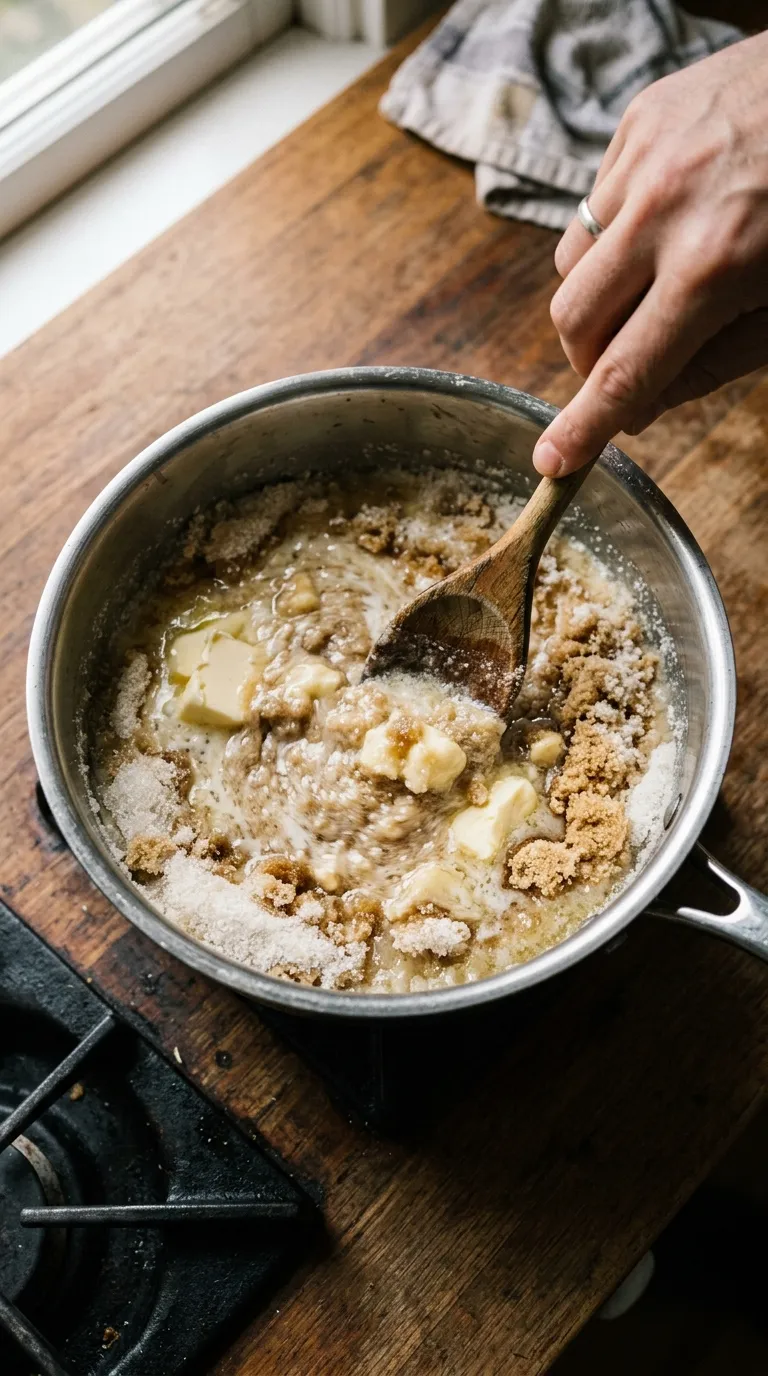
In a medium saucepan, combine the unsalted butter, granulated sugar, light brown sugar, and milk. Place the pan over medium heat.Stir the mixture constantly as the butter melts and the sugar dissolves. You want to bring it to a full, rolling boil. This is a boil that you can’t stir down.
Step 3: The Critical One-Minute Boil
Once the mixture reaches that rolling boil, set a timer for exactly 60 seconds. Continue stirring constantly during this minute. This step is crucial—it cooks the sugar to the perfect stage to ensure your bars set up properly without becoming dry or crumbly. Don’t be tempted to boil it for longer!Step 4: Combine the Base Ingredients
Immediately remove the saucepan from the heat. Working quickly, stir in 1 cup of the creamy peanut butter, the vanilla extract, and the salt until the peanut butter is completely melted and the mixture is smooth.Finally, pour in the quick-cooking oats and stir until every oat is evenly coated in the delicious peanut butter mixture. The texture will be thick and sticky.
Step 5: Press into the Pan
Scrape the oat mixture into your prepared 9×13 inch pan. Use a spatula or the back of a spoon (lightly greased if it’s sticking) to press the mixture into an even, compact layer. You want it to be firm and level. Set the pan aside to cool while you make the frosting. This process is much simpler than making individual cookies like Peanut Butter Blossoms, which is why bar recipes are so great.Step 6: Make the Creamy Frosting
In a large bowl using a hand mixer or in the bowl of a stand mixer fitted with the paddle attachment, beat the softened unsalted butter until it’s light and creamy.Add the remaining 1 cup of creamy peanut butter and the vanilla extract. Beat again on medium speed until everything is well combined and smooth. If you love peanut butter desserts, you’ll recognize this frosting is a close cousin to the filling in our Chocolate Peanut Butter Valentine Hearts.
Gradually add the powdered sugar, about one cup at a time, mixing on low speed until it’s incorporated before adding more. This prevents a sugar cloud from exploding in your kitchen! Once all the sugar is in, add the milk one tablespoon at a time, beating well after each addition, until the frosting reaches a light, creamy, and easily spreadable consistency.
Step 7: Assemble and Chill
Spoon the finished frosting over the cooled oat base in the pan. Use an offset spatula to spread it evenly all the way to the edges.Now for the most important part: patience. Cover the pan with plastic wrap or foil and place it in the refrigerator to chill for at least 2-3 hours, or until the base and frosting are completely firm. This step is non-negotiable for getting clean, beautiful slices. While you wait, you could even whip up a batch of our simple Peanut Butter Fudge!
Once chilled, use the parchment paper handles to lift the bars out of the pan and onto a cutting board. Slice into squares and serve.
Expert Tips for Success
- Measure Accurately: Baking is a science! Use the “spoon and level” method for your powdered sugar and oats. Spoon the ingredient into your measuring cup until it’s mounded, then level it off with the back of a knife for the most accurate measurement.
- Use Room Temperature Ingredients: For the smoothest frosting, make sure your butter and peanut butter are at room temperature. This allows them to whip together into a light, airy, and perfectly combined topping.
- Don’t Substitute the Oats: This recipe is specifically developed for quick-cooking oats. Old-fashioned rolled oats have a different texture and liquid absorption rate and will result in bars that may not set up correctly.
Serving Suggestions
These Peanut Butter Lunch Lady Bars are a powerhouse of a dessert all on their own, but they also play well with others. They are a fantastic addition to any dessert table, standing proudly next to other crowd-pleasers like Sugar Cookie Bars or rich Sourdough Discard Brownies.The most classic way to serve one is with a tall, ice-cold glass of milk. The milk cuts through the richness of the peanut butter perfectly.
For a more decadent dessert, serve a slightly warmed square with a scoop of vanilla bean or chocolate ice cream. A drizzle of chocolate or caramel sauce over the top would not be out of place, either!
Because they are so rich and satisfying, you can cut them into smaller, bite-sized squares to serve on a platter for a party. They hold their shape beautifully at room temperature for a few hours, making them ideal for gatherings.
If you tried this recipe and loved it, please leave a 5-star rating below. It helps us so much
Can I use old-fashioned rolled oats instead of quick-cooking oats for this recipe?
No, it is essential to use quick-cooking oats for these bars. The recipe is specifically developed for them as they have the correct texture and liquid absorption rate to ensure the bars set up properly. Using old-fashioned or steel-cut oats will result in a different texture and the bars may not set correctly.
What is the best type of peanut butter to use for these Lunch Lady Bars?
For the best results, use a standard commercial creamy peanut butter like Jif or Skippy. The article advises against using natural peanut butters, as they can separate and cause the bars to become oily. If you prefer extra texture, you can substitute crunchy peanut butter.
How can I make these peanut butter bars gluten-free?
To make a gluten-free version of these bars, you simply need to use certified gluten-free quick-cooking oats. The rest of the ingredients listed in the recipe are naturally gluten-free.
Why is it necessary to boil the oat base mixture for exactly one minute?
Boiling the butter, sugar, and milk mixture for a full 60 seconds is a critical step. This process cooks the sugar to the perfect stage, which is what creates the dense, moist, and chewy candy-like base and ensures the bars set up properly without being dry or crumbly.
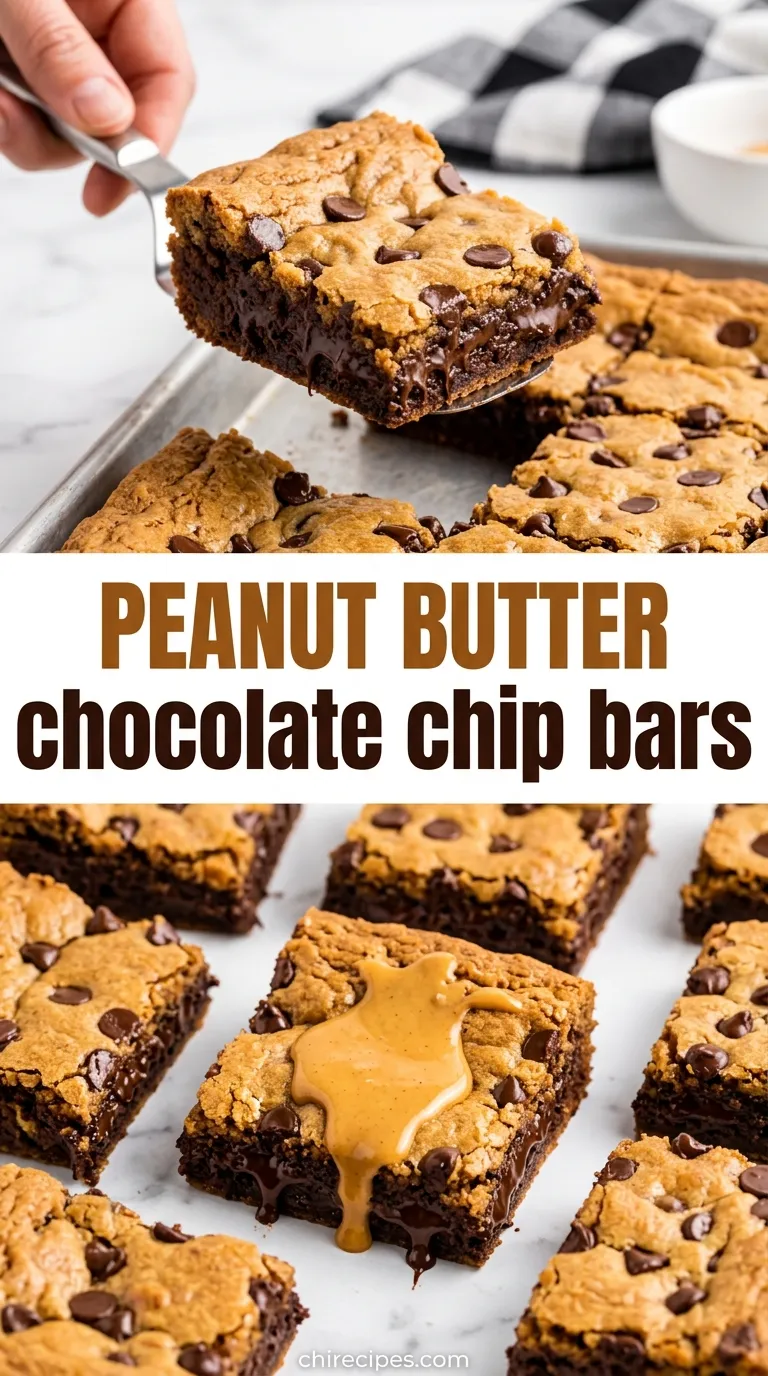
Crowd Pleasing Peanut Butter Lunch Lady Bars
Ingredients
Equipment
Method
- Prepare the Pan: Lightly grease a 9×13 inch baking pan. Line it with parchment paper, leaving an overhang on the long sides to use as handles for easy removal.
- Start the Base: In a medium saucepan, combine 1 cup of unsalted butter, granulated sugar, light brown sugar, and 1/2 cup of milk. Place over medium heat.
- Boil the Mixture: Stir constantly until the butter is melted and the sugars are dissolved. Bring the mixture to a full, rolling boil that cannot be stirred down.
- Time the Boil: Once at a rolling boil, set a timer and continue to stir constantly for exactly 60 seconds. This step is crucial for the bars to set properly.
- Add Final Base Ingredients: Immediately remove the pan from the heat. Quickly stir in 1 cup of creamy peanut butter, 1 teaspoon of vanilla extract, and the salt until completely smooth. Add the 3 cups of quick-cooking oats and stir until every oat is evenly coated.
- Press into Pan: Scrape the oat mixture into the prepared pan. Use a greased spatula to press it into a firm, even, and compact layer. Set aside to cool while you prepare the frosting.
- Make the Frosting: In a large bowl with a hand mixer or a stand mixer, beat the 1/2 cup of softened butter until light and creamy. Add 1 cup of creamy peanut butter and 1 teaspoon of vanilla, and beat until well combined and smooth.
- Finish the Frosting: Gradually add the powdered sugar, mixing on low speed until incorporated. Add 2-4 tablespoons of milk, one at a time, beating until the frosting is light, creamy, and easily spreadable.
- Assemble and Chill: Spread the finished frosting evenly over the cooled oat base. Cover the pan and refrigerate for at least 2-3 hours, or until the bars are completely firm.
- Slice and Serve: Use the parchment handles to lift the entire slab out of the pan. Place on a cutting board, slice into 24 squares, and serve.
Notes
Variations: For a chocolate twist, fold 1 cup of mini chocolate chips into the warm oat base. For a salty-sweet flavor, sprinkle flaky sea salt over the finished frosting before chilling. You can also gently press 1 cup of chopped Reese’s Pieces or M&M’s onto the frosting before it sets.
Storage: Store bars in an airtight container in the refrigerator for up to one week.