
Remember those long summer days as a kid? The sun beating down, the sound of the ice cream truck in the distance, and that pure, unadulterated joy of biting into a creamsicle? That creamy vanilla center, encased in a tangy orange shell – pure bliss! Well, what if I told you that you could recreate that magic at home, but even better? Forget the artificial flavors and questionable ingredients. We’re talking about a delightful homemade orange creamsicle ice cream that’s bursting with fresh, natural flavor. It’s easier than you might think, and trust me, the result is worth every single step. Get ready to transport yourself back to those carefree days, one delicious spoonful at a time.
Making the Best Orange Creamsicle Ice Cream at Home
So, you’re ready to embark on this creamsicle adventure? Excellent! Let’s break down what you’ll need and how we’re going to bring this frozen dream to life. The beauty of making your own ice cream is the control you have over the ingredients. We’re using real oranges, good quality vanilla extract, and a few other simple components to create a truly exceptional treat. No artificial anything here!
Ingredients You’ll Need:
- For the Orange Layer:
- 2 cups freshly squeezed orange juice (from about 6-8 oranges)
- ½ cup granulated sugar
- 1 tablespoon lemon juice (to brighten the flavor)
- For the Vanilla Cream Layer:
- 2 cups heavy cream
- 1 cup whole milk
- ¾ cup granulated sugar
- 1 tablespoon pure vanilla extract
- Pinch of salt
Equipment Required:
- Ice cream maker
- Two medium saucepans
- Whisk
- Measuring cups and spoons
- Fine-mesh sieve (optional, for smoother orange juice)
- Freezer-safe container
Preparing the Orange Layer:
- Extract the Orange Essence: Start by juicing those oranges. Freshly squeezed is non-negotiable! If you’re feeling fancy, strain the juice through a fine-mesh sieve to remove any pulp for a smoother texture. I personally like a little pulp, so I usually skip this step.
- Sweeten the Deal: In a medium saucepan, combine the orange juice, sugar, and lemon juice.
- Gentle Heat: Heat over medium heat, stirring constantly, until the sugar is completely dissolved. This usually takes about 3-5 minutes. Avoid boiling the mixture.
- Cool Down: Remove from heat and let the orange mixture cool completely. This is crucial! If you pour warm liquid into your ice cream maker, you’ll end up with a slushy mess. You can speed up the cooling process by placing the saucepan in an ice bath.
- Chill Out: Once cooled, cover the orange mixture and refrigerate for at least 2 hours, or preferably overnight. This allows the flavors to meld together beautifully.
Crafting the Vanilla Cream Layer:
- Creamy Base: In another medium saucepan, combine the heavy cream, whole milk, sugar, and salt.
- Gentle Simmer: Heat over medium heat, stirring constantly, until the sugar is completely dissolved. Again, avoid boiling. You just want the sugar to melt into the dairy.
- Vanilla Magic: Remove from heat and stir in the vanilla extract. Ah, that intoxicating aroma!
- Cool and Chill: Let the vanilla cream mixture cool completely. Then, cover and refrigerate for at least 2 hours, or preferably overnight. Just like the orange layer, chilling is key to a smooth and creamy ice cream.
The Ice Cream Maker Tango: Churning to Perfection
Now for the fun part! This is where the magic truly happens. Before you start, make sure your ice cream maker bowl is properly frozen according to the manufacturer’s instructions. Usually, this means at least 24 hours in the freezer. A properly frozen bowl is essential for achieving that perfect ice cream consistency.
- Churn the Orange: Pour the chilled orange mixture into your ice cream maker. Churn according to the manufacturer’s instructions. This usually takes about 20-25 minutes. The mixture should thicken to a soft-serve consistency.
- Transfer and Freeze: Once churned, transfer the orange ice cream to a freezer-safe container. Spread it out evenly.
- Churn the Vanilla: Pour the chilled vanilla cream mixture into your ice cream maker. Churn according to the manufacturer’s instructions, until it reaches a soft-serve consistency.
- Layering Time: Gently spoon dollops of the vanilla ice cream over the orange ice cream in the freezer-safe container. You can swirl them together slightly with a knife or spoon for a marbled effect, or leave them in distinct layers – it’s totally up to you!
- Final Freeze: Cover the container tightly and freeze for at least 4 hours, or preferably overnight, to allow the ice cream to firm up completely. This is where patience comes in handy!
Tips and Tricks for the Best Orange Creamsicle Ice Cream
Making ice cream is a science, but it’s also an art! Here are a few extra tips to help you create the most amazing orange creamsicle ice cream ever:
- Orange Variety Matters: Navel oranges are a classic choice, but feel free to experiment with other varieties like blood oranges or mandarin oranges for a different flavor profile.
- Zest for Success: For an extra burst of orange flavor, add a teaspoon of orange zest to the orange juice mixture before heating. Just be sure to use a microplane to avoid any bitter pith.
- Boozy Boost (Optional): A tablespoon of orange liqueur (like Cointreau or Grand Marnier) added to the orange juice mixture can enhance the flavor and prevent the ice cream from becoming too icy. But remember, this is optional and intended for adults only!
- Sweetness Adjustment: Adjust the amount of sugar to your liking. If your oranges are particularly sweet, you might want to reduce the sugar slightly.
- Preventing Ice Crystals: Adding a tablespoon of vodka to the vanilla cream mixture can also help prevent ice crystals from forming. The alcohol doesn’t freeze, which helps keep the ice cream smooth. Again, this is optional and for adults only.
- Serving Suggestions: Serve your homemade orange creamsicle ice cream in waffle cones, sugar cones, or simply in a bowl. Garnish with a sprig of mint or a slice of orange for an extra touch of elegance.
- Storage Secrets: Store your ice cream in an airtight container in the freezer for up to 2 weeks. After that, it might start to develop ice crystals.
Troubleshooting Your Homemade Ice Cream
Sometimes, things don’t go exactly as planned. Here are a few common ice cream-making problems and how to solve them:
- Ice Cream is Icy: This is usually caused by too much water content or not enough fat. Make sure you’re using heavy cream and whole milk, and avoid over-churning. Adding a bit of alcohol (as mentioned above) can also help.
- Ice Cream is Too Soft: This could be due to not chilling the mixtures properly or not freezing the ice cream maker bowl long enough. Double-check that both the orange juice mixture and the vanilla cream mixture are thoroughly chilled, and that your ice cream maker bowl is frozen solid.
- Ice Cream is Grainy: This can happen if the sugar doesn’t dissolve completely. Make sure you stir the mixtures constantly while heating to ensure the sugar is fully dissolved.
- Ice Cream Didn’t Churn Properly: Ensure your ice cream maker is assembled correctly and that the dasher (the part that churns the ice cream) is properly engaged. Also, make sure the ice cream maker bowl is frozen solid.
Why This Recipe is the Best
Okay, so maybe I’m a little biased, but I truly believe this recipe is fantastic. First off, it tastes *exactly* like the creamsicles of your childhood, but even better because it’s made with real ingredients. Second, it’s so simple to make! The steps are straightforward, and there aren’t any complicated techniques involved. Furthermore, you can customize it to your liking. Prefer a more intense orange flavor? Add more zest! Want it sweeter? Add more sugar! The possibilities are endless. Finally, the feeling of accomplishment you get from making your own ice cream is simply unmatched. You’ll be the hero of your household, I promise!
FAQ: Your Orange Creamsicle Ice Cream Questions Answered
Still have questions? Don’t worry, I’ve got you covered!
- Q: Can I make this recipe without an ice cream maker?
A: While an ice cream maker is the easiest and most efficient way to make ice cream, you can try the “no-churn” method. This involves whisking sweetened condensed milk into whipped cream and then folding in the orange juice mixture. Freeze for at least 6 hours, stirring occasionally to break up ice crystals. The texture won’t be quite as smooth, but it’s still a delicious option.
- Q: Can I use store-bought orange juice?
A: While you *can*, I highly recommend using freshly squeezed orange juice. The flavor is so much brighter and more vibrant. Store-bought juice often contains added sugars and preservatives that can affect the taste and texture of the ice cream.
- Q: Can I substitute the whole milk with something else?
A: You can use half-and-half for a richer flavor, or even coconut milk for a dairy-free version. Keep in mind that the texture and flavor will be slightly different.
- Q: How long does this ice cream last in the freezer?
A: Homemade ice cream is best enjoyed within 2 weeks. After that, it may start to develop ice crystals and lose its creamy texture.
- Q: My ice cream is too hard to scoop straight from the freezer. What can I do?
A: Let it sit at room temperature for 5-10 minutes before scooping. This will soften it slightly and make it easier to serve. You can also run your ice cream scoop under warm water before each scoop.
Conclusion: A Sweet Ending to a Perfect Treat
And there you have it! Your very own delightful homemade orange creamsicle ice cream. From squeezing those fresh oranges to watching the ice cream churn to perfection, every step of this process is filled with a sense of accomplishment and anticipation. Remember those key tips: use fresh ingredients, chill thoroughly, and don’t be afraid to experiment with flavors. This recipe is more than just a dessert; it’s a trip down memory lane, a celebration of summer, and a testament to the power of homemade goodness. So, what are you waiting for? Grab your ingredients, fire up your ice cream maker, and get ready to create a truly unforgettable treat! Share your creations and experiences – I can’t wait to see your delightful results!
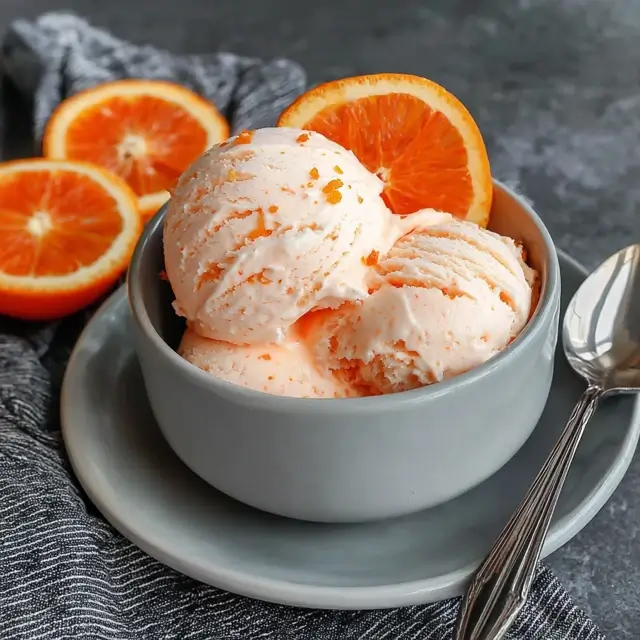
Delightful Homemade Orange Creamsicle Ice Cream: Refreshing Summer Treat
- Total Time: 40 minutes + chill/freeze time
- Yield: 1.5 quarts 1x
- Diet: Vegetarian
Description
A nostalgic homemade treat that blends fresh orange juice and creamy vanilla layers for the perfect creamsicle experience – smooth, tangy, and absolutely refreshing.
Ingredients
- Orange Layer:
- 2 cups freshly squeezed orange juice (about 6–8 oranges)
- 1/2 cup granulated sugar
- 1 tablespoon lemon juice
- Vanilla Cream Layer:
- 2 cups heavy cream
- 1 cup whole milk
- 3/4 cup granulated sugar
- 1 tablespoon pure vanilla extract
- Pinch of salt
Instructions
- Prepare Orange Layer: In a saucepan, heat orange juice, sugar, and lemon juice over medium heat, stirring until sugar dissolves (3–5 mins). Do not boil. Cool completely, then refrigerate at least 2 hours or overnight.
- Prepare Vanilla Layer: In another saucepan, combine cream, milk, sugar, and salt. Heat gently until sugar dissolves. Remove from heat, stir in vanilla extract. Cool completely and chill for 2+ hours.
- Churn Orange Layer: Pour chilled orange mixture into an ice cream maker and churn according to manufacturer’s instructions (about 20–25 minutes). Transfer to freezer-safe container and spread evenly.
- Churn Vanilla Layer: Repeat churning process with vanilla cream mixture. Gently spoon over orange layer. Swirl together for marbled effect or keep layers distinct.
- Final Freeze: Cover tightly and freeze for at least 4 hours or overnight until firm.
Notes
Add orange zest for extra citrus flavor. Optional: a tablespoon of orange liqueur in the orange layer or vodka in the vanilla for smoother texture. Use fresh juice for best results.
- Prep Time: 30 minutes
- Cook Time: 10 minutes
- Category: Dessert
- Method: Ice Cream Maker
- Cuisine: American
Nutrition
- Serving Size: 1/2 cup
- Calories: 240
- Sugar: 22g
- Sodium: 35mg
- Fat: 14g
- Saturated Fat: 9g
- Unsaturated Fat: 4g
- Trans Fat: 0g
- Carbohydrates: 25g
- Fiber: 0g
- Protein: 2g
- Cholesterol: 55mg
Keywords: orange creamsicle, homemade ice cream, summer dessert, citrus vanilla ice cream, frozen treat


