
I remember the summer my grandma taught me how to make strawberry jam; the sweet, sticky aroma permeated the entire house. The best part, though, wasn’t just the jam itself, but the little squares of graham cracker crust topped with fresh cream cheese and dollops of that homemade strawberry goodness we’d sneak while the jars cooled. It’s a memory forever etched in my mind, and inspired this recipe for Easy No-Bake Strawberry Cheesecake Bars-Baked In Bliss, a simple but elegant dessert that captures that same summery joy. Today, I’m sharing all my secrets for the most amazing Easy No-Bake Strawberry Cheesecake Bars-Baked In Bliss you’ll ever make!
Easy No-Bake Strawberry Cheesecake Bars: A Slice of Summer Heaven

Oh, friends, get ready! We’re diving headfirst into a dessert that’s not only incredibly easy to make but also tastes like pure sunshine. These No-Bake Strawberry Cheesecake Bars are the perfect treat for summer parties, potlucks, or just a delightful afternoon snack. And the best part? No oven required! We’re talking creamy, dreamy cheesecake filling nestled on a buttery graham cracker crust, topped with a vibrant, fresh strawberry topping that’s bursting with flavor. Trust me; this is a recipe you’ll want to make again and again.
Why You’ll Absolutely Adore These Bars
- No Baking Needed: Perfect for hot days when you don’t want to turn on the oven.
- Easy to Make: Simple ingredients and straightforward steps make this recipe a breeze.
- Deliciously Creamy: The cheesecake filling is rich, smooth, and utterly irresistible.
- Bursting with Strawberry Flavor: Fresh strawberries add a bright, fruity sweetness.
- Make-Ahead Friendly: Prepare these bars in advance and chill them until you’re ready to serve.
Let’s Get Started: Ingredients You’ll Need
Before we begin, let’s gather our ingredients. Don’t worry, you probably have most of these in your pantry already! Remember, the quality of your ingredients will directly impact the flavor of your bars, so choose the freshest strawberries and the best cream cheese you can find. You will savor the baked in bliss!
For the Graham Cracker Crust:
- 1 ½ cups graham cracker crumbs (about 12 full graham crackers)
- ⅓ cup granulated sugar
- 6 tablespoons (3 ounces) unsalted butter, melted
For the Cheesecake Filling:
- 16 ounces (2 packages) cream cheese, softened to room temperature
- 1 (14 ounce) can sweetened condensed milk
- ⅓ cup lemon juice, freshly squeezed
- 1 teaspoon vanilla extract
For the Strawberry Topping:
- 2 cups fresh strawberries, hulled and sliced
- ¼ cup granulated sugar
- 2 tablespoons lemon juice, freshly squeezed
- 1 tablespoon cornstarch
Step-by-Step Instructions: Making Your Dream Bars a Reality
Okay, let’s get down to business! Follow these simple steps, and you’ll be enjoying your own batch of No-Bake Strawberry Cheesecake Bars in no time. Don’t be intimidated by the steps – I’m going to walk you through everything, so you feel like I’m right there with you. And remember, a little love in the kitchen goes a long way!
Making the Graham Cracker Crust:
- Crush the Graham Crackers: Place the graham crackers in a food processor and pulse until you have fine crumbs. If you don’t have a food processor, you can place the crackers in a resealable bag and crush them with a rolling pin. It’s a great stress reliever, trust me!
- Combine Ingredients: In a medium bowl, combine the graham cracker crumbs, sugar, and melted butter. Mix well until all the crumbs are moistened and the mixture resembles wet sand. The butter helps bind everything together to ensure the crust holds together.
- Press into Pan: Press the mixture firmly into the bottom of a 9×13 inch baking pan. I like to use the bottom of a measuring cup to get a nice, even layer. This step is crucial for creating a solid base for our cheesecake filling.
- Chill the Crust: Place the pan in the refrigerator while you prepare the filling. This will help the crust set and prevent it from crumbling when you add the cheesecake layer.
Preparing the Cheesecake Filling:
- Beat the Cream Cheese: In a large bowl, beat the softened cream cheese with an electric mixer until smooth and creamy. This is where having softened cream cheese makes all the difference. Lumpy cream cheese can ruin the texture of your filling.
- Add Sweetened Condensed Milk: Gradually add the sweetened condensed milk to the cream cheese, beating until well combined. Sweetened condensed milk adds a unique sweetness and richness to the filling that you just can’t get with regular sugar.
- Incorporate Lemon Juice and Vanilla: Add the lemon juice and vanilla extract and mix until everything is smooth and fully incorporated. The lemon juice adds a touch of tanginess that balances the sweetness of the condensed milk, and the vanilla enhances all the other flavors.
- Pour over Crust: Pour the cheesecake filling over the chilled graham cracker crust, spreading it evenly with a spatula. Make sure to get right into the corners for a perfect finish!
- Chill Again: Cover the pan with plastic wrap and refrigerate for at least 4 hours, or preferably overnight. This chilling time is crucial for allowing the cheesecake filling to set properly.
Making the Strawberry Topping:
- Combine Strawberries and Sugar: In a medium saucepan, combine the sliced strawberries and sugar. Stir gently and let them sit for about 10 minutes. This will help the strawberries release their juices and create a natural syrup.
- Add Lemon Juice and Cornstarch: Stir in the lemon juice and cornstarch. The cornstarch will help thicken the topping and create a beautiful, glossy finish.
- Cook Over Medium Heat: Cook the mixture over medium heat, stirring constantly, until the sauce thickens and the strawberries soften, about 5-7 minutes. Be careful not to overcook the strawberries, or they will become mushy.
- Cool Slightly: Remove from heat and let the strawberry topping cool slightly before spreading it over the chilled cheesecake. This prevents the heat from melting the cheesecake filling.
- Spread and Chill: Spread the strawberry topping evenly over the cheesecake layer. Cover with plastic wrap and refrigerate for at least 1 hour to allow the topping to set.
Success Tips: Your Golden Rules for Perfect Cheesecake Bars
Here are a few tips to ensure your No-Bake Strawberry Cheesecake Bars turn out absolutely perfect every single time. These are the little secrets that will elevate your bars from good to *amazing*!
- Soften the Cream Cheese: This is non-negotiable! Make sure your cream cheese is completely softened to room temperature before you start mixing. This will prevent lumps and ensure a smooth, creamy filling. If you’re in a hurry, you can microwave it for a few seconds, but watch it carefully so it doesn’t melt.
- Don’t Overmix: Overmixing the cheesecake filling can incorporate too much air, which can cause it to crack as it sets. Mix until just combined, and no more.
- Use Fresh, Ripe Strawberries: The flavor of your strawberry topping will only be as good as the strawberries you use. Choose fresh, ripe, and fragrant strawberries for the best results.
- Chill Thoroughly: Patience is key! Make sure you allow the bars to chill for the recommended amount of time (or longer) to allow the cheesecake filling to set properly. This will make them easier to slice and serve.
- Slice with a Warm Knife: For clean, even slices, dip a large knife in warm water and wipe it dry before each cut. This will prevent the cheesecake from sticking to the knife and creating a messy slice.
Variations and Additions: Let Your Creativity Shine!
Want to put your own spin on these No-Bake Strawberry Cheesecake Bars? Here are a few ideas to get your creative juices flowing:
- Chocolate Graham Cracker Crust: Substitute regular graham crackers with chocolate graham crackers for a richer, more decadent crust.
- Add a Layer of Chocolate: Drizzle melted chocolate over the chilled cheesecake filling before adding the strawberry topping. This adds a layer of chocolatey goodness that complements the strawberries beautifully.
- Use Different Berries: Substitute some of the strawberries with other berries like blueberries, raspberries, or blackberries for a mixed berry topping.
- Add a Sprinkle of Nuts: Sprinkle chopped nuts like pecans or walnuts over the strawberry topping for added crunch and flavor.
- Make Individual Bars: Press the graham cracker crust into muffin tins or small ramekins for individual servings.
Serving Suggestions: The Perfect Presentation
These No-Bake Strawberry Cheesecake Bars are delicious on their own, but here are a few ideas for serving them that will really impress your guests:
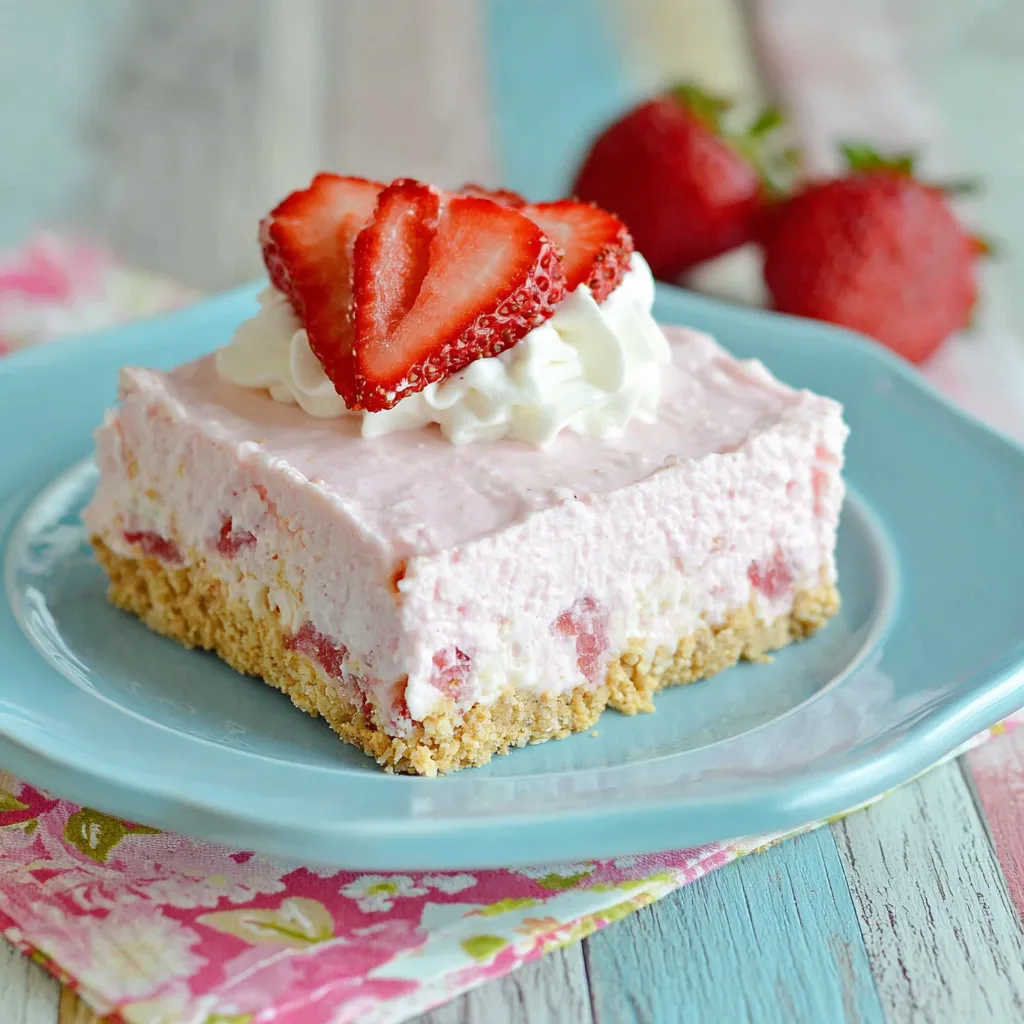
- Garnish with Fresh Strawberries: Top each bar with a fresh strawberry half for a beautiful presentation.
- Add a Dollop of Whipped Cream: A dollop of freshly whipped cream adds a touch of elegance and enhances the creamy texture of the cheesecake.
- Dust with Powdered Sugar: A light dusting of powdered sugar adds a delicate sweetness and makes the bars look even more appealing.
- Serve with Coffee or Tea: These bars are the perfect accompaniment to a cup of coffee or tea.
Storing Your Strawberry Cheesecake Bars
These bars are best stored in the refrigerator. They will keep for up to 3-4 days, but I doubt they’ll last that long! Make sure to cover them tightly with plastic wrap or store them in an airtight container to prevent them from drying out.
And if you’re looking for other strawberry delights, you absolutely *must* try my FUDGY STRAWBERRY BROWNIE BLISS. The combination of fudgy brownies and fresh strawberries is simply divine! And for a quick and elegant treat, you can’t go wrong with Chocolate Covered Strawberries. They’re always a crowd-pleaser! If you are looking for something with a flakey crust, you will love these Fresh Strawberry Tartlets. They will be devoured in minutes. Looking for a grab and go treat? Then Strawberry Shortcake Cupcakes are the perfect summer picnic treat. Or maybe you want to really impress with a showstopper? Then you have to bake this Red Velvet Strawberry Cheesecake and Strawberry Shortcake Cheesecake.
Conclusion: Your Sweet Success Awaits!
There you have it! My easy-peasy recipe for No-Bake Strawberry Cheesecake Bars. I truly hope you give this recipe a try. It’s such a simple and satisfying dessert that’s perfect for any occasion. And remember, baking (or in this case, no-baking!) should be fun and relaxing. So, put on some music, gather your ingredients, and get ready to create a little slice of summer heaven. Happy baking (or no-baking!), my friends! I can’t wait to hear how your bars turn out!
Can I make these strawberry cheesecake bars ahead of time?
Yes! These no-bake strawberry cheesecake bars are make-ahead friendly. Prepare them in advance and chill them until you’re ready to serve.
What makes these bars “no-bake”?
The recipe doesn’t require turning on the oven. The graham cracker crust is chilled instead of baked, and the cheesecake filling sets in the refrigerator.
What is the best way to cut the bars for a clean slice?
For clean, even slices, dip a large knife in warm water and wipe it dry before each cut. This will prevent the cheesecake from sticking to the knife.
What can I substitute if I don’t have fresh strawberries?
While fresh strawberries are recommended for the best flavor, you could experiment with other berries like blueberries, raspberries, or blackberries for a mixed berry topping.
Easy No-Bake Strawberry Cheesecake Bars
Ingredients
Equipment
Method
- **Making the Graham Cracker Crust:** Place the graham crackers in a food processor and pulse until you have fine crumbs. If you don’t have a food processor, you can place the crackers in a resealable bag and crush them with a rolling pin.
- In a medium bowl, combine the graham cracker crumbs, sugar, and melted butter. Mix well until all the crumbs are moistened and the mixture resembles wet sand.
- Press the mixture firmly into the bottom of a 9×13 inch baking pan. Use the bottom of a measuring cup to get a nice, even layer.
- Place the pan in the refrigerator while you prepare the filling.
- **Preparing the Cheesecake Filling:** In a large bowl, beat the softened cream cheese with an electric mixer until smooth and creamy.
- Gradually add the sweetened condensed milk to the cream cheese, beating until well combined.
- Add the lemon juice and vanilla extract and mix until everything is smooth and fully incorporated.
- Pour the cheesecake filling over the chilled graham cracker crust, spreading it evenly with a spatula.
- Cover the pan with plastic wrap and refrigerate for at least 4 hours, or preferably overnight. This chilling time is crucial for allowing the cheesecake filling to set properly.
- **Making the Strawberry Topping:** In a medium saucepan, combine the sliced strawberries and sugar. Stir gently and let them sit for about 10 minutes.
- Stir in the lemon juice and cornstarch.
- Cook the mixture over medium heat, stirring constantly, until the sauce thickens and the strawberries soften, about 5-7 minutes.
- Remove from heat and let the strawberry topping cool slightly before spreading it over the chilled cheesecake. This prevents the heat from melting the cheesecake filling.
- Spread the strawberry topping evenly over the cheesecake layer.
- Cover with plastic wrap and refrigerate for at least 1 hour to allow the topping to set.
- Cut into bars and serve.


