
A truly great peanut butter cookie doesn’t shout for attention; it hums a quiet, confident tune of pure, unadorned comfort. It’s not about fancy swirls or exotic additions, but about capturing that perfect balance between salty and sweet, chewy and crumbly. This recipe is my ode to that simplicity, a method honed over decades to ensure that perfect, satisfying melody in every single bite.
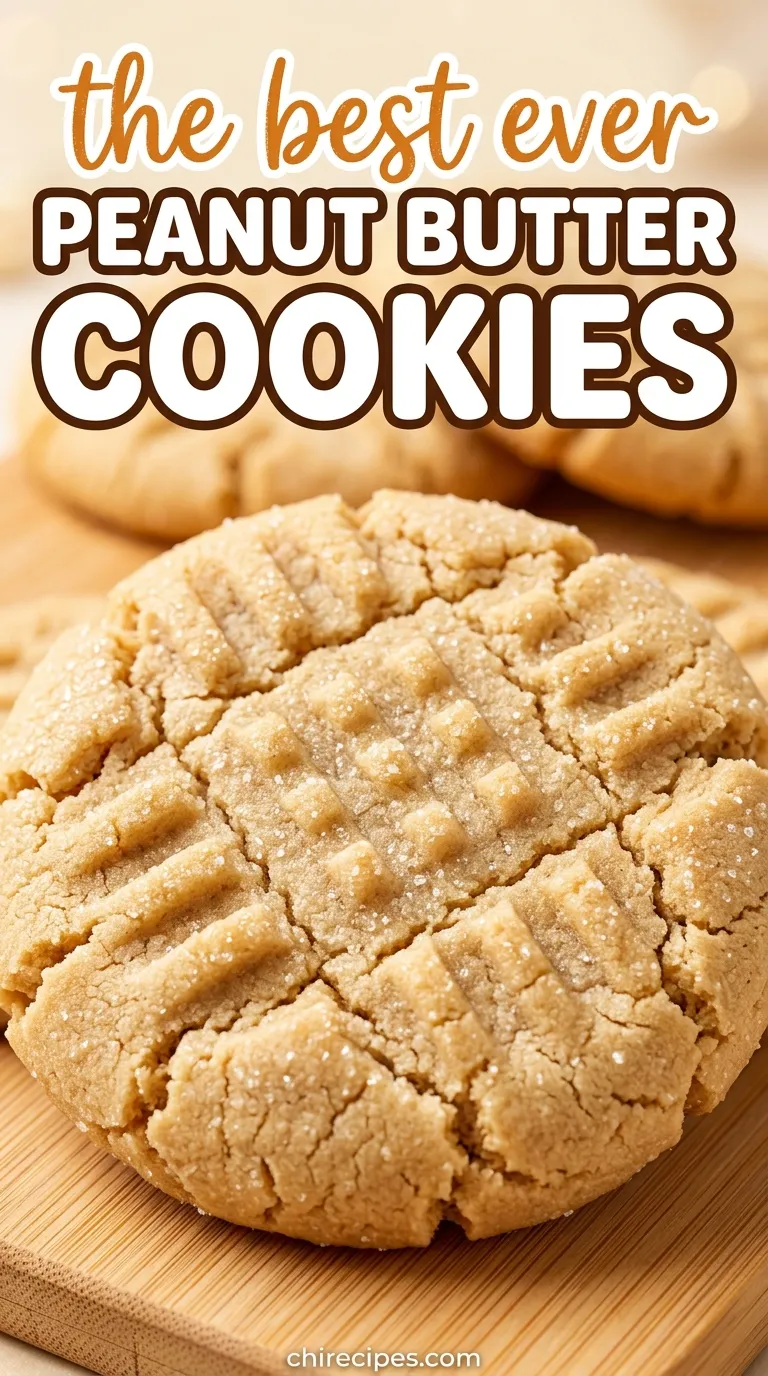
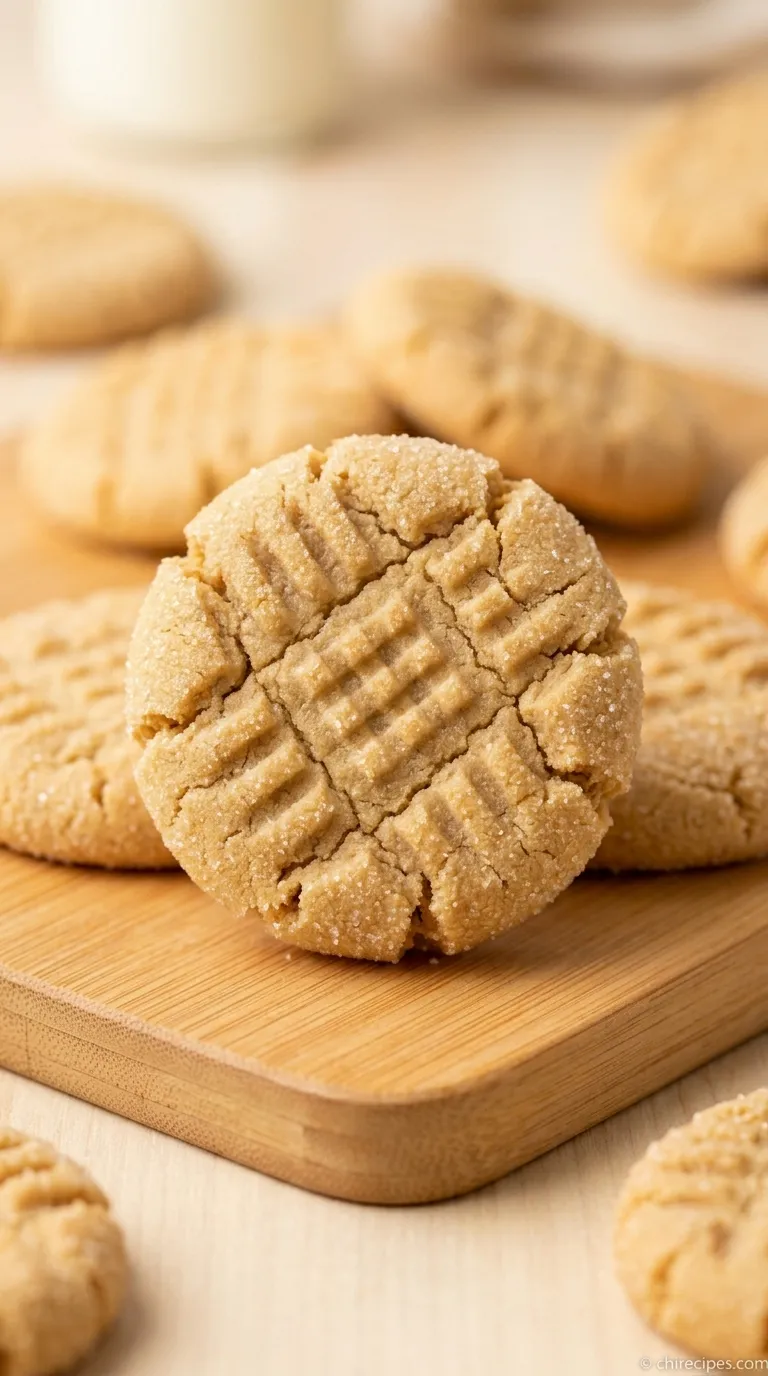
What you’ll get is a cookie with a deeply nutty flavor, a wonderfully soft center that gives way to slightly crisp edges, and that classic crisscross pattern that promises goodness. They are sturdy enough to pack for a picnic, yet tender enough to melt in your mouth alongside a cold glass of milk. This is the peanut butter cookie you remember from childhood, only better.
Why This Method Works
- Room Temperature Ingredients: Using softened butter and eggs at room temperature is non-negotiable. It allows them to emulsify properly, creating a uniform, airy dough that bakes evenly and results in a tender crumb.
- The Creaming Method: Beating the butter and sugars together until light and fluffy isn’t just for show. It incorporates tiny air pockets into the dough, which act as a leavener to give the cookies a gentle lift and a wonderfully chewy texture.
- A Brief Chill: Just 30 minutes in the refrigerator makes a world of difference. It solidifies the fat in the dough, preventing the cookies from spreading too much in the oven and ensuring a thicker, chewier final product.
Gather Your Ingredients
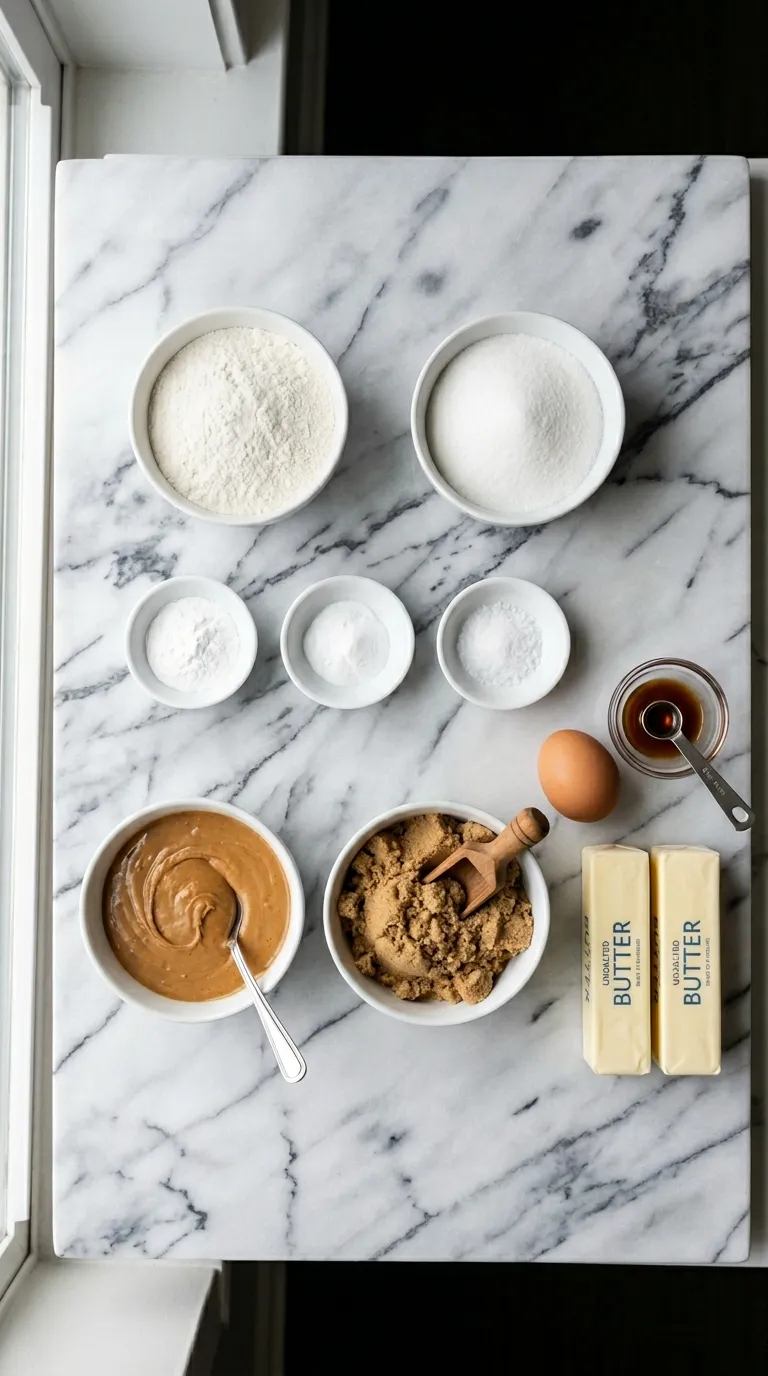
- All-Purpose Flour: (The foundation of our cookie, providing structure without making it tough.)
- Baking Soda & Baking Powder: (This duo provides the perfect lift. The soda reacts with the brown sugar for a nice spread, while the powder gives it a little puff.)
- Salt: (Crucial for balancing the sweetness and enhancing the peanut butter flavor.)
- Unsalted Butter: (Must be softened to room temperature. This is the key to a smooth, perfectly creamed dough.)
- Creamy Peanut Butter: (Use a standard commercial brand like Jif or Skippy. Natural peanut butters can separate and make the cookies oily and crumbly.)
- Granulated Sugar: (Provides sweetness and helps create those delightfully crisp edges.)
- Light Brown Sugar: (Packed with molasses, this is our secret to a soft, chewy center and a deeper, more complex flavor.)
- Large Egg: (Acts as a binder, holding everything together. Make sure it’s at room temperature.)
- Vanilla Extract: (A splash of pure vanilla extract rounds out the flavors and adds a lovely warmth.)
Simple Swaps
While this recipe is a classic, your pantry might have other plans. Here are a few reliable substitutions if you’re in a pinch.- Peanut Butter: If you only have crunchy peanut butter, feel free to use it! It will add a lovely texture and little bits of nutty crunch to the final cookie.
- Butter: If you only have salted butter, you can use it. Just be sure to reduce the added salt in the recipe by half.
- Light Brown Sugar: No light brown sugar? You can use dark brown sugar for an even chewier cookie with a more pronounced molasses flavor, or use all granulated sugar for a crisper cookie.
- Vanilla Extract: Almond extract can be a fun substitute, but use it sparingly! Start with just 1/4 teaspoon, as its flavor is much more potent.
Make It Your Own
Once you’ve mastered the basic recipe, it becomes a wonderful canvas for your own creativity. A few simple additions can transform these cookies into something new and exciting.A handful of semi-sweet chocolate chips folded into the dough at the very end is a classic for a reason. The slightly bitter chocolate is a perfect partner for the sweet and salty peanut butter.
For a truly decadent treat, consider pressing a candy into the center of each cookie. You can turn these into delightful Rolo-stuffed Peanut Butter Cookies by wrapping the dough around a caramel-filled chocolate, or make a batch of Reese’s Mini Cup Peanut Butter Cookies by pressing a mini peanut butter cup into the warm cookie right after it comes out of the oven.
For a bit of texture and crunch, try adding 1/2 cup of chopped peanuts or toffee bits to the dough along with the flour. It adds a wonderful new dimension to every bite.
The Time-Tested Method
1. Whisk the Dry Ingredients
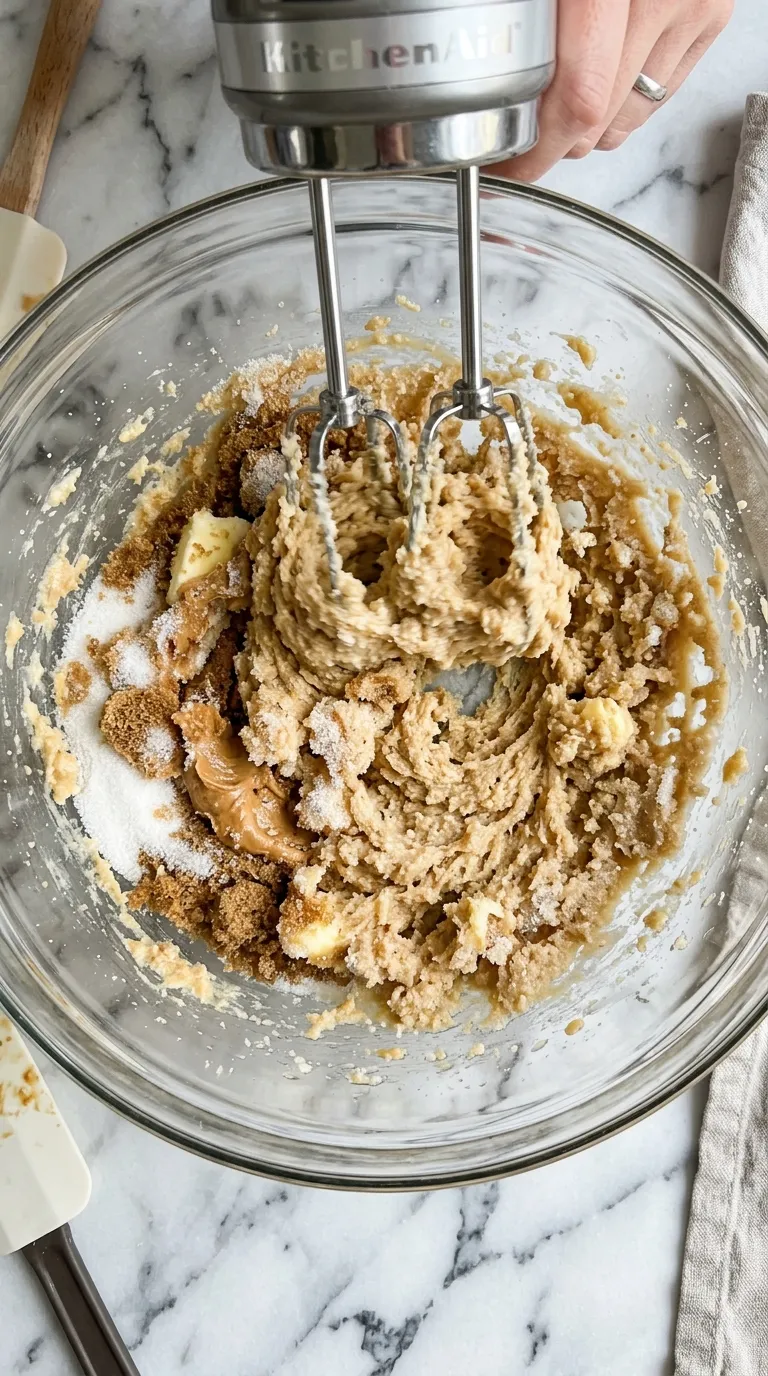
In a medium bowl, whisk together the all-purpose flour, baking soda, baking powder, and salt. Whisking is better than sifting here; it combines everything beautifully and breaks up any lumps. Set this bowl aside for now.2. Cream the Fats and Sugars
In the bowl of a stand mixer fitted with the paddle attachment, or in a large bowl with a hand mixer, beat the softened butter and creamy peanut butter on medium speed until they are completely combined and smooth.Add the granulated sugar and the packed light brown sugar. Cream them together on medium-high speed for a good 2-3 minutes, until the mixture is light, pale, and fluffy. Don’t rush this step! This is where you are building the cookie’s structure.
3. Add the Egg and Vanilla
Add the room temperature egg and the vanilla extract to the creamed mixture. Beat on medium speed until just combined, scraping down the sides of the bowl with a rubber spatula to make sure everything is incorporated evenly.4. Combine Wet and Dry
With the mixer on its lowest speed, gradually add the dry flour mixture to the wet ingredients. Mix only until the last streaks of flour have disappeared. Over-mixing at this stage can develop the gluten in the flour, leading to tough cookies, and we want them to be tender.5. Chill the Dough
Cover the bowl with plastic wrap and refrigerate the dough for at least 30 minutes. This step is so important for preventing the cookies from spreading into thin, greasy wafers. A chilled dough is a happy dough.6. Shape and Bake
Preheat your oven to 375°F (190°C) and line two baking sheets with parchment paper. Scoop the chilled dough into balls about 1.5 inches in diameter and roll them between your palms until smooth.Place the dough balls on the prepared baking sheets, leaving about 2 inches of space between them. Using the tines of a fork, gently press down on the top of each ball, then press again from the opposite direction to create that iconic crisscross pattern.
7. Bake to Perfection
Bake for 10-12 minutes, or until the edges are lightly golden brown and the centers look just set. They might seem a little underdone in the middle, but that’s the secret to a chewy center. They will continue to firm up as they cool on the baking sheet.Let the cookies cool on the baking sheet for 5 minutes before transferring them to a wire rack to cool completely. This brief rest allows them to set properly so they don’t fall apart when you move them.
Notes from My Kitchen
Over the years, I’ve learned a few things that help guarantee success. Keep these little tidbits in mind, and your cookies will be the talk of the town.- Don’t Overbake: The number one mistake people make is baking peanut butter cookies for too long. Pull them from the oven when the centers still look a tiny bit soft. Carryover cooking on the hot pan will finish the job perfectly.
- The Fork Trick: If your fork sticks to the dough when making the crisscross pattern, dip it lightly in a small bowl of granulated sugar between cookies. This not only prevents sticking but also adds a lovely, sparkly finish.
- Dough Can Be Frozen: This dough freezes beautifully. Roll it into balls, place them on a baking sheet, and freeze until solid. Then, transfer the frozen balls to a zip-top bag. You can bake them directly from frozen; just add 2-3 minutes to the baking time.
- Flavor Foundation: This simple recipe is the base for so many other wonderful treats. It’s very similar to the dough used for classic Peanut Butter Blossoms and can even be adapted with oats and other mix-ins to create something like hearty Cowboy Cookies. Understanding this base opens up a world of possibilities, from Chocolate Peanut Butter Valentine Hearts to a simple 3-ingredient Peanut Butter Fudge.
Perfect Pairings
A perfect peanut butter cookie is a joy all on its own, but it plays very well with others. The most classic companion, of course, is a tall, cold glass of milk. It’s a timeless combination for a reason.For a more grown-up treat, enjoy a warm cookie with a cup of hot coffee or black tea. The bitterness of the beverage cuts through the richness of the cookie in the most delightful way.
And for a truly decadent dessert, try making a cookie sandwich. Spread a layer of your favorite chocolate-hazelnut spread, raspberry jam, or even marshmallow fluff between two cookies. It’s a simple way to elevate this humble treat into something spectacular.
Did you change any ingredients? Let me know in the comments how you made this recipe your own
Why is it important to chill the cookie dough before baking?
Chilling the dough for at least 30 minutes is a crucial step because it solidifies the fat. This prevents the cookies from spreading too much in the oven, ensuring a thicker and chewier final product.
Can I use natural peanut butter in this recipe?
The recipe recommends using a standard commercial brand like Jif or Skippy. Natural peanut butters tend to separate, which can make the cookies oily and crumbly. However, you can use crunchy peanut butter if you’d like to add extra texture.
How do I know when the peanut butter cookies are perfectly baked?
You should remove the cookies from the oven when the edges are lightly golden brown and the centers still look a bit soft. They will continue to firm up on the hot baking sheet as they cool, which is the secret to achieving a chewy center.
What should I do if my fork sticks to the dough when making the crisscross pattern?
If the fork sticks to the dough, you can dip it lightly in a small bowl of granulated sugar between pressing each cookie. This not only prevents sticking but also adds a lovely, sparkly finish to the cookies.
Fast and Perfect Peanut Butter Cookies
Ingredients
Equipment
Method
- In a medium bowl, whisk together the all-purpose flour, baking soda, baking powder, and salt. Set aside.
- In a large bowl using a hand mixer or a stand mixer with the paddle attachment, beat the softened butter and creamy peanut butter on medium speed until completely combined and smooth.
- Add the granulated sugar and packed light brown sugar. Cream together on medium-high speed for 2-3 minutes until the mixture is light, pale, and fluffy.
- Add the room temperature egg and vanilla extract. Beat on medium speed until just combined, scraping down the sides of the bowl as needed.
- With the mixer on its lowest speed, gradually add the dry flour mixture to the wet ingredients. Mix only until the last streaks of flour have disappeared. Do not overmix.
- Cover the bowl with plastic wrap and refrigerate the dough for at least 30 minutes to prevent spreading.
- Preheat your oven to 375°F (190°C). Line two baking sheets with parchment paper.
- Scoop the chilled dough and roll into balls about 1.5 inches in diameter. Place them on the prepared baking sheets, leaving about 2 inches of space between them.
- Using the tines of a fork, gently press down on the top of each ball, then press again from the opposite direction to create a crisscross pattern.
- Bake for 10-12 minutes, until the edges are lightly golden brown and the centers look just set. The centers may appear slightly underdone.
- Let the cookies cool on the baking sheet for 5 minutes before carefully transferring them to a wire rack to cool completely.


