
I’ll never forget the first time I tried something similar to these. It was at a local street fair, and the aroma of garlic and cheese drew me in like a cartoon character following a pie. The vendor called them “Parmesan Garlic Knots,” but I immediately envisioned them stuffed with juicy burger deliciousness. Today, I’m sharing all my secrets for the most amazing Garlic Parmesan Cheeseburger Bombs you’ll ever make!
Garlic Parmesan Cheeseburger Bombs: Your New Favorite Indulgence

Okay, friends, let’s be honest: who doesn’t love a good burger? But sometimes, you want something a little…extra. Something that’s bursting with flavor, fun to eat, and guaranteed to impress. That’s where these Garlic Parmesan Cheeseburger Bombs come in! They’re like a gourmet burger and a cheesy garlic knot had a delicious baby, and trust me, you’re going to want to be a part of this family. Think juicy, seasoned ground beef, melty cheese, all wrapped in a soft, garlicky, parmesan-crusted dough. Are you drooling yet? I know I am!
Why These Burger Bombs Are the Best
There are tons of burger recipes out there, but these bombs are special, and here’s why:
- Flavor Explosion: We’re talking savory beef, sharp parmesan, pungent garlic, and gooey cheese all in one bite.
- Portable Perfection: These are perfect for parties, picnics, or even a fun weeknight dinner. No messy buns falling apart!
- Customizable: Want to add bacon? Jalapeños? Go for it! These bombs are a blank canvas for your culinary creativity.
- Surprisingly Easy: Don’t let the fancy name fool you. These are easier to make than you think, and I’m here to guide you every step of the way.
- They’re Just Plain Fun! Seriously, who can resist a warm, cheesy, garlicky bomb of burger goodness?
Let’s Get Cooking: The Step-by-Step Recipe
Alright, let’s dive into the recipe. Don’t be intimidated! I’ve broken it down into easy-to-follow steps, and I’ll share all my tips and tricks along the way. Remember, cooking should be fun, so relax, put on some music, and let’s create some magic!
Ingredients You’ll Need:
- For the Dough:
- 1 (1/4 ounce) package active dry yeast
- 1 cup warm water (105-115°F)
- 1 tablespoon sugar
- 1 teaspoon salt
- 2 tablespoons olive oil
- 2 1/2 – 3 cups all-purpose flour
- For the Burger Filling:
- 1 pound ground beef
- 1 teaspoon garlic powder
- 1/2 teaspoon onion powder
- 1/2 teaspoon smoked paprika
- Salt and pepper to taste
- 8 ounces cheddar cheese, cut into small cubes (or your favorite cheese!)
- For the Garlic Parmesan Topping:
- 4 tablespoons butter, melted
- 2 cloves garlic, minced
- 1/4 cup grated parmesan cheese
- 1 tablespoon chopped fresh parsley (optional)
Making the Dough:
- Activate the Yeast: In a large bowl, dissolve the yeast, sugar, and salt in the warm water. Let it stand for 5-10 minutes until foamy. This means the yeast is alive and ready to work its magic! The mixture should have a light, yeasty smell.
- Add the Oil and Flour: Add the olive oil to the yeast mixture. Gradually add the flour, one cup at a time, mixing well after each addition. You may not need all the flour, so add it until the dough comes together and forms a ball. The dough should be slightly sticky, but not overly wet.
- Knead the Dough: Turn the dough out onto a lightly floured surface and knead for 5-7 minutes, until it becomes smooth and elastic. If the dough is too sticky, add a little more flour, one tablespoon at a time. Kneading develops the gluten, which gives the dough its structure and chewiness.
- First Rise: Place the dough in a lightly oiled bowl, turning to coat. Cover with plastic wrap or a clean kitchen towel and let it rise in a warm place for 1-1.5 hours, or until doubled in size. This is where the magic happens! The yeast is working hard, creating those airy pockets that make the dough light and fluffy.
Preparing the Burger Filling:
- Season the Beef: In a large bowl, combine the ground beef, garlic powder, onion powder, smoked paprika, salt, and pepper. Mix well to ensure the seasonings are evenly distributed. Don’t overmix, though, or the beef will become tough.
- Cook the Beef (Optional): While it’s not strictly necessary, I prefer to lightly brown the ground beef in a skillet over medium heat. This adds extra flavor and helps to render out some of the excess fat. Drain off any grease before proceeding. If you skip this step, make sure your internal burger temp reaches at least 160°F!
- Cheese Prep: Cut your cheddar cheese (or whatever cheese your heart desires!) into small cubes. This makes it easier to stuff them into the burger bombs and ensures that you get a cheesy bite in every mouthful.
Assembling the Burger Bombs:
- Punch Down the Dough: Once the dough has doubled in size, gently punch it down to release the air. This helps to redistribute the yeast and prevents the dough from becoming too airy.
- Divide the Dough: Turn the dough out onto a lightly floured surface and divide it into 8-10 equal pieces.
- Form the Bombs: Take one piece of dough and flatten it into a small circle. Place a spoonful of the seasoned ground beef and a few cubes of cheese in the center of the circle.
- Seal the Bombs: Gently pull the edges of the dough up and over the filling, pinching them together to seal the bomb. Make sure there are no holes or gaps, or the cheese will leak out during baking.
- Place on Baking Sheet: Place the sealed burger bombs on a baking sheet lined with parchment paper or a silicone baking mat. Leave some space between each bomb to allow for expansion.
- Second Rise: Cover the burger bombs with a clean kitchen towel and let them rise for another 20-30 minutes. This second rise helps to make them even lighter and fluffier.
Making the Garlic Parmesan Topping:
- Melt the Butter: In a small bowl, melt the butter in the microwave or in a saucepan over low heat.
- Add Garlic and Parmesan: Stir in the minced garlic and grated parmesan cheese. If you’re using fresh parsley, add it now as well. The mixture should be fragrant and cheesy.
Baking the Burger Bombs:
- Preheat the Oven: Preheat your oven to 375°F (190°C).
- Brush with Garlic Parmesan: Brush each burger bomb generously with the garlic parmesan topping. Make sure to get into all the nooks and crannies for maximum flavor.
- Bake: Bake for 20-25 minutes, or until the burger bombs are golden brown and the internal temperature of the beef reaches 160°F (71°C). You can use a meat thermometer to check.
- Cool and Serve: Let the burger bombs cool on the baking sheet for a few minutes before transferring them to a wire rack to cool completely. Serve warm and enjoy!
Success Tips for Perfect Garlic Parmesan Cheeseburger Bombs
Here are my top tips for making sure your burger bombs are a smashing success every single time!
- Use Warm (Not Hot!) Water: The water you use to activate the yeast should be warm, but not hot. If it’s too hot, it will kill the yeast. Aim for a temperature between 105-115°F (40-46°C).
- Don’t Overwork the Dough: Over-kneading the dough can result in tough burger bombs. Knead it just until it becomes smooth and elastic, about 5-7 minutes.
- Ensure Burger is Cooked: Ensure that the burger is cooked through to a safe internal temperature. The best way to do this is to use a meat thermometer.
- Cheese Choices Matter: Feel free to experiment with different types of cheese! Mozzarella, provolone, or even a spicy pepper jack would be delicious in these burger bombs.
- Garlic Intensity: Adjust the amount of garlic in the topping to your liking. If you’re a garlic lover like me, you can even add a little extra!
- Make-Ahead Option: You can assemble the burger bombs ahead of time and store them in the refrigerator for up to 24 hours before baking. Just add a few extra minutes to the baking time.
Variations to Spice Things Up
One of the best things about these Garlic Parmesan Cheeseburger Bombs is how easy they are to customize. Here are a few ideas to get your creative juices flowing:
- Bacon Cheeseburger Bombs: Add cooked and crumbled bacon to the burger filling for a smoky, savory twist.
- Jalapeño Popper Burger Bombs: Mix diced jalapeños and cream cheese into the burger filling for a spicy, creamy kick.
- Pizza Burger Bombs: Add pepperoni, mozzarella cheese, and a spoonful of marinara sauce to the filling for a pizza-inspired treat.
- Mushroom and Swiss Burger Bombs: Sauté some sliced mushrooms and onions and mix them with the ground beef and Swiss cheese.
- BBQ Burger Bombs: Mix BBQ sauce into the ground beef and top the bombs with a sprinkle of cheddar cheese and crispy fried onions.
Serving Suggestions
These Garlic Parmesan Cheeseburger Bombs are delicious on their own, but they also pair well with a variety of sides:
- Salad: A simple green salad with a light vinaigrette is a refreshing counterpoint to the rich burger bombs.
- Fries or Onion Rings: A classic burger pairing!
- Coleslaw: A creamy coleslaw adds a cool and tangy element.
- Roasted Vegetables: Roasted broccoli, carrots, or Brussels sprouts are a healthy and flavorful side dish.
- Dipping Sauces: Offer a variety of dipping sauces, such as ketchup, mustard, ranch dressing, or a spicy aioli.
Other Recipes You’ll Love
If you’re a fan of garlic and parmesan, you’re definitely in the right place! Check out these other delicious recipes that are sure to become new favorites:
- Enjoy the flavors of GARLIC CHICKEN BROCCOLI BOWLS, a complete and delicious meal.
- For a low-carb option, try these KETO PHILLY CHEESESTEAK BOMBS.
- For a quick and easy lunch or dinner, try GARLIC CHICKEN WRAPS.
- Indulge in the creamy goodness of GARLIC PARMESAN PASTA PERFECTION.
- If you love burgers, you have to try the CRACK BURGERS, they are ADDICTIVE!
- Don’t forget to check out Air Fryer Baked Garlic Parmesan Potatoes for a perfect side dish.
Final Thoughts
There you have it – everything you need to create these incredible Garlic Parmesan Cheeseburger Bombs! I hope you enjoy making and eating them as much as I do. They’re truly a crowd-pleaser and perfect for any occasion. Don’t be afraid to get creative with the fillings and toppings, and most importantly, have fun in the kitchen! Remember, cooking is an act of love, so share your creations with the people you care about. Happy baking (and bombing)! You’ve got this!
What makes these Garlic Parmesan Cheeseburger Bombs better than regular burgers?
These burger bombs offer a flavor explosion with savory beef, sharp parmesan, pungent garlic, and gooey cheese all in one bite. They’re also portable, customizable, and surprisingly easy to make.
Can I prepare the burger bombs in advance?
Yes, you can assemble the burger bombs ahead of time and store them in the refrigerator for up to 24 hours before baking. Just add a few extra minutes to the baking time.
What are some variations I can try with the Garlic Parmesan Cheeseburger Bombs?
You can try variations like Bacon Cheeseburger Bombs, Jalapeño Popper Burger Bombs, Pizza Burger Bombs, Mushroom and Swiss Burger Bombs, or BBQ Burger Bombs by adding the corresponding ingredients to the burger filling.
What temperature should the water be when activating the yeast?
The water used to activate the yeast should be warm, not hot, between 105-115°F (40-46°C). If the water is too hot, it will kill the yeast.
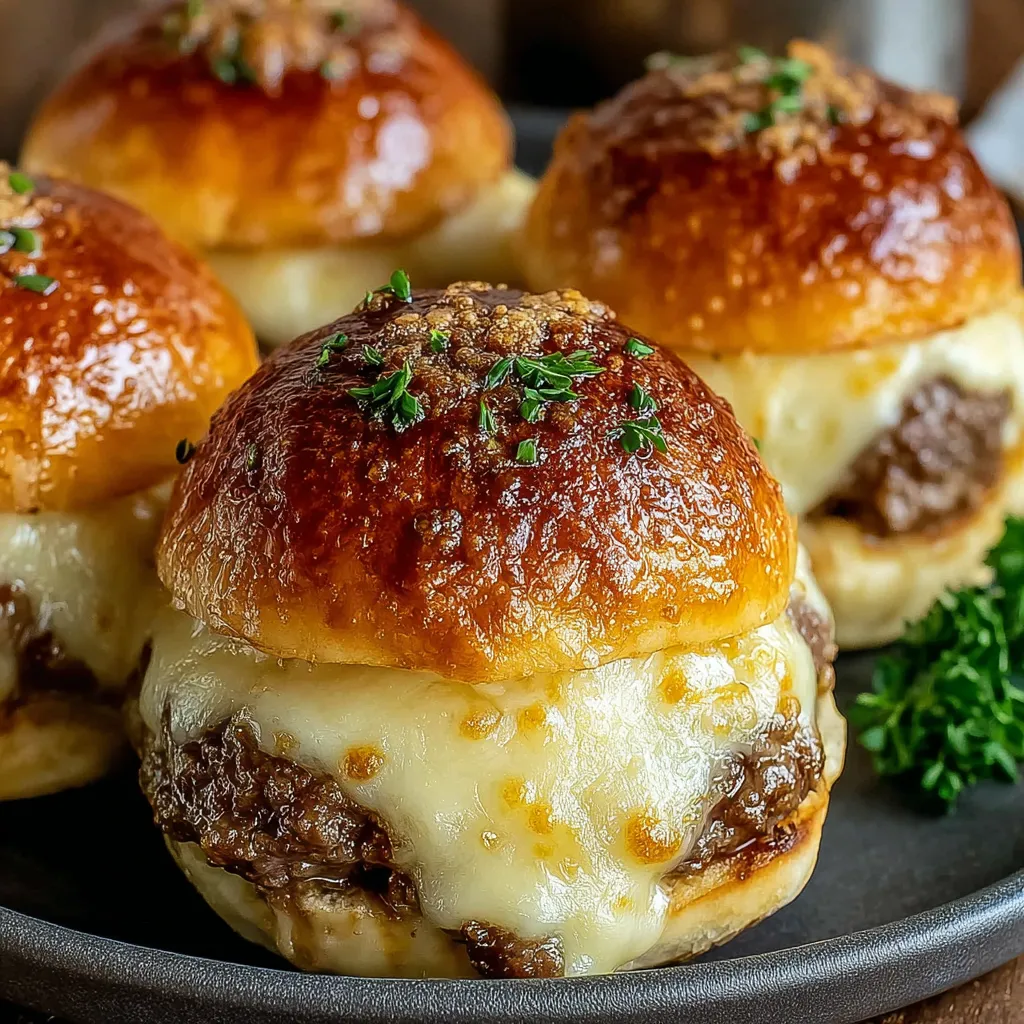
Garlic Parmesan Cheeseburger Bombs
Ingredients
Equipment
Method
- **Making the Dough:**
- 1. **Activate the Yeast:** In a large bowl, dissolve the yeast, sugar, and salt in the warm water. Let it stand for 5-10 minutes until foamy.
- 2. **Add the Oil and Flour:** Add the olive oil to the yeast mixture. Gradually add the flour, one cup at a time, mixing well after each addition. You may not need all the flour, so add it until the dough comes together and forms a ball.
- 3. **Knead the Dough:** Turn the dough out onto a lightly floured surface and knead for 5-7 minutes, until it becomes smooth and elastic. If the dough is too sticky, add a little more flour, one tablespoon at a time.
- 4. **First Rise:** Place the dough in a lightly oiled bowl, turning to coat. Cover with plastic wrap or a clean kitchen towel and let it rise in a warm place for 1-1.5 hours, or until doubled in size.
- **Preparing the Burger Filling:**
- 1. **Season the Beef:** In a large bowl, combine the ground beef, garlic powder, onion powder, smoked paprika, salt, and pepper. Mix well.
- 2. **Cook the Beef (Optional):** Lightly brown the ground beef in a skillet over medium heat. Drain off any grease.
- 3. **Cheese Prep:** Cut the cheddar cheese into small cubes.
- **Assembling the Burger Bombs:**
- 1. **Punch Down the Dough:** Once the dough has doubled in size, gently punch it down to release the air.
- 2. **Divide the Dough:** Turn the dough out onto a lightly floured surface and divide it into 8-10 equal pieces.
- 3. **Form the Bombs:** Take one piece of dough and flatten it into a small circle. Place a spoonful of the seasoned ground beef and a few cubes of cheese in the center of the circle.
- 4. **Seal the Bombs:** Gently pull the edges of the dough up and over the filling, pinching them together to seal the bomb. Make sure there are no holes or gaps.
- 5. **Place on Baking Sheet:** Place the sealed burger bombs on a baking sheet lined with parchment paper or a silicone baking mat. Leave some space between each bomb.
- 6. **Second Rise:** Cover the burger bombs with a clean kitchen towel and let them rise for another 20-30 minutes.
- **Making the Garlic Parmesan Topping:**
- 1. **Melt the Butter:** In a small bowl, melt the butter in the microwave or in a saucepan over low heat.
- 2. **Add Garlic and Parmesan:** Stir in the minced garlic and grated parmesan cheese. If you’re using fresh parsley, add it now as well.
- **Baking the Burger Bombs:**
- 1. **Preheat the Oven:** Preheat your oven to 375°F (190°C).
- 2. **Brush with Garlic Parmesan:** Brush each burger bomb generously with the garlic parmesan topping.
- 3. **Bake:** Bake for 20-25 minutes, or until the burger bombs are golden brown and the internal temperature of the beef reaches 160°F (71°C).
- 4. **Cool and Serve:** Let the burger bombs cool on the baking sheet for a few minutes before transferring them to a wire rack to cool completely. Serve warm.


