Popped quinoa has completely changed my dessert game, and I say that with zero exaggeration. For years, I thought of it only as a savory side dish, a healthy base for a grain bowl, but never as the star of a sweet treat. Then, one day, I toasted a batch a little too long, and it started to pop like miniature popcorn, releasing a nutty, toasty aroma that was absolutely irresistible. A lightbulb went off, and I knew this incredible, light-as-air crunch had to meet its perfect match: a creamy, dreamy peanut butter cup.
The result is nothing short of spectacular. Imagine biting through a crisp, dark chocolate shell that gives way to a rich, salty-sweet peanut butter filling, but then—the surprise!—a delicate, satisfying crunch in every single bite. These Quinoa Crunch Peanut Butter Cups are the treat you’ve been dreaming of: they feel indulgent and decadent, yet they’re packed with a little extra protein and fiber. They are unbelievably easy to make, require no baking, and will have everyone asking for your secret ingredient.
Why This Quinoa Crunch Peanut Butter Cups Works
- Incredible Texture: The toasted, popped quinoa provides a light, crispy crunch that you just can’t get from anything else. It elevates the classic peanut butter cup to a whole new level.
- A Healthier Indulgence: With protein-packed quinoa, natural sweeteners, and dark chocolate, this is a treat you can feel good about. It satisfies your sweet tooth without the guilt.
- Unbelievably Simple: This is a no-bake recipe that comes together in minutes. With just a handful of simple ingredients, you can create a truly impressive dessert with minimal effort.
What You’ll Need
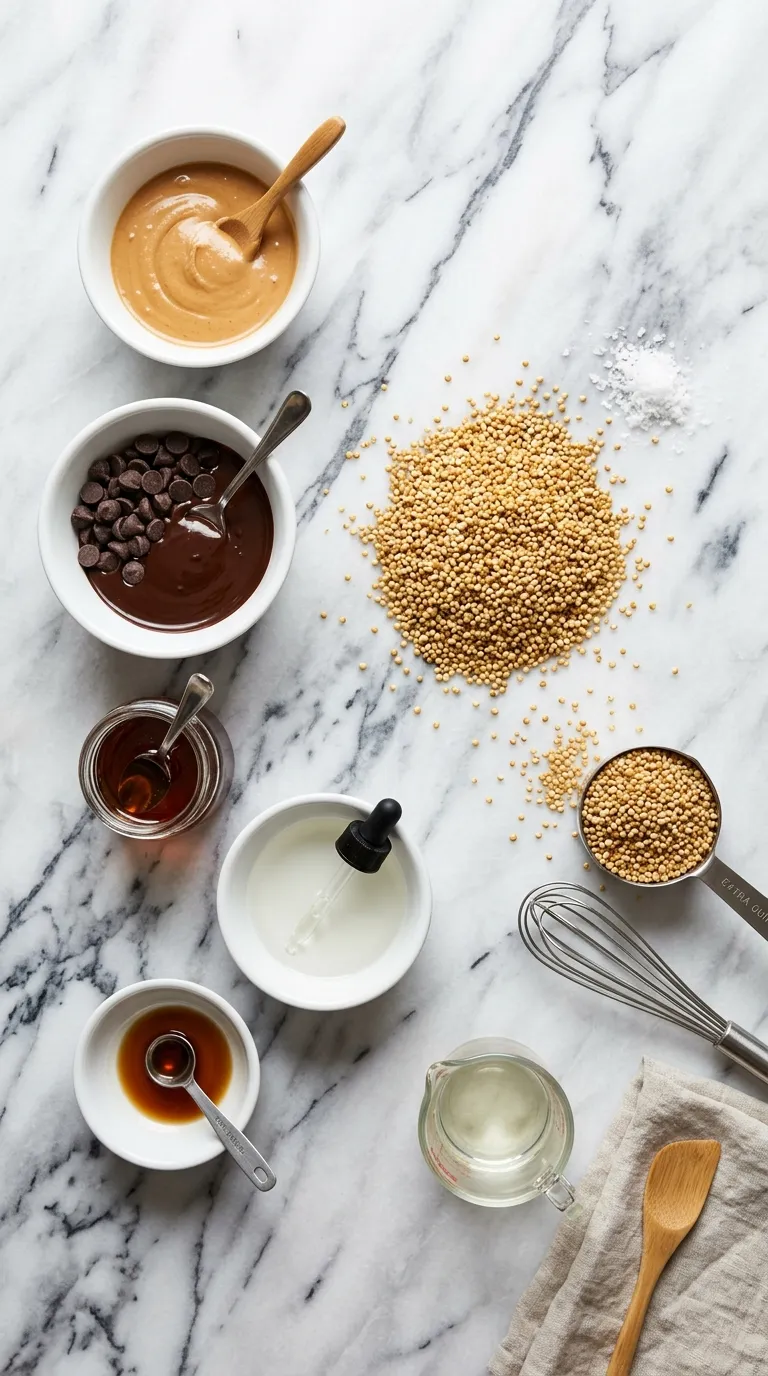
The beauty of this recipe lies in its simplicity. We’re using wholesome, easy-to-find ingredients to create something truly special. You probably have most of these in your pantry right now!
Here’s our shopping list:
- 1 cup cooked quinoa: (This is our secret weapon! Make sure it’s rinsed and cooked according to package directions, then completely cooled and dry before you start).
- 1 cup dark chocolate chips or wafers: (Using a good quality dark chocolate provides a rich, deep flavor that perfectly balances the sweet and salty filling).
- 1 tablespoon coconut oil: (This is essential for creating a smooth, glossy chocolate shell that melts beautifully and sets up perfectly firm).
- ¾ cup creamy peanut butter: (The heart and soul of our filling. Use a brand you love, as the flavor will shine through).
- 3 tablespoons maple syrup or honey: (This provides a gentle, natural sweetness and helps bind the peanut butter filling together).
- 1 teaspoon vanilla extract: (A non-negotiable for me! It deepens and enhances all the other flavors in the recipe).
- ¼ teaspoon fine sea salt: (To mix into the filling, balancing the sweetness and amplifying the peanut flavor).
- Flaky sea salt, for sprinkling: (This is for that final, professional-looking touch and a delightful pop of salty flavor on top).
Dietary Adaptations
One of the best things about this recipe is how easily it can be adapted to fit your needs. Here are a few simple swaps you can make:
- For the Peanut Butter: If you have a nut allergy or just want to try something new, almond butter, cashew butter, or even sunflower seed butter will work beautifully. Just be sure to use a creamy version for the best texture.
- For the Chocolate: Feel free to use semi-sweet or even milk chocolate if you prefer a sweeter cup. For a dairy-free or vegan version, simply choose a high-quality dairy-free chocolate chip.
- For the Sweetener: Agave nectar is a great 1:1 substitute for maple syrup.
- For the Quinoa: If you’re in a real pinch and don’t have quinoa, you can substitute crispy rice cereal for a similar (though not identical) crunch.
Fun Variations to Try
Once you’ve mastered the basic recipe, it’s so much fun to play around with different flavor combinations. Think of this recipe as your delicious canvas!
- Mocha Crunch Cups: Add 1 teaspoon of instant espresso powder to your melted chocolate. The coffee flavor beautifully complements the dark chocolate and nutty peanut butter.
- Spiced Peanut Butter Filling: Mix ¼ teaspoon of ground cinnamon and a tiny pinch of cardamom into the peanut butter mixture. It adds a warm, cozy spice that is absolutely divine.
- PB & J Cups: Before you add the top layer of chocolate, place a tiny dollop (about ½ teaspoon) of your favorite raspberry or strawberry jam on top of the peanut butter filling.
- White Chocolate Drizzle: After the cups have fully set, melt some white chocolate and drizzle it over the tops for a beautiful and delicious contrast. This is a great way to make them look extra fancy.
If you fall in love with the peanut butter and chocolate combination here, you absolutely must try these Reese’s Mini Cup Peanut Butter Cookies next. They take that classic flavor profile and wrap it in a soft, chewy cookie.
How to Make Quinoa Crunch Peanut Butter Cups
Alright, let’s get to the fun part! This process is so simple and satisfying. Just follow these steps, and you’ll have perfect peanut butter cups in no time.
Step 1: Toast the Quinoa
First, we need to transform our plain cooked quinoa into crispy, crunchy magic. Spread your completely cooled, dry cooked quinoa onto a baking sheet lined with parchment paper. Bake at 375°F (190°C) for 12-15 minutes, shaking the pan every 5 minutes, until the quinoa is golden brown, dry, and crispy. You might even hear some of it popping! Let it cool completely. This step is crucial for getting that signature crunch.
Step 2: Prepare the Chocolate Base
While the quinoa cools, prepare your muffin tin by lining it with 12 paper or silicone liners. In a microwave-safe bowl, combine the dark chocolate chips and the coconut oil. Microwave in 30-second intervals, stirring in between, until the chocolate is completely melted and smooth. Be careful not to overheat it. Spoon about 1 to 1.5 teaspoons of the melted chocolate into the bottom of each liner, using the back of the spoon to spread it up the sides a little. Place the tin in the freezer for about 10 minutes to set the base.
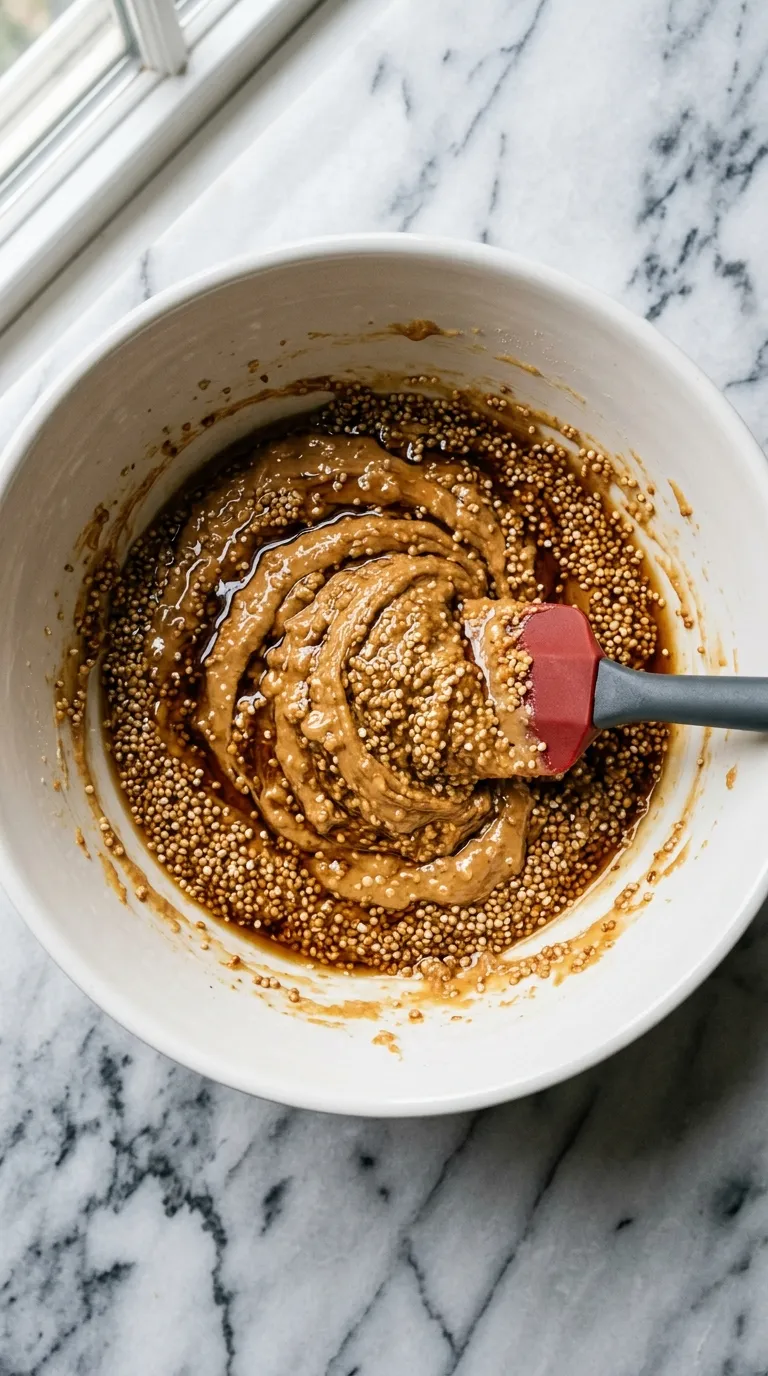
Step 3: Mix the Peanut Butter Filling
In a separate medium bowl, combine the creamy peanut butter, maple syrup, vanilla extract, and fine sea salt. Stir until everything is smooth and well-incorporated. Now, fold in your cooled, toasted quinoa. Mix gently until the crispy quinoa is evenly distributed throughout the peanut butter filling. The texture of this filling is just incredible! It’s the heart of what makes these cups so special, much like the rich filling in my favorite Peanut Butter Fudge.
Step 4: Assemble the Cups
Remove the muffin tin from the freezer. The chocolate bases should be hard to the touch. Spoon about 1 tablespoon of the quinoa peanut butter filling into the center of each cup, right on top of the chocolate base. Gently press it down to create an even layer. The goal is to have a nice, thick layer of filling. If you love shaping peanut butter treats, you’ll also adore making these Chocolate Peanut Butter Valentine Hearts for a special occasion.
Step 5: Top and Chill
Gently re-warm your remaining melted chocolate if it has started to firm up. Spoon another 1 to 1.5 teaspoons of chocolate over the top of the peanut butter filling in each cup, spreading it carefully to the edges to seal everything in. While the chocolate is still wet, sprinkle a few flakes of sea salt on top of each cup. This little touch makes a huge difference in flavor! Return the muffin tin to the refrigerator or freezer for at least 20-30 minutes, or until the cups are completely firm.
Chef’s Tips
- Dry Quinoa is Key: For the crispiest result, make sure your cooked quinoa is as dry as possible before toasting. After cooking, I like to spread it on a baking sheet and let it air-dry for an hour or so.
- Use Silicone Liners: While paper liners work, silicone muffin liners are a game-changer. The peanut butter cups pop right out without any sticking or tearing, giving you a perfect, clean edge every time.
- Chill Between Layers: Don’t skip the chilling steps! Ensuring the bottom chocolate layer is fully set before adding the filling is crucial for creating distinct, clean layers. It prevents the peanut butter from mixing into the bottom.
- Storage is Simple: Store your finished peanut butter cups in an airtight container in the refrigerator for up to two weeks, or in the freezer for up to three months. They are fantastic straight from the freezer on a warm day!
How to Serve
These Quinoa Crunch Peanut Butter Cups are perfectly wonderful all on their own, but they can also be a fantastic component of a larger dessert spread. They are a welcome addition to any cookie platter, especially alongside classics like Peanut Butter Blossoms or their sophisticated cousin, Brown Butter Peanut Butter Blossoms.
Enjoy one with a hot cup of coffee or a cold glass of milk for the perfect afternoon pick-me-up. They are also a fantastic treat to pack in a lunchbox for a delightful surprise.
For a more decadent dessert, try chopping one up and sprinkling it over a scoop of vanilla bean or coffee ice cream. The combination of cold, creamy ice cream with the crunchy, chocolatey peanut butter cup is out of this world.
You can also make a batch of these alongside some simple Peanut Butter Bites for a platter that offers two different, yet equally delicious, healthy-ish peanut butter treats.
If you tried this recipe and loved it, please leave a 5-star rating below. It helps us so much
What gives these peanut butter cups their unique crunchy texture?
The unique crunch comes from cooked quinoa that is toasted in the oven until it becomes golden, dry, and crispy. This process makes the quinoa pop, creating a light, satisfying crunch that elevates the classic peanut butter cup.
What is the most important tip for making the quinoa crispy?
The most crucial step for achieving crispy quinoa is to ensure it is as dry as possible before toasting. The article recommends spreading the cooked quinoa on a baking sheet to air-dry for about an hour to remove excess moisture, which results in the best crunch.
Can I make this recipe with a nut allergy or other dietary restrictions?
Yes, the recipe is easily adaptable. For a nut allergy, you can substitute peanut butter with sunflower seed butter. For a dairy-free or vegan version, simply use high-quality dairy-free chocolate chips. You can also swap maple syrup for agave nectar.
How should I store the finished Quinoa Crunch Peanut Butter Cups?
Store the finished peanut butter cups in an airtight container in the refrigerator for up to two weeks. For longer-term storage, they can be kept in the freezer for up to three months.

Guilt-Free Quinoa Crunch Peanut Butter Cups
Ingredients
Equipment
Method
- Toast the Quinoa: Preheat oven to 375°F (190°C). Spread the completely dry, cooked quinoa on a parchment-lined baking sheet. Bake for 12-15 minutes, shaking the pan every 5 minutes, until golden, dry, and crispy. Let cool completely.
- Prepare the Chocolate Base: Line a 12-cup muffin tin with liners. In a microwave-safe bowl, combine dark chocolate chips and coconut oil. Microwave in 30-second intervals, stirring between each, until fully melted and smooth. Spoon about 1-1.5 teaspoons of chocolate into each liner, spreading it slightly up the sides. Freeze for 10 minutes to set.
- Mix the Filling: In a medium bowl, stir together the creamy peanut butter, maple syrup, vanilla extract, and fine sea salt until smooth. Gently fold in the cooled, toasted quinoa until evenly distributed.
- Assemble the Cups: Remove the muffin tin from the freezer. Spoon about 1 tablespoon of the quinoa peanut butter filling into each cup over the set chocolate base, pressing it down into an even layer.
- Top and Chill: Re-warm the remaining chocolate if needed. Spoon another 1-1.5 teaspoons of chocolate over the peanut butter filling, spreading to the edges to seal. Immediately sprinkle with flaky sea salt. Refrigerate or freeze for at least 20-30 minutes, until completely firm.
Notes
Storage: Store in an airtight container in the refrigerator for up to 2 weeks, or in the freezer for up to 3 months.
Variations: Add 1 tsp instant espresso powder to the chocolate for a mocha flavor. Mix ¼ tsp cinnamon into the filling for a spiced version. Add a small dollop of jam on the filling before topping with chocolate for a PB&J cup.
Dietary Swaps: Almond or sunflower seed butter can be used instead of peanut butter. Use dairy-free chocolate for a vegan version. Agave can replace maple syrup.