
I can still remember the smell of my grandmother’s kitchen every fall. It was a symphony of warm spices and sweet apples, all culminating in her famous apple crisp. She never used a recipe, just a pinch of this and a handful of that, but it always turned out perfect. Recreating that feeling is what inspired me to perfect my own recipe for Easy Cozy Apple Crisp, a dessert so simple and comforting, it’s become a fall staple in my own home. Today, I’m sharing all my secrets for the most amazing Easy Cozy Apple Crisp you’ll ever make!
The Ultimate Easy Cozy Apple Crisp Recipe

Alright, my friends, let’s dive into the heart of apple crisp season! This recipe is all about achieving that perfect balance of tender, sweet apples and a wonderfully crunchy, buttery topping. Don’t be intimidated – I’ve broken it down into super simple steps, so even beginner bakers can achieve apple crisp perfection.
Why This Recipe Works
You might be thinking, “There are a million apple crisp recipes out there! What makes this one so special?” Well, let me tell you! This recipe has been carefully crafted to:
- Maximize Apple Flavor: We’re using a blend of apple varieties to get a dynamic and complex taste.
- Create the Perfect Crumble: The ratio of oats, flour, butter, and sugar is *just right* for a topping that’s both crunchy and tender.
- Simplify the Process: No fancy equipment or complicated techniques needed! This recipe is all about ease and enjoyment.
- Be Infinitely Adaptable: Got a favorite spice? Want to add nuts? Go for it! This recipe is a fantastic base for your own culinary creations.
Ingredients You’ll Need
Let’s gather our ingredients. Don’t worry, you probably have most of these in your pantry already!
For the Apple Filling:
- 6-8 Medium Apples: (About 3 pounds) I recommend a mix of varieties like Honeycrisp, Granny Smith, and Gala for the best flavor and texture. Honeycrisp provides sweetness and crispness, Granny Smith adds tartness, and Gala offers a subtle sweetness and keeps its shape nicely during baking. Feel free to experiment with your own favorites!
- 1/4 Cup Granulated Sugar: For just the right amount of sweetness.
- 2 Tablespoons All-Purpose Flour: This helps to thicken the apple juices and prevent a watery crisp.
- 1 Teaspoon Ground Cinnamon: Because what’s apple crisp without cinnamon?
- 1/4 Teaspoon Ground Nutmeg: Adds a warm, cozy depth of flavor.
- 2 Tablespoons Lemon Juice: Brightens the apple flavor and prevents browning.
- 2 Tablespoons Butter, Cut into Small Pieces: Adds richness and helps the apples caramelize.
For the Crumble Topping:
- 1 Cup All-Purpose Flour: The base of our crumble.
- 1 Cup Rolled Oats: Adds a wonderful texture and nutty flavor.
- 1 Cup Packed Brown Sugar: Adds moisture and a caramel-like sweetness.
- 1/2 Teaspoon Baking Powder: For a slightly lighter and more tender crumble.
- 1/2 Teaspoon Ground Cinnamon: More cinnamon, because why not?
- 1/4 Teaspoon Salt: Balances the sweetness and enhances the other flavors.
- 1 Cup (2 Sticks) Cold Unsalted Butter, Cut into Cubes: The key to a perfectly crumbly topping! Make sure it’s COLD.
Step-by-Step Instructions: Let’s Bake!
Okay, let’s get down to business! I’ll walk you through each step, holding your hand (figuratively, of course!) to ensure apple crisp success.
Step 1: Prep the Apples
This is where your knife skills come into play! Peel, core, and slice the apples into about 1/4-inch thick pieces. Don’t worry about them being perfectly uniform; a little variation adds character. Place the sliced apples in a large bowl.
Step 2: Make the Apple Filling
Add the granulated sugar, flour, cinnamon, nutmeg, and lemon juice to the bowl with the apples. Toss everything together until the apples are evenly coated. This ensures that every bite is bursting with flavor. Dot the top of the apple mixture with the small pieces of butter. This will help the apples caramelize and create a delicious, saucy filling.
Step 3: Prepare the Crumble Topping
In a separate bowl, whisk together the flour, rolled oats, brown sugar, baking powder, cinnamon, and salt. Add the cold, cubed butter to the dry ingredients. Now, here’s the fun part: use a pastry blender or your fingertips to cut the butter into the dry ingredients until the mixture resembles coarse crumbs. The key here is to keep the butter cold, so work quickly! You want to see small pieces of butter throughout the mixture – these will melt during baking and create those delicious pockets of buttery goodness.
Step 4: Assemble and Bake
Pour the apple filling into a 9×13 inch baking dish. Sprinkle the crumble topping evenly over the apples. Make sure to distribute it well, so every bite has that satisfying crunch. Bake in a preheated oven at 375°F (190°C) for 40-45 minutes, or until the topping is golden brown and the apples are tender and bubbly. If the topping starts to brown too quickly, you can loosely tent the baking dish with foil for the last 10-15 minutes of baking.
Step 5: Cool and Serve
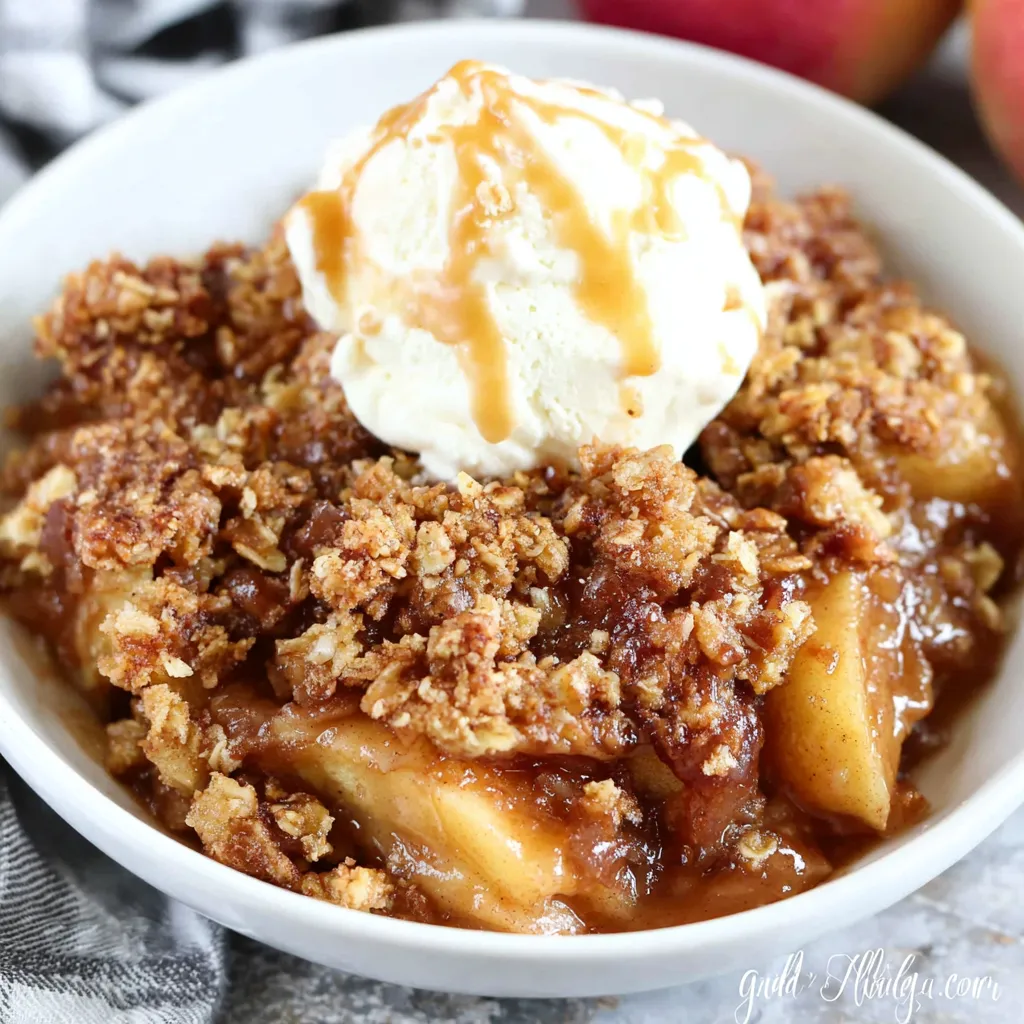
Let the apple crisp cool for at least 15-20 minutes before serving. This allows the filling to thicken slightly and prevents you from burning your mouth on molten apple lava (trust me, I’ve been there!). Serve warm, and preferably with a scoop of vanilla ice cream or a dollop of whipped cream. Trust me, this is essential. Maybe even a drizzle of caramel sauce for extra decadence!
Tips and Tricks for Apple Crisp Perfection
Okay, my friend, now that you know the basic recipe, let’s talk about some insider tips and tricks to elevate your apple crisp to the next level!
Choosing the Right Apples
As I mentioned before, using a variety of apples is key to a complex and delicious flavor. But here’s a little more detail on some of my favorite varieties:
- Honeycrisp: Sweet, crisp, and juicy. Holds its shape well during baking.
- Granny Smith: Tart and firm. Provides a nice contrast to the sweetness of other apples.
- Gala: Sweet and slightly soft. Adds a delicate sweetness and blends well with other flavors.
- Fuji: Sweet and crisp. Similar to Honeycrisp, but often more readily available.
- Braeburn: Sweet, tart, and spicy. Adds a unique flavor profile to the crisp.
Feel free to experiment with different combinations to find your perfect apple blend! I encourage you to try new things!
Making the Crumble Topping Ahead of Time
Want to get ahead of the game? You can absolutely make the crumble topping in advance! Simply prepare it as directed and store it in an airtight container in the refrigerator for up to 3 days. You can even freeze it for longer storage! Just be sure to break it up with your fingers before sprinkling it over the apples, so it doesn’t clump together.
Adding Nuts to the Topping
If you’re a nut lover, feel free to add 1/2 cup of chopped nuts to the crumble topping. Pecans, walnuts, or almonds all work beautifully. Just toss them in with the dry ingredients before adding the butter.
Spice It Up!
Don’t be afraid to experiment with different spices! A pinch of ground ginger, cardamom, or cloves can add a unique and warming flavor to the apple crisp. You can also use apple pie spice for a convenient all-in-one blend.
Preventing a Soggy Crust
Nobody wants a soggy apple crisp! To prevent this, make sure to use enough flour in the apple filling to thicken the juices. You can also add a layer of crushed graham crackers or gingersnap cookies to the bottom of the baking dish before adding the apple filling. This will act as a barrier and absorb any excess moisture.
Serving Suggestions
As I mentioned before, vanilla ice cream is a classic pairing for apple crisp. But don’t be afraid to get creative! Here are some other delicious serving suggestions:
- Whipped Cream: A light and fluffy alternative to ice cream.
- Caramel Sauce: Adds a decadent touch of sweetness.
- Cheddar Cheese: Trust me on this one! A slice of sharp cheddar cheese is surprisingly delicious with apple crisp. The salty cheese complements the sweetness of the apples and the warmth of the spices.
- Greek Yogurt: A healthier option that still provides a creamy and tangy contrast.
Variations on the Classic Apple Crisp
Once you’ve mastered the basic apple crisp recipe, the possibilities are endless! Here are a few variations to inspire you:
Pear Crisp
Substitute pears for the apples for a slightly different flavor and texture. Pears are naturally sweeter than apples, so you may need to reduce the amount of sugar in the filling.
Berry Crisp
Add a cup or two of mixed berries to the apple filling for a burst of fruity flavor. Blueberries, raspberries, and blackberries all work well.
Apple Cranberry Crisp
Add a cup of fresh or frozen cranberries to the apple filling for a tart and festive twist. You may need to add a little extra sugar to balance the tartness of the cranberries.
Gluten-Free Apple Crisp
Simply substitute the all-purpose flour in both the filling and the topping with a gluten-free all-purpose flour blend. Make sure to use a blend that contains xanthan gum, as this will help to bind the ingredients together.
Other Delicious Apple-Centric Recipes
If you are in the mood for something different but still want that core Apple flavor, why not try making APPLE CINNAMON COOKIES? These are the perfect autumn treat, or if crumbles are your thing then you have to try this CINNAMON APPLE CRUMB. On the other hand, I would recommend this CARAMEL APPLE COOKIE for a rich and satisfying treat, or for something completely different, then you MUST try this CARAMEL APPLE CHEESECAKE, or even this CARAMEL APPLE CHEESECAKE. If you want a snack that you can air-fry, then this APPLE FRITTER could be perfect!
Storage Instructions
Got leftovers? Lucky you! Apple crisp can be stored in the refrigerator for up to 3 days. Reheat it in the oven or microwave before serving. You can also freeze apple crisp for longer storage. Wrap it tightly in plastic wrap and then foil, and it will keep for up to 2 months. Thaw it in the refrigerator overnight before reheating.
Final Thoughts
And there you have it, my friend! Everything you need to make the most amazing Easy Cozy Apple Crisp you’ve ever tasted. This recipe is more than just a dessert; it’s a warm hug on a chilly day, a reminder of cozy kitchens and happy memories. So, gather your ingredients, preheat your oven, and let’s bake some happiness together!
What types of apples are recommended for the best flavor and texture in this apple crisp recipe?
The recipe recommends a mix of apple varieties like Honeycrisp, Granny Smith, and Gala for the best flavor and texture. Honeycrisp provides sweetness and crispness, Granny Smith adds tartness, and Gala offers a subtle sweetness and keeps its shape nicely during baking. Fuji and Braeburn are also good options.
How can I prevent my apple crisp from having a soggy crust?
To prevent a soggy crust, ensure you use enough flour in the apple filling to thicken the juices. You can also add a layer of crushed graham crackers or gingersnap cookies to the bottom of the baking dish before adding the apple filling to absorb excess moisture.
Can I make the crumble topping ahead of time?
Yes, you can prepare the crumble topping in advance and store it in an airtight container in the refrigerator for up to 3 days, or freeze it for longer storage. Be sure to break it up with your fingers before sprinkling it over the apples if it has been refrigerated or frozen.
What are some serving suggestions for the apple crisp?
The recipe suggests serving the apple crisp warm with vanilla ice cream, whipped cream, caramel sauce, cheddar cheese, or Greek yogurt.
Perfect Autumnal Apple Crisp
Ingredients
Equipment
Method
- Preheat oven to 375°F (190°C).
- Peel, core, and slice the apples into about 1/4-inch thick pieces. Place the sliced apples in a large bowl.
- Add the granulated sugar, flour, cinnamon, nutmeg, and lemon juice to the bowl with the apples. Toss everything together until the apples are evenly coated.
- Dot the top of the apple mixture with the small pieces of butter.
- In a separate bowl, whisk together the flour, rolled oats, brown sugar, baking powder, cinnamon, and salt.
- Add the cold, cubed butter to the dry ingredients. Use a pastry blender or your fingertips to cut the butter into the dry ingredients until the mixture resembles coarse crumbs. Work quickly to keep the butter cold.
- Pour the apple filling into a 9×13 inch baking dish.
- Sprinkle the crumble topping evenly over the apples.
- Bake for 40-45 minutes, or until the topping is golden brown and the apples are tender and bubbly. If the topping starts to brown too quickly, loosely tent the baking dish with foil for the last 10-15 minutes of baking.
- Let the apple crisp cool for at least 15-20 minutes before serving.
- Serve warm with vanilla ice cream or whipped cream, if desired.


