
After countless batches, I’ve discovered that the secret to truly perfect Sheet Pan Chicken Pitas lies in the perfect balance of seasoning and achieving just the right char on the chicken and vegetables. This method ensures tender, flavorful chicken and perfectly cooked veggies every single time.
Making these pitas is simpler than you think! It’s a fantastic way to get a healthy and delicious meal on the table quickly.
Don’t be afraid to experiment with different spices and toppings to make it your own. The possibilities are endless!
Why This Method Works
- Bold Wisdom 1: Sheet pan cooking simplifies everything by allowing you to cook the chicken and vegetables simultaneously, infusing them with flavor as they roast.
- Bold Wisdom 2: Marinating the chicken beforehand is crucial; it tenderizes the meat and ensures a deep, savory flavor that penetrates every bite.
- Bold Wisdom 3: A hot oven is key to getting that desirable char on the vegetables and a slightly crispy edge on the chicken without drying it out.
Kitchen Staples
Good ingredients are the foundation of any great dish. Fresh, high-quality ingredients will elevate your Sheet Pan Chicken Pitas from ordinary to extraordinary.
When it comes to the chicken, opt for cuts that are uniform in thickness to ensure even cooking. Similarly, vibrant, fresh vegetables will contribute to both the flavor and visual appeal of your pitas.
Here’s what you’ll need:
- Chicken Breasts: (Boneless, skinless, and cut into bite-sized pieces for even cooking).
- Bell Peppers: (Adds sweetness and color to the sheet pan).
- Red Onion: (Provides a pungent flavor that complements the chicken).
- Cherry Tomatoes: (Burst of juicy sweetness when roasted).
- Olive Oil: (Helps the chicken and vegetables roast evenly and prevents sticking).
- Lemon Juice: (Brightens the flavor and tenderizes the chicken).
- Garlic: (Essential for a savory, aromatic flavor).
- Dried Oregano: (Adds a Mediterranean touch).
- Paprika: (Contributes a smoky, sweet flavor and vibrant color).
- Salt & Pepper: (To enhance all the flavors).
- Pita Bread: (To hold all of the delicious fillings).
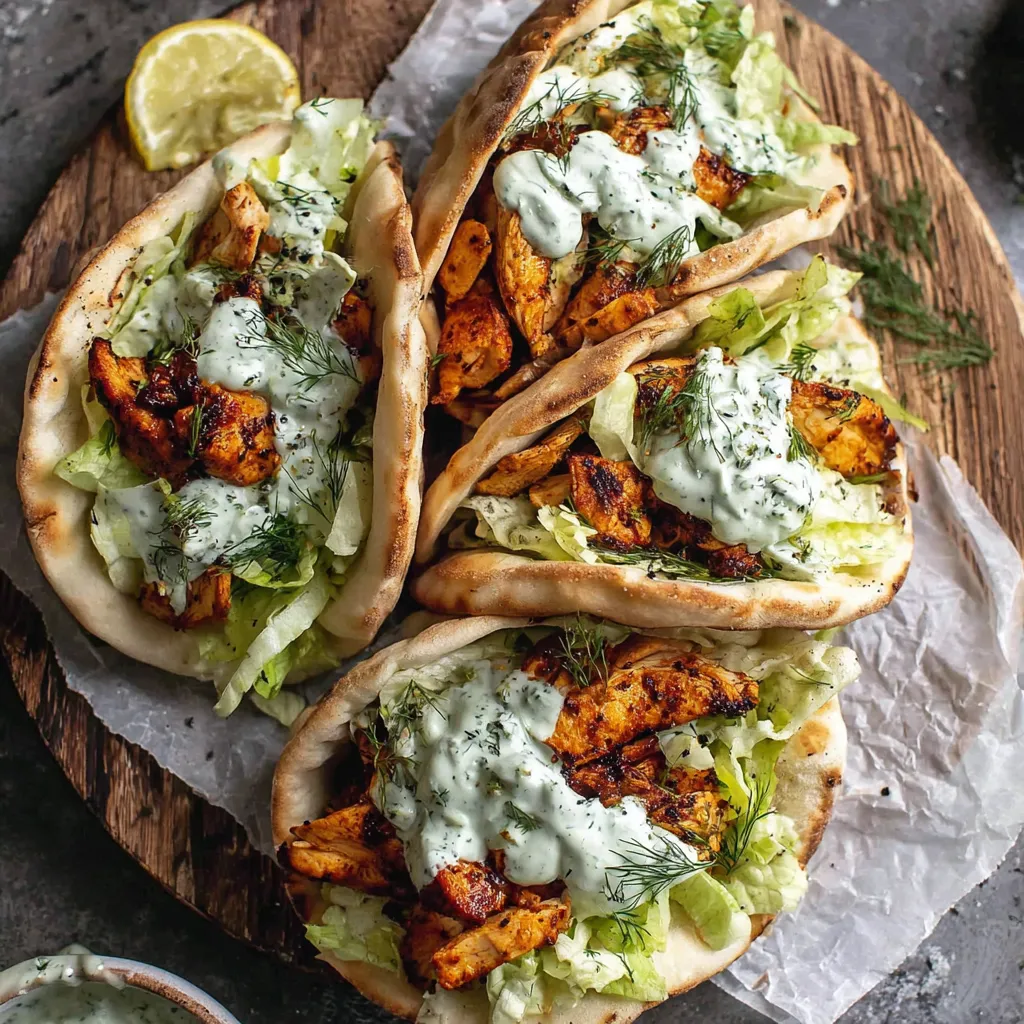
- Toppings: (Yogurt sauce, feta cheese, hummus, fresh herbs – customize to your liking!).
Simple Swaps
- Chicken Thighs: Use boneless, skinless chicken thighs for a richer flavor.
- Different Vegetables: Zucchini, mushrooms, or broccoli can be easily substituted.
- Spices: Experiment with different spice blends like cumin, chili powder, or Italian seasoning.
- Pita Bread Alternative: Use naan bread or tortillas instead of pita bread.
- Dairy-Free Option: Substitute dairy-free yogurt and cheese.
Tried & True Variations

- Spicy Chicken Pitas: Add a pinch of cayenne pepper or a dash of hot sauce to the marinade for a spicy kick.
- Mediterranean Chicken Pitas: Incorporate Kalamata olives, sun-dried tomatoes, and feta cheese for a taste of the Mediterranean.
- Lemon Herb Chicken Pitas: Enhance the lemon flavor by adding fresh herbs like dill, parsley, or thyme to the marinade and serving.
- BBQ Chicken Pitas: Use your favorite BBQ sauce as a marinade and top with coleslaw for a fun twist. If you are looking for other great chicken dishes, be sure to check out Grilled Avocado Chicken Wraps.
The Method: Step-by-Step
Step 1: Marinate the Chicken
In a bowl, combine the chicken pieces with olive oil, lemon juice, minced garlic, dried oregano, paprika, salt, and pepper. Mix well and let it marinate for at least 30 minutes (or up to overnight) in the refrigerator. The longer it marinates, the more flavorful it will be.Step 2: Prepare the Vegetables
While the chicken is marinating, chop the bell peppers and red onion into bite-sized pieces. Halve the cherry tomatoes.Step 3: Arrange on the Sheet Pan
Preheat your oven to 400°F (200°C). Toss the chopped vegetables with a little olive oil, salt, and pepper. Spread them evenly on a large sheet pan. Add the marinated chicken pieces on top of the vegetables, ensuring they are in a single layer.Step 4: Bake
Bake for 20-25 minutes, or until the chicken is cooked through and the vegetables are tender and slightly charred. Be sure to check the internal temperature of the chicken with a meat thermometer to ensure it reaches 165°F (74°C).Step 5: Warm the Pita Bread
While the chicken and vegetables are baking, warm the pita bread in a dry skillet or in the oven for a few minutes. This will make them more pliable and easier to fill. For another quick and easy option, you might enjoy Cheesy Garlic Chicken Wraps!Step 6: Assemble the Pitas
Fill each pita bread with the cooked chicken and vegetables. Top with your favorite toppings such as yogurt sauce, feta cheese, hummus, and fresh herbs. Serve immediately and enjoy! Another recipe you might enjoy is Grilled Salsa Verde Pepper Jack ChickenBaker’s Notes
Serving Ideas
These Sheet Pan Chicken Pitas are delicious on their own, but they can also be served with a variety of sides. Consider pairing them with a fresh salad, a simple yogurt sauce, or a side of hummus.
They’re also a great option for lunch or a light dinner. Serve with a side of couscous for a more filling meal. The flavors are similar to what you might find in Chicken Avocado Ranch Burritos.
Enjoy these pitas warm or at room temperature. They are perfect for picnics and potlucks.
Know someone who loves Sheet Pan Chicken Pitas? Share this recipe with them!
What’s the key to making the perfect Sheet Pan Chicken Pitas according to the article?
The secret lies in the perfect balance of seasoning and achieving just the right char on the chicken and vegetables. This method ensures tender, flavorful chicken and perfectly cooked veggies every single time.
What are some ingredient substitutions I can make in this recipe?
You can substitute chicken thighs for chicken breasts, use different vegetables like zucchini or mushrooms, experiment with spices like cumin or chili powder, use naan bread or tortillas instead of pita bread, and substitute dairy-free yogurt and cheese for a dairy-free option.
How long should I marinate the chicken for Sheet Pan Chicken Pitas?
You should marinate the chicken for at least 30 minutes, but you can marinate it for longer, even overnight, in the refrigerator for a more flavorful result.
What oven temperature is recommended for baking the Sheet Pan Chicken Pitas?
The recipe recommends preheating your oven to 400°F (200°C) to bake the chicken and vegetables.
Perfect Sheet Pan Chicken Pitas
Ingredients
Equipment
Method
- In a bowl, combine the chicken pieces with olive oil, lemon juice, minced garlic, dried oregano, paprika, salt, and pepper. Mix well and let it marinate for at least 30 minutes (or up to overnight) in the refrigerator.
- While the chicken is marinating, chop the bell peppers and red onion into bite-sized pieces. Halve the cherry tomatoes.
- Preheat your oven to 400°F (200°C).
- Toss the chopped vegetables with a little olive oil, salt, and pepper. Spread them evenly on a large sheet pan.
- Add the marinated chicken pieces on top of the vegetables, ensuring they are in a single layer.
- Bake for 20-25 minutes, or until the chicken is cooked through and the vegetables are tender and slightly charred. Check the internal temperature of the chicken with a meat thermometer to ensure it reaches 165°F (74°C).
- While the chicken and vegetables are baking, warm the pita bread in a dry skillet or in the oven for a few minutes.
- Fill each pita bread with the cooked chicken and vegetables. Top with your favorite toppings such as yogurt sauce, feta cheese, hummus, and fresh herbs.
- Serve immediately and enjoy!


