
The scent of peppermint and melting chocolate always takes me back to those whirlwind days before Christmas, crafting treats with my mom – a tradition I now cherish more than ever. This year, I’m excited to share a recipe that’s as adorable as it is delicious: Strawberry Santa Treats! Get ready to create some edible holiday magic that’s guaranteed to bring smiles, even if your decorating skills are a little… rustic (like mine!).
Ho Ho Ho! Let’s Make Some Strawberry Santa Treats!
Alright, my friends, gather ’round! We’re about to embark on a culinary adventure that’s perfect for holiday parties, kids’ activities, or just a fun afternoon in the kitchen. These Strawberry Santa Treats are not only ridiculously cute, but they’re also surprisingly simple to make. I promise, even if you’re a baking newbie, you can totally nail this! Think of me as your culinary co-pilot, guiding you through every step.
Why You’ll Absolutely Love These Strawberry Santas
- Adorable Factor: Seriously, who can resist a strawberry dressed up as Santa? They’re guaranteed to be the star of any dessert table.
- Easy Peasy: We’re talking minimal ingredients and simple steps. No fancy techniques required!
- Kid-Friendly Fun: Get the little ones involved! Decorating the Santas is a fantastic activity for kids of all ages.
- Deliciously Light: Compared to some heavier holiday desserts, these strawberry treats are relatively light and refreshing.
- Customizable: Want to add a little sparkle? Go for it! The decorating possibilities are endless.
What You’ll Need: Your Strawberry Santa Squad

Before we dive in, let’s make sure we have all our ingredients and equipment ready. Here’s your checklist:
Ingredients:
- Fresh Strawberries: About 1 pound, choose plump, ripe berries with a nice conical shape. The size will determine how many Santas you can make.
- Sweetened Whipped Cream: You can use store-bought (Reddi-Wip works great for convenience!) or make your own. For homemade, you’ll need heavy cream, powdered sugar, and vanilla extract.
- Mini Chocolate Chips or Sprinkles: For the eyes! Get creative here. You could also use black sesame seeds.
Equipment:
- Piping Bag or Ziploc Bag: For easy whipped cream application.
- Small Knife or Offset Spatula: For smoothing the whipped cream.
- Baking Sheet or Plate: To arrange your finished Strawberry Santas.
- Optional: Small bowl for melting chocolate if you want to make chocolate eyes.
Step-by-Step: Assembling Your Strawberry Santa Army
Okay, let’s get started! I’ve broken down the process into easy-to-follow steps. Don’t worry if your first few Santas aren’t perfect – it’s all part of the fun!
Step 1: Prep the Strawberries
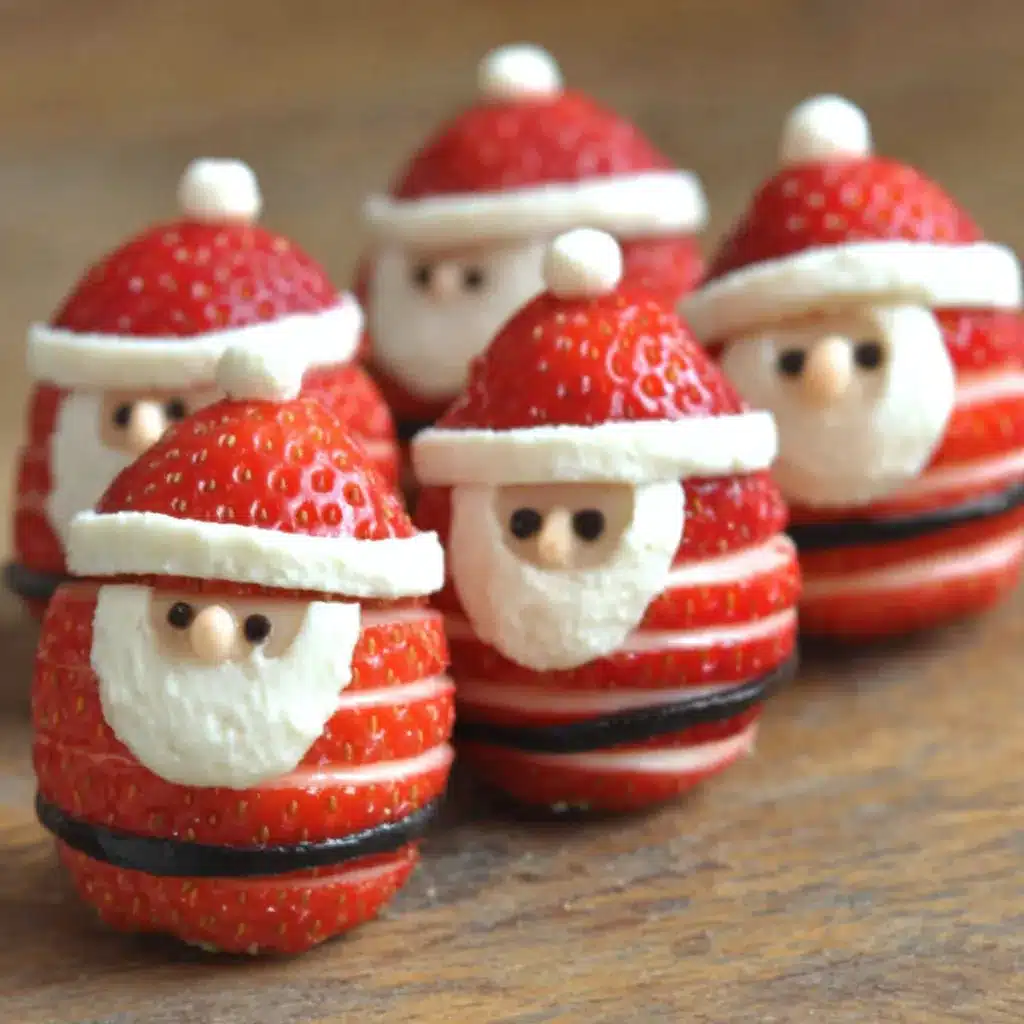
Gently wash and dry your strawberries. Make sure they’re completely dry, otherwise the whipped cream won’t adhere properly. Cut off the stem end of each strawberry to create a flat base so your Santas can stand upright. Then, slice off the top third of each strawberry to create Santa’s hat.
Pro Tip: If your strawberries are wobbly, you can slice a tiny sliver off the bottom to help them stand straight. Just be careful not to cut too much off!
Step 2: Whip Up the Cream (or Uncap the Can!)
If you’re using store-bought whipped cream, you’re already one step ahead! If you’re making your own, combine heavy cream, powdered sugar, and vanilla extract in a chilled bowl. Beat with an electric mixer until stiff peaks form. Be careful not to overbeat, or you’ll end up with butter! Transfer the whipped cream to a piping bag fitted with a small round tip (or a Ziploc bag with a corner snipped off).
Homemade Whipped Cream Recipe:
- 1 cup heavy cream, chilled
- 2-3 tablespoons powdered sugar, or to taste
- 1/2 teaspoon vanilla extract
Step 3: Assemble Santa’s Body
Pipe a generous swirl of whipped cream onto the flat base of each strawberry. This is Santa’s fluffy beard! Try to create a nice, even layer that covers the entire base. This is where you can get creative – short beard, long beard, it’s up to you!
Step 4: Top with Santa’s Hat
Carefully place the strawberry hat on top of the whipped cream beard. Gently press down to secure it. Now, pipe a small dollop of whipped cream on top of the hat to create Santa’s pom-pom.
Step 5: Add the Eyes
This is where your Strawberry Santas really come to life! Using mini chocolate chips or sprinkles, gently press two eyes onto the whipped cream beard. If you’re using melted chocolate, use a toothpick to carefully dab two small dots onto the cream.
Troubleshooting Tip: If your eyes are sliding off, try dabbing a tiny bit of melted chocolate or extra whipped cream on the back of the chocolate chip or sprinkle to act as glue.
Step 6: Chill and Serve
Arrange your finished Strawberry Santas on a baking sheet or plate. Chill in the refrigerator for at least 30 minutes to allow the whipped cream to firm up. This will also help the Santas hold their shape. Serve chilled and enjoy!
Variations and Tips: Making Your Santas Extra Special
Want to take your Strawberry Santas to the next level? Here are a few ideas:
- Dip the strawberries in chocolate: Before adding the whipped cream, dip the strawberries in melted white or dark chocolate for an extra layer of decadence. This makes them similar to Chocolate Covered Strawberries, but with a festive twist.
- Add a touch of flavor to the whipped cream: Stir in a few drops of peppermint extract or almond extract for a festive flavor boost.
- Use different toppings for the eyes: Get creative with your toppings! Try using edible glitter, colored sprinkles, or even small pieces of candy.
- Make a Santa belt: Use a thin strip of black fondant or licorice to create a belt around Santa’s belly. Add a small square of yellow fondant or a yellow sprinkle for the buckle.
- Serve with a dipping sauce: Offer a side of melted chocolate, caramel sauce, or raspberry sauce for dipping.
Storage Tips: These Strawberry Santa Treats are best enjoyed fresh, but they can be stored in the refrigerator for up to 24 hours. After that, the whipped cream may start to soften. Store them in an airtight container to prevent them from drying out.
More Strawberry Delights to Explore!
Once you’ve mastered these adorable Strawberry Santas, why not try your hand at some other delicious strawberry treats? The possibilities are endless!
If you’re looking for a simple and satisfying dessert, these Strawberry Bars are a fantastic choice. They’re easy to make and perfect for a crowd.
For a bite-sized treat, these Strawberry Shortcake Bites are always a hit. They’re no-bake, which makes them perfect for a quick and easy dessert.
And if you’re in the mood for something truly decadent, these Strawberry Tartlets are sure to impress. They’re elegant, delicious, and surprisingly easy to make.
Craving something fluffy and sweet? Dive into Strawberry Shortcake Cupcakes. These are perfect for parties!
For a fun twist, why not try Strawberry Shortcake Cheesecake Rolls? They combine the best of both worlds!
Frequently Asked Questions (FAQ)
Got questions? I’ve got answers! Here are some common questions about making Strawberry Santa Treats:
Q: Can I use frozen strawberries?
A: While you *can* use frozen strawberries, I highly recommend using fresh ones for the best texture and flavor. Frozen strawberries tend to be softer and release more moisture, which can make the whipped cream slide off.
Q: Can I make these ahead of time?
A: Yes, you can assemble the Strawberry Santas a few hours ahead of time. Just be sure to store them in the refrigerator in an airtight container to prevent the whipped cream from drying out. However, I recommend assembling them as close to serving time as possible for the best quality.
Q: Can I use a different type of cream?
A: Yes! While sweetened whipped cream is the traditional choice, you can also use mascarpone cream, cream cheese frosting, or even a vegan whipped cream alternative. Just make sure the cream is thick enough to hold its shape.
Q: What if my whipped cream is too runny?
A: If your whipped cream is too runny, try adding a tablespoon of powdered sugar at a time and beating it until it thickens. You can also add a stabilizer like cornstarch or cream of tartar.
Q: My strawberries are too big/small. What should I do?
A: No problem! Just adjust the amount of whipped cream you use to match the size of the strawberries. If your strawberries are very large, you may need to use a larger piping tip to create a bigger beard.
Ready to Spread Some Holiday Cheer?
There you have it! Everything you need to create these adorable Strawberry Santa Treats. I hope you have as much fun making them as I do! Remember, don’t be afraid to get creative and put your own personal touch on these festive treats. Happy holidays, and happy baking!
Can I use frozen strawberries for the Strawberry Santa Treats?
While you *can* use frozen strawberries, fresh ones are highly recommended for the best texture and flavor. Frozen strawberries tend to be softer and release more moisture, which can cause the whipped cream to slide off.
How far in advance can I make the Strawberry Santa Treats?
You can assemble the Strawberry Santas a few hours ahead of time and store them in the refrigerator in an airtight container to prevent the whipped cream from drying out. However, it’s recommended to assemble them as close to serving time as possible for the best quality.
What other toppings can I use for the eyes besides chocolate chips or sprinkles?
You can get creative with toppings like edible glitter, colored sprinkles, or even small pieces of candy for the eyes.
What can I do if my whipped cream is too runny?
If your whipped cream is too runny, try adding a tablespoon of powdered sugar at a time and beating it until it thickens. You can also add a stabilizer like cornstarch or cream of tartar.
Strawberry Santa Treats
Ingredients
Equipment
Method
- Wash and dry the strawberries thoroughly. Cut off the stem end to create a flat base and slice off the top third to form Santa’s hat.
- If making homemade whipped cream, combine heavy cream, powdered sugar, and vanilla extract in a chilled bowl. Beat with an electric mixer until stiff peaks form. Transfer to a piping bag.
- Pipe a generous swirl of whipped cream onto the flat base of each strawberry to create Santa’s beard.
- Place the strawberry hat on top of the whipped cream beard and gently press down.
- Pipe a small dollop of whipped cream on top of the hat for Santa’s pom-pom.
- Gently press two mini chocolate chips or sprinkles onto the whipped cream beard for the eyes.
- Arrange the finished Strawberry Santas on a baking sheet or plate.
- Chill in the refrigerator for at least 30 minutes before serving.


