
Let’s Gather Our Ingredients!
For the “Rice” (Sweetened Cream Cheese Mixture):
- 8 ounces cream cheese, softened
- 1/4 cup powdered sugar
- 1 teaspoon vanilla extract
For the “Nori” (Cake):
- 1 box (15.25 ounces) vanilla cake mix, plus ingredients called for on the box (usually eggs, oil, and water)
- 1/4 cup milk
- Pink or red food coloring (optional)
For the Filling (Strawberries):
- 1 pound fresh strawberries, hulled and thinly sliced
- 2 tablespoons granulated sugar
For the Topping:
- Whipped cream, for serving
- Extra sliced strawberries, for serving
- Optional: Sprinkles, chocolate shavings, or a drizzle of strawberry sauce
Essential Equipment You’ll Need

- 9×13 inch baking pan
- Mixing bowls
- Electric mixer
- Rubber spatula
- Plastic wrap
- Sushi rolling mat (optional, but helpful!)
- Sharp knife
Step-by-Step Instructions: Let’s Roll!
Baking the Cake “Nori”
- Prepare the Cake Batter: Follow the instructions on the vanilla cake mix box to prepare the batter. Add the milk and food coloring (if using) to the batter and mix well. The milk will make the cake slightly more pliable for rolling, and the food coloring adds a fun visual element!
- Bake the Cake: Pour the batter into a greased and floured 9×13 inch baking pan. Bake according to the cake mix instructions, or until a toothpick inserted into the center comes out clean.
- Cool the Cake: Let the cake cool completely in the pan. This is crucial! A warm cake will be too crumbly to work with.
- Prepare the Cake Sheet: Once the cake is cool, gently invert it onto a large cutting board. Trim the edges of the cake to create a neat rectangle. Then, carefully slice the cake horizontally into two thin layers. You want each layer to be about 1/4 inch thick. This can be a little tricky, so go slow and use a serrated knife if you have one. If the cake tears a little, don’t worry! We can patch it up later.
Making the Sweetened Cream Cheese “Rice”
- Soften the Cream Cheese: Make sure your cream cheese is at room temperature. This is key to getting a smooth, lump-free mixture.
- Combine Ingredients: In a mixing bowl, beat the softened cream cheese, powdered sugar, and vanilla extract with an electric mixer until smooth and creamy. Be careful not to overbeat, or the cream cheese mixture might become too thin.
Preparing the Strawberry Filling
- Slice the Strawberries: Wash and hull the strawberries. Thinly slice them lengthwise.
- Sweeten the Strawberries: In a bowl, gently toss the sliced strawberries with the granulated sugar. This will help macerate the strawberries, drawing out their juices and making them even more flavorful. Let them sit for about 10 minutes.
Assembling the Strawberry Shortcake Sushi Rolls
- Lay Down the “Nori”: Place one of the cake layers onto a sheet of plastic wrap. If you’re using a sushi rolling mat, place the plastic wrap and cake on top of the mat.
- Spread the “Rice”: Evenly spread the sweetened cream cheese mixture over the cake layer, leaving a 1/2-inch border along one of the long edges. This border will help seal the roll.
- Add the Strawberry Filling: Arrange the sliced strawberries in a single layer over the cream cheese mixture. Don’t overcrowd the filling, or the roll will be difficult to close.
- Roll It Up!: Using the plastic wrap (or the sushi rolling mat), carefully lift and roll the cake layer away from you, starting from the edge with the strawberries. Gently tuck the filling in as you roll. Aim for a tight, even roll.
- Seal the Roll: Once you’ve rolled the cake completely, gently squeeze the roll to seal the edge. Wrap the entire roll tightly in plastic wrap.
- Chill the Roll: Refrigerate the Strawberry Shortcake Sushi Rolls for at least 30 minutes to allow the cream cheese to firm up and the flavors to meld. This will also make it easier to slice.
Slicing and Serving Your Masterpiece
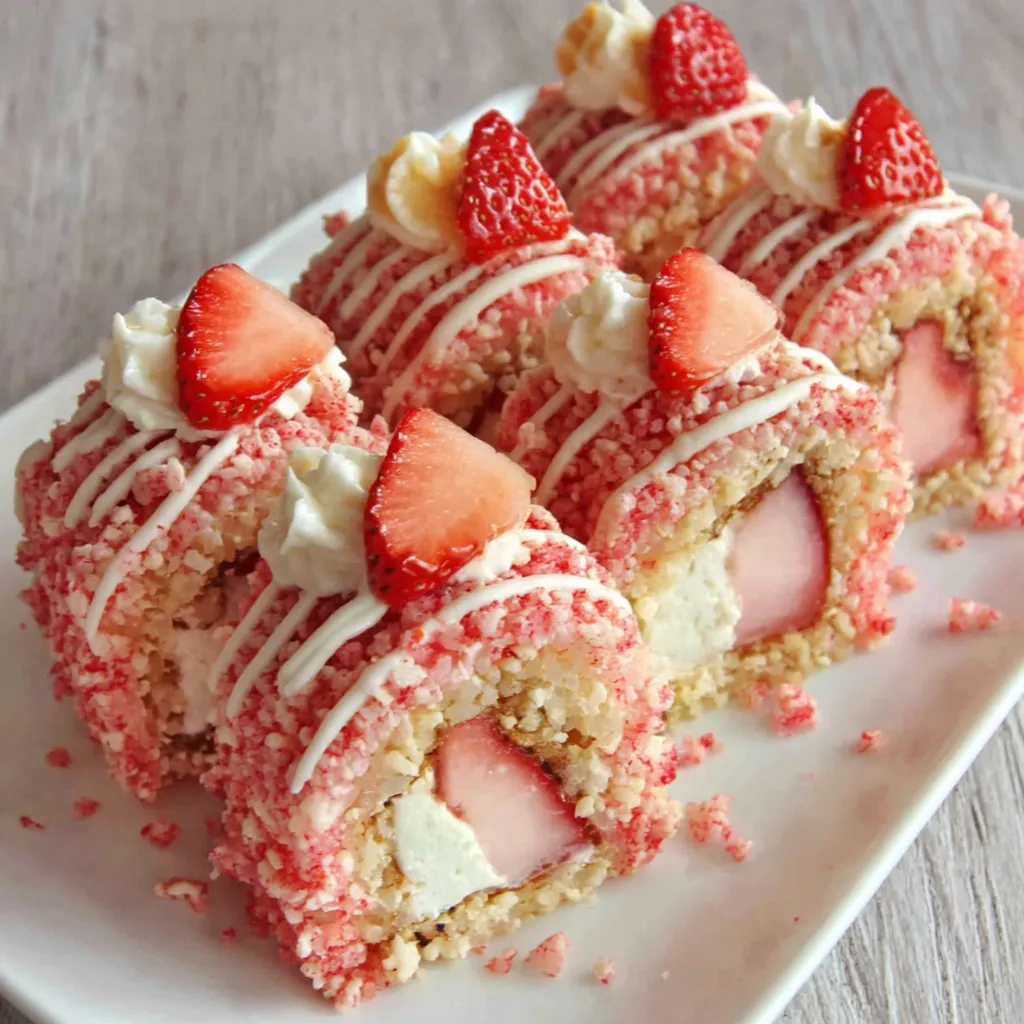
- Unwrap and Slice: Remove the roll from the refrigerator and unwrap it. Use a sharp, serrated knife to trim the ends of the roll. Then, slice the roll into 1-inch thick pieces.
- Plate and Garnish: Arrange the Strawberry Shortcake Sushi Rolls on a platter. Top with whipped cream, extra sliced strawberries, and any other desired toppings, like sprinkles or a drizzle of strawberry sauce.
- Serve and Enjoy!: Serve immediately and watch your guests’ eyes light up!
Tips for Success: Your Secret Weapons
- Don’t Overbake the Cake: A slightly underbaked cake is better than an overbaked one. Overbaked cake will be dry and crumbly, making it difficult to roll.
- Use a Serrated Knife: A serrated knife will slice through the cake cleanly without tearing it.
- Chill Thoroughly: Chilling the rolls is essential for easy slicing and a firm texture.
- Get Creative with Fillings: While strawberries are classic, feel free to experiment with other fruits like blueberries, raspberries, or even peaches. You can also add a layer of crushed graham crackers for extra crunch.
- Make it Gluten-Free: Use a gluten-free vanilla cake mix to make this recipe gluten-free.
Variations and Additions: Level Up Your Rolls
- Chocolate Drizzle: Drizzle melted chocolate over the finished rolls for a decadent touch.
- Coconut Flakes: Sprinkle toasted coconut flakes over the rolls for added texture and flavor.
- Lemon Zest: Add lemon zest to the cream cheese filling for a zesty twist.
- Mini Chocolate Chips: Mix mini chocolate chips into the cream cheese filling for a fun and unexpected surprise.
Make Ahead Tips: Be Prepared!
You can bake the cake and make the cream cheese filling a day ahead of time. Store them separately in the refrigerator. The strawberry filling is best made fresh, but you can slice the strawberries a few hours in advance and store them in the refrigerator.
Storing Leftovers: If There Are Any!
Store leftover Strawberry Shortcake Sushi Rolls in an airtight container in the refrigerator for up to 2 days. The cake may become slightly softer over time, but they’ll still taste delicious!
Other Delicious Recipes You Might Enjoy
If you loved these Strawberry Shortcake Sushi Rolls, you should definitely try these other delightful recipes: Strawberry Shortcake Bites for a quick and easy treat, Strawberry Lemonade Cupcakes for a burst of citrusy flavor, and if you’re feeling adventurous, try a Fruity Pebbles Sushi Roll! Don’t forget the classics like Chocolate Covered Strawberries, and similar roll recipes such as Strawberry Shortcake Cheesecake Rolls or Strawberry Shortcake Cheesecake!
Why I Love This Recipe
I absolutely adore this recipe because it’s the perfect blend of familiar flavors and unexpected presentation. It’s a showstopper that’s surprisingly easy to make, and it’s always a hit at parties and gatherings. Plus, it’s a great way to get creative in the kitchen and have some fun with your food!
So, grab your ingredients, put on some music, and get ready to roll your way to deliciousness! I’m confident that you’ll create some Strawberry Shortcake Sushi Rolls that are both beautiful and incredibly tasty. Happy baking (and rolling)!
Can I make the Strawberry Shortcake Sushi Rolls ahead of time?
Yes, you can bake the cake and make the cream cheese filling a day ahead. Store them separately in the refrigerator. The strawberry filling is best made fresh, but you can slice the strawberries a few hours in advance and store them in the refrigerator.
What if my cake tears while I’m slicing it into thin layers?
Don’t worry if the cake tears a little! You can patch it up later. Just try to slice slowly and carefully, using a serrated knife if you have one.
What other fruits can I use instead of strawberries in the filling?
While strawberries are classic, feel free to experiment with other fruits like blueberries, raspberries, or even peaches. You can also add a layer of crushed graham crackers for extra crunch.
How should I store any leftover Strawberry Shortcake Sushi Rolls?
Store leftover Strawberry Shortcake Sushi Rolls in an airtight container in the refrigerator for up to 2 days. The cake may become slightly softer over time, but they’ll still taste delicious!
Strawberry Shortcake Sushi Rolls Ultimate
Ingredients
Equipment
Method
- Preheat oven and prepare vanilla cake batter according to box instructions. Add milk and food coloring (if using) to the batter and mix well.
- Pour batter into a greased and floured 9×13 inch baking pan. Bake according to cake mix instructions, or until a toothpick inserted into the center comes out clean.
- Let the cake cool completely in the pan.
- Gently invert the cake onto a large cutting board. Trim the edges of the cake to create a neat rectangle.
- Carefully slice the cake horizontally into two thin layers (about 1/4 inch thick).
- In a mixing bowl, beat the softened cream cheese, powdered sugar, and vanilla extract with an electric mixer until smooth and creamy.
- Wash and hull the strawberries. Thinly slice them lengthwise.
- In a bowl, gently toss the sliced strawberries with the granulated sugar. Let them sit for about 10 minutes.
- Place one of the cake layers onto a sheet of plastic wrap (or sushi rolling mat covered in plastic wrap).
- Evenly spread the sweetened cream cheese mixture over the cake layer, leaving a 1/2-inch border along one of the long edges.
- Arrange the sliced strawberries in a single layer over the cream cheese mixture.
- Using the plastic wrap (or the sushi rolling mat), carefully lift and roll the cake layer away from you, starting from the edge with the strawberries. Gently tuck the filling in as you roll.
- Gently squeeze the roll to seal the edge. Wrap the entire roll tightly in plastic wrap.
- Refrigerate the Strawberry Shortcake Sushi Rolls for at least 30 minutes to allow the cream cheese to firm up.
- Remove the roll from the refrigerator and unwrap it. Use a sharp, serrated knife to trim the ends of the roll.
- Slice the roll into 1-inch thick pieces.
- Arrange the Strawberry Shortcake Sushi Rolls on a platter. Top with whipped cream, extra sliced strawberries, and any other desired toppings.


