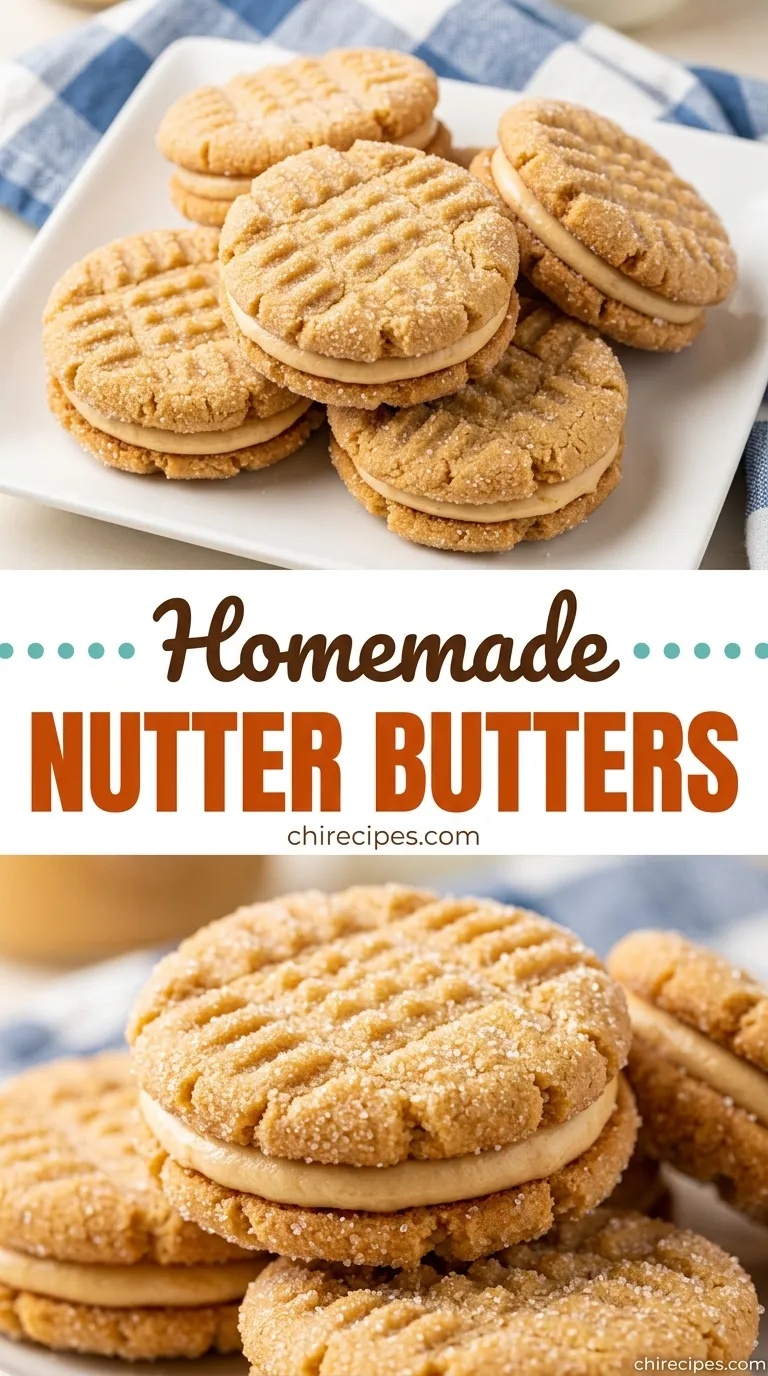
Peanut butter possesses a certain kind of magic, a comforting richness that instantly transports us back to simpler times. While the bright orange package from the store has its place, there is an entirely different level of joy found in creating its likeness from scratch. This recipe isn’t about mere imitation; it’s about elevation. We are capturing the very soul of that beloved cookie—the crisp, sandy texture and the intensely creamy filling—and amplifying it with the goodness of a home kitchen.
What you’ll create is a cookie with a delicate, satisfying snap that gives way to a sweet, salty, and profoundly peanut-buttery center. Each bite is a perfect balance of textures and flavors, a nostalgic treat made infinitely better because you crafted it with your own two hands. These are the Nutter Butters you remember, but more vibrant, more delicious, and filled with the kind of love that can only come from your oven.
Why This Method Works
- Proper Chilling is Non-Negotiable: Chilling the dough for at least an hour is the key to cookies that hold their iconic peanut shape. A cold dough is firm, easy to handle, and won’t spread into a flat puddle in the oven.
- Powdered Sugar for the Filling: We use powdered sugar, not granulated, in the filling for a reason. It dissolves instantly into the peanut butter, creating a silky-smooth, creamy texture without any of the grit you’d get from regular sugar.
- The Two-Ball Shaping Technique: Forming two small balls and gently pressing them together before flattening is the simplest way to achieve that classic peanut silhouette. It’s a small detail that makes all the difference in the final look.
Gather Your Ingredients
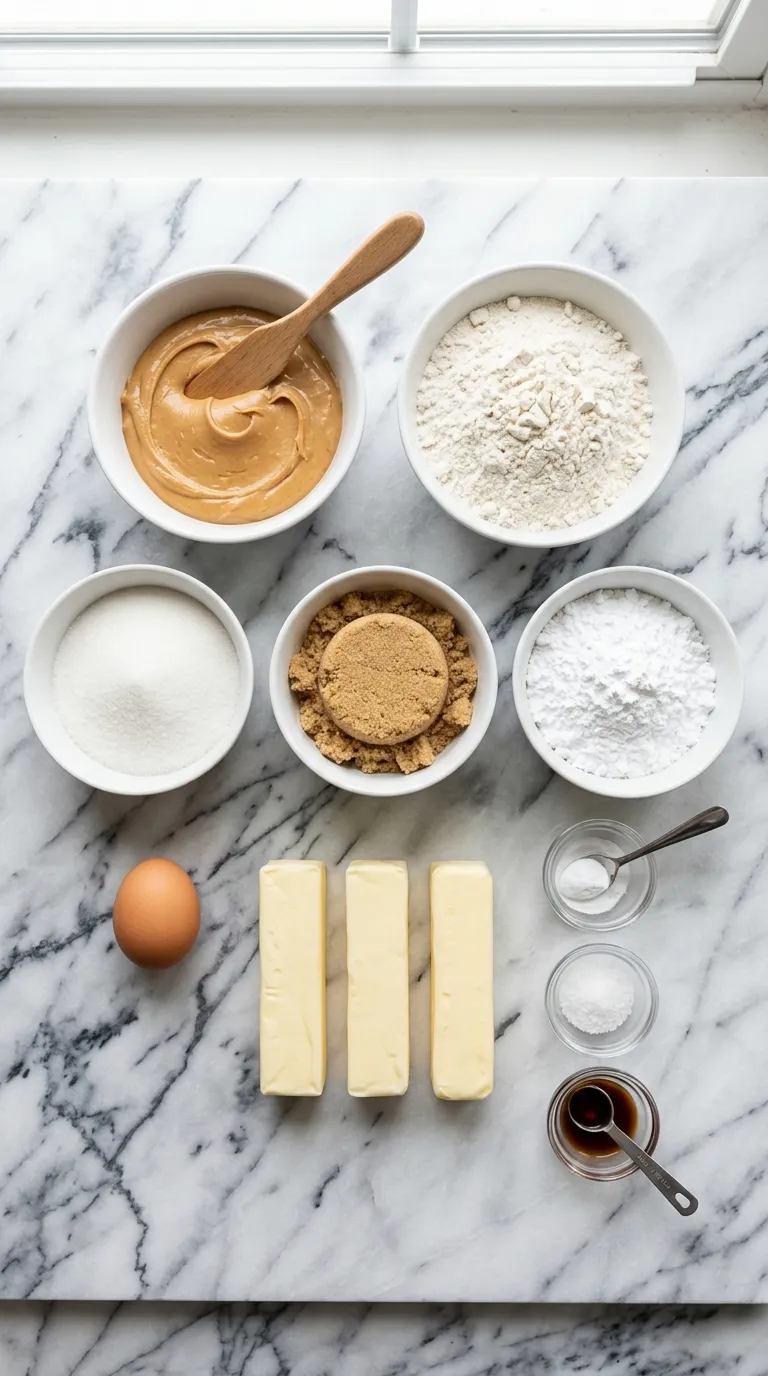
For the Peanut Butter Cookies:
- All-Purpose Flour: (This provides the structure for a cookie that’s tender on the inside but sturdy enough to hold its shape and sandwich the filling.)
- Baking Soda: (Gives the cookies just a little bit of lift and encourages that lovely golden-brown color.)
- Salt: (A crucial component in any sweet recipe, salt heightens the flavor of the peanut butter and balances the sweetness.)
- Unsalted Butter: (Make sure it’s softened to room temperature. This allows it to cream properly with the sugars, creating a light, uniform dough.)
- Creamy Peanut Butter: (The heart of the recipe! Use a standard commercial brand like Jif or Skippy. Natural peanut butters that separate will alter the texture and are not recommended here.)
- Granulated Sugar: (Provides the primary sweetness and contributes to the crisp edges.)
- Light Brown Sugar: (Adds moisture, a hint of molasses flavor, and a slightly chewier texture than if we used only white sugar.)
- Large Egg: (Acts as the binder, holding the entire dough together.)
- Vanilla Extract: (A splash of good vanilla adds a background note of warmth that complements the peanut butter beautifully.)
For the Peanut Butter Filling:
- Creamy Peanut Butter: (More of the good stuff for that double dose of peanut flavor.)
- Powdered Sugar: (As mentioned, this is the secret to a perfectly smooth, non-grainy filling.)
- A Pinch of Salt: (Just a little to make the peanut flavor pop.)
Simple Swaps
- For a Gluten-Free Version: You can substitute the all-purpose flour with a good quality 1-to-1 gluten-free baking flour blend that contains xanthan gum.
- Different Nut Butters: While it won’t be a classic Nutter Butter, you can certainly experiment with creamy almond butter or cashew butter for a different flavor profile in both the cookie and the filling.
- Shortening for Butter: If you prefer a softer, cakier cookie, you can substitute half of the butter with vegetable shortening.
- Dairy-Free Option: Use a high-quality plant-based butter substitute in stick form and your favorite dairy-free milk if needed for the filling.
Tried & True Variations
Once you’ve mastered the classic, these cookies are a wonderful canvas for a little creativity. Here are a few ways to change things up.Chocolate-Dipped Nutter Butters
Peanut butter and chocolate are a match made in heaven. After the cookies are assembled and the filling has set, melt some good-quality semi-sweet or dark chocolate. Dip one half of each sandwich cookie into the melted chocolate, let the excess drip off, and place it on parchment paper to set. This adds a touch of elegance and a rich, decadent flavor, much like in these Chocolate Peanut Butter Valentine Hearts.Add a Little Crunch
For a textural twist, you can use crunchy peanut butter in place of creamy in the cookie dough. I would still recommend using creamy peanut butter for the filling to keep it smooth and easy to spread.Jam-Filled Center
For a “PB&J” version, skip the peanut butter filling. Instead, spread a small amount of thick strawberry or raspberry jam on one cookie and sandwich it with another. It’s a delightful, fruity surprise.The Time-Tested Method
1. Combine the Dry Ingredients
In a medium bowl, whisk together the all-purpose flour, baking soda, and salt. Whisking is a simple step that acts like sifting, evenly distributing the leavening and seasoning so you don’t get a salty or bitter bite. Set this bowl aside for now.2. Cream the Butter, Sugars, and Peanut Butter
In the bowl of a stand mixer fitted with the paddle attachment, or in a large bowl with a hand mixer, beat the softened butter, creamy peanut butter, granulated sugar, and brown sugar on medium-high speed. Let it go for a good 2-3 minutes, until the mixture is light, fluffy, and pale in color. This process whips air into the dough, which is essential for a tender cookie.3. Form the Dough
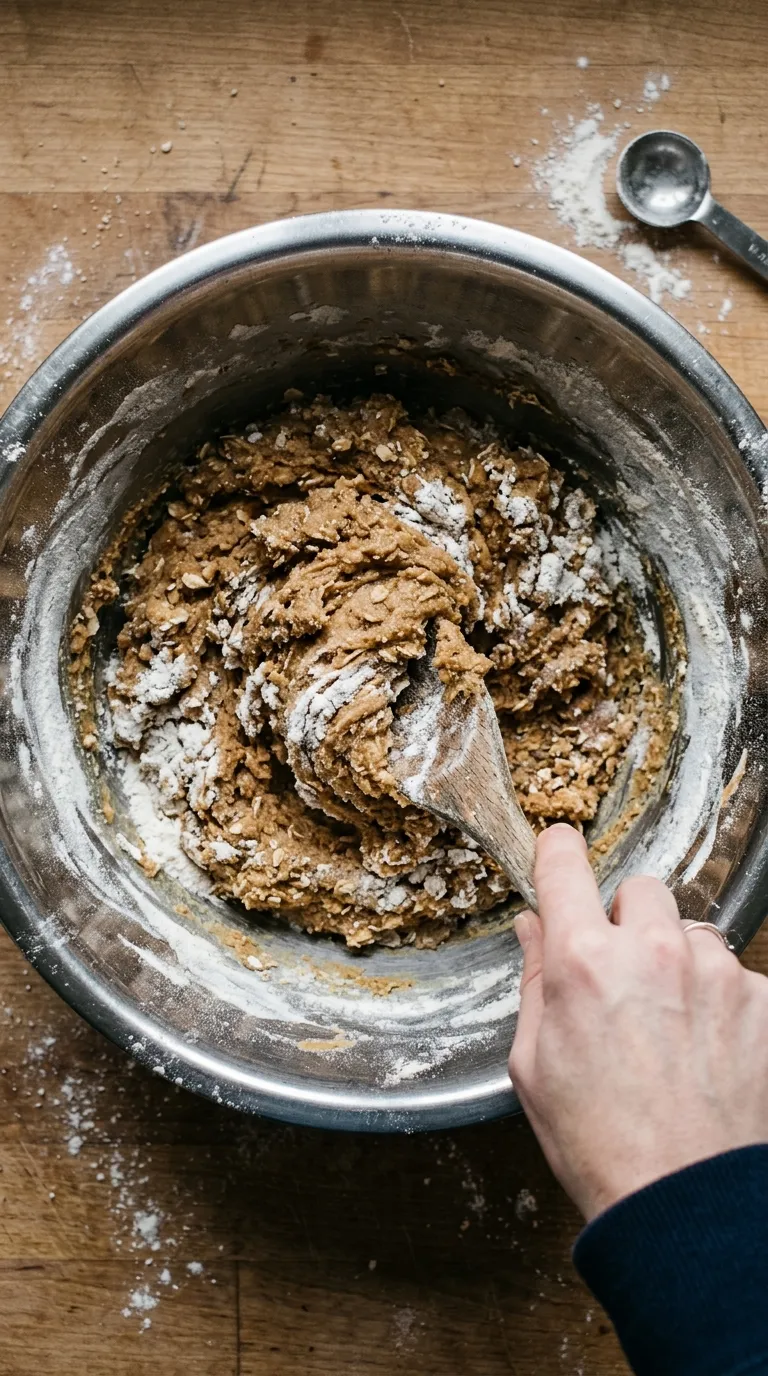
Scrape down the sides of the bowl. Add the egg and vanilla extract and beat again until they are just combined. Don’t overdo it here. Now, with the mixer on its lowest speed, gradually add the dry ingredient mixture you set aside earlier. Mix only until the last streaks of flour have disappeared. Overmixing develops gluten and can make your cookies tough.4. Chill the Dough (The Important Step!)
This is the step that separates good cookies from great ones. Scrape the dough out onto a piece of plastic wrap, form it into a flattened disk, and wrap it tightly. Place it in the refrigerator for at least one hour, or up to two days. A cold dough is much easier to shape and, most importantly, it prevents the cookies from spreading too much in the oven, ensuring they keep that lovely peanut shape.5. Shape the Cookies
Preheat your oven to 375°F (190°C) and line two baking sheets with parchment paper. Take the chilled dough from the refrigerator. For each cookie, you will roll two small, equal-sized balls of dough, about ½ inch each. Place them side-by-side on the prepared baking sheet, then gently press them together where they meet to form a single peanut shape. Using the tines of a fork, gently press a crosshatch pattern onto the surface of each cookie, flattening it slightly. This is a classic peanut butter cookie touch, just like in Brown Butter Peanut Butter Blossoms.6. Bake Until Golden
Bake the cookies for 9-11 minutes, or until the edges are lightly golden brown and the centers look set. They might seem a little soft when you take them out, but they will firm up as they cool. Let them rest on the baking sheet for 5 minutes before transferring them to a wire rack to cool completely. You must let them cool completely before filling, or the filling will melt and slide right out.7. Whip Up the Filling
While the cookies are cooling, prepare the simple but delicious filling. In a small bowl, combine the creamy peanut butter, powdered sugar, and pinch of salt. Stir with a spoon or spatula until it’s completely smooth and creamy. If it seems too stiff, you can add a tiny splash of milk or cream to make it more spreadable, but start with just a teaspoon.8. Assemble Your Cookies
Once the cookies are completely cool, it’s time for the final, fun step. Find matching pairs of cookies. Spread a small amount of the peanut butter filling onto the flat side of one cookie, then gently press another cookie on top to create your sandwich. Repeat with the remaining cookies. This sandwiching technique is what makes so many peanut butter cookies special, from these to the famous Peanut Butter Blossoms.Notes from My Kitchen
Over the years, I’ve learned a few things that ensure these cookies turn out perfectly every single time. Keep these little tips in mind.- Don’t Skip the Chill: I know I’ve said it before, but it bears repeating. A warm, sticky dough will spread into thin, sad discs. Chilling is your secret weapon for that perfect shape and texture.
- Use Commercial Peanut Butter: This is one of the few times I’ll tell you to avoid the natural, “healthy” stuff. The oil separation in natural peanut butter can make the dough greasy and the filling runny. A no-stir brand is your best bet for consistent results, which is also true for other classics like Rolo-stuffed Peanut Butter Cookies.
- Uniformity is Key: Try to make your dough balls for the peanut shape as close in size as possible. This ensures they bake evenly and that you’ll have perfectly matched pairs for sandwiching later.
- Cool Completely: Be patient! If you try to fill and sandwich warm cookies, you’ll have a sweet, sticky mess. Let them cool to room temperature on a wire rack first. It’s worth the wait.
Perfect Pairings
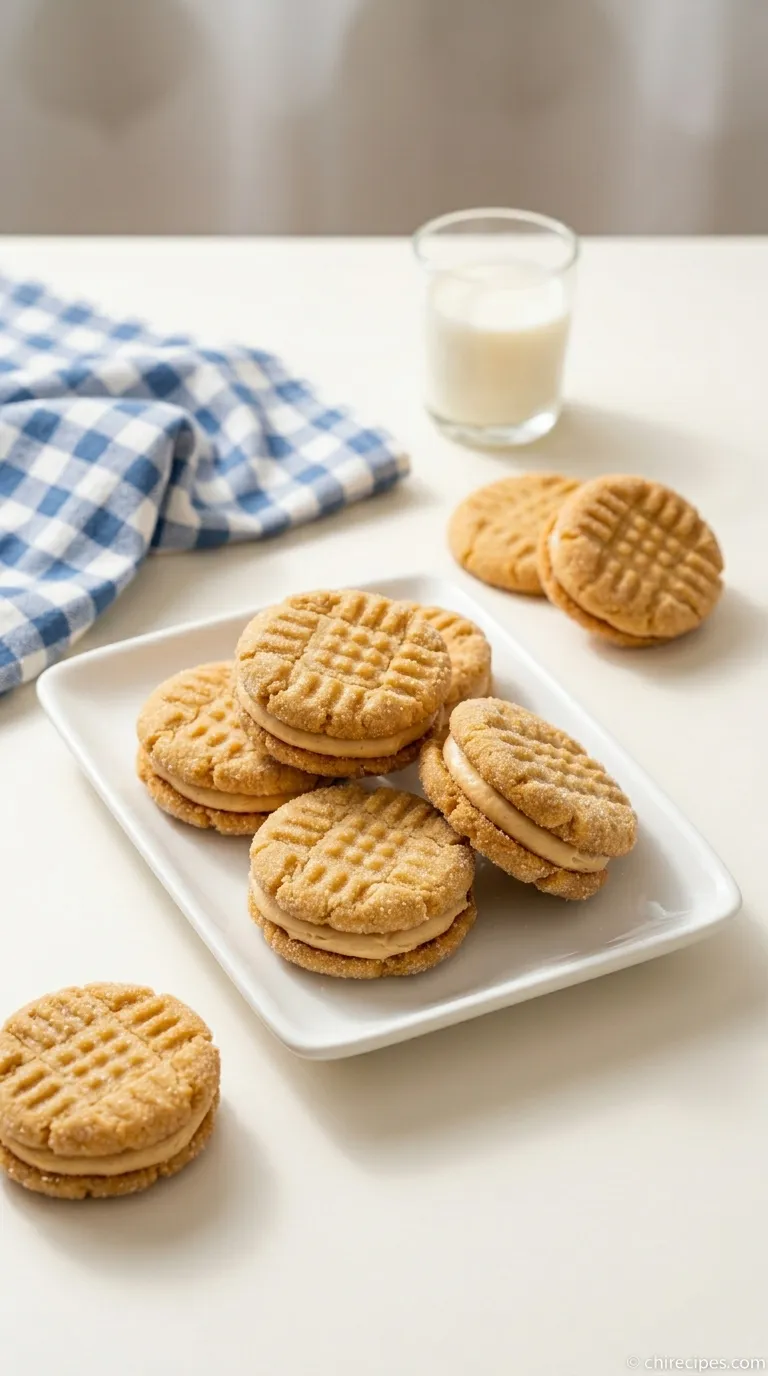
These homemade Nutter Butters are a treat all on their own, but they truly shine when served with a tall, cold glass of milk. There’s nothing better.They are also wonderful with a cup of coffee or tea in the afternoon for a little pick-me-up. For a more decadent dessert, serve one or two alongside a scoop of high-quality vanilla bean or rich chocolate ice cream.
If you’re putting together a cookie platter for a gathering, these provide a wonderful textural and flavor contrast to softer cookies. They would be fantastic next to some chewy Soft Snickerdoodles or even some gooey Reese’s Mini Cup Peanut Butter Cookies for the ultimate peanut butter lover’s dream.
First time making Homemade Nutter Butter Cookies? I hope this guide made it easy. Let me know how it turned out
Why is it so important to chill the dough for these cookies?
Chilling the dough for at least one hour is a critical step because it makes the dough firm and easy to handle. Most importantly, it prevents the cookies from spreading into flat puddles while baking, which is essential for them to hold their iconic peanut shape.
Can I use natural peanut butter in this recipe?
No, the recipe strongly advises against using natural peanut butter. The oil separation common in natural brands can make the cookie dough greasy and the filling runny. For the best texture and consistent results, a standard commercial, no-stir brand like Jif or Skippy is recommended.
What’s the secret to getting a smooth, non-gritty peanut butter filling?
The key to a perfectly smooth and creamy filling is using powdered sugar instead of granulated sugar. Powdered sugar dissolves instantly into the peanut butter, which eliminates the gritty texture you would get from using regular sugar.
How do I create the classic peanut shape for the cookies?
The recipe recommends a simple two-ball technique. For each cookie, roll two small, equal-sized balls of dough. Place them side-by-side on the baking sheet and gently press them together where they meet to form a single peanut silhouette before flattening with a fork.
No-Fail Homemade Nutter Butter Cookies
Ingredients
Equipment
Method
- In a medium bowl, whisk together the all-purpose flour, baking soda, and salt. This step evenly distributes the ingredients. Set aside.
- In the bowl of a stand mixer with the paddle attachment, or in a large bowl with a hand mixer, beat the softened butter, creamy peanut butter, granulated sugar, and brown sugar on medium-high speed for 2-3 minutes until light and fluffy.
- Scrape down the sides of the bowl. Add the egg and vanilla extract and beat until just combined. On low speed, gradually add the dry ingredient mixture and mix only until the last streaks of flour have disappeared. Do not overmix.
- Scrape the dough onto a piece of plastic wrap, form it into a flattened disk, and wrap it tightly. Refrigerate for at least one hour or up to two days. This chilling step is crucial for preventing the cookies from spreading.
- Preheat your oven to 375°F (190°C) and line two baking sheets with parchment paper. For each cookie, roll two small, equal-sized balls of dough (about ½ inch each). Place them side-by-side on the baking sheet and gently press them together to form a peanut shape.
- Using the tines of a fork, gently press a crosshatch pattern onto the surface of each cookie, flattening it slightly.
- Bake for 9-11 minutes, until the edges are lightly golden brown. Let the cookies rest on the baking sheet for 5 minutes before transferring them to a wire rack to cool completely.
- While the cookies cool, prepare the filling. In a small bowl, combine the creamy peanut butter, powdered sugar, and salt. Stir with a spatula until completely smooth. If it’s too stiff, add a teaspoon of milk or cream to make it more spreadable.
- Once the cookies are completely cool, spread a small amount of filling onto the flat side of one cookie and gently press another cookie on top to create a sandwich. Repeat with the remaining cookies.
Notes
– Chilling the dough is non-negotiable for achieving the classic peanut shape and preventing spread.
– Use a commercial, no-stir creamy peanut butter for the best, most consistent texture in both the dough and filling.
– Ensure your dough balls are uniform in size for even baking and perfectly matched pairs.
– Always allow cookies to cool completely before filling to prevent the filling from melting. Variations & Substitutions:
– Chocolate-Dipped: Dip half of each assembled cookie in melted semi-sweet chocolate and let set on parchment paper.
– Crunchy Twist: Use crunchy peanut butter in the cookie dough, but stick with creamy for the filling.
– PB&J Style: Omit the peanut butter filling and sandwich the cookies with a thick strawberry or raspberry jam instead.
– Gluten-Free: Substitute a quality 1-to-1 gluten-free baking flour blend containing xanthan gum. Storage:
– Store the finished cookies in an airtight container at room temperature for up to 5 days.