
I still remember the look on my husband’s face the first time I served him these; it was a weeknight, we were both exhausted, and suddenly, the table was adorned with what looked like edible bouquets! I call them Red Pizza Roses, and they’re the perfect blend of comfort food and elegance. Get ready to impress yourself and anyone you share these with, because you’re about to create something truly special (and delicious!).
Unveiling the Beauty of Red Pizza Roses
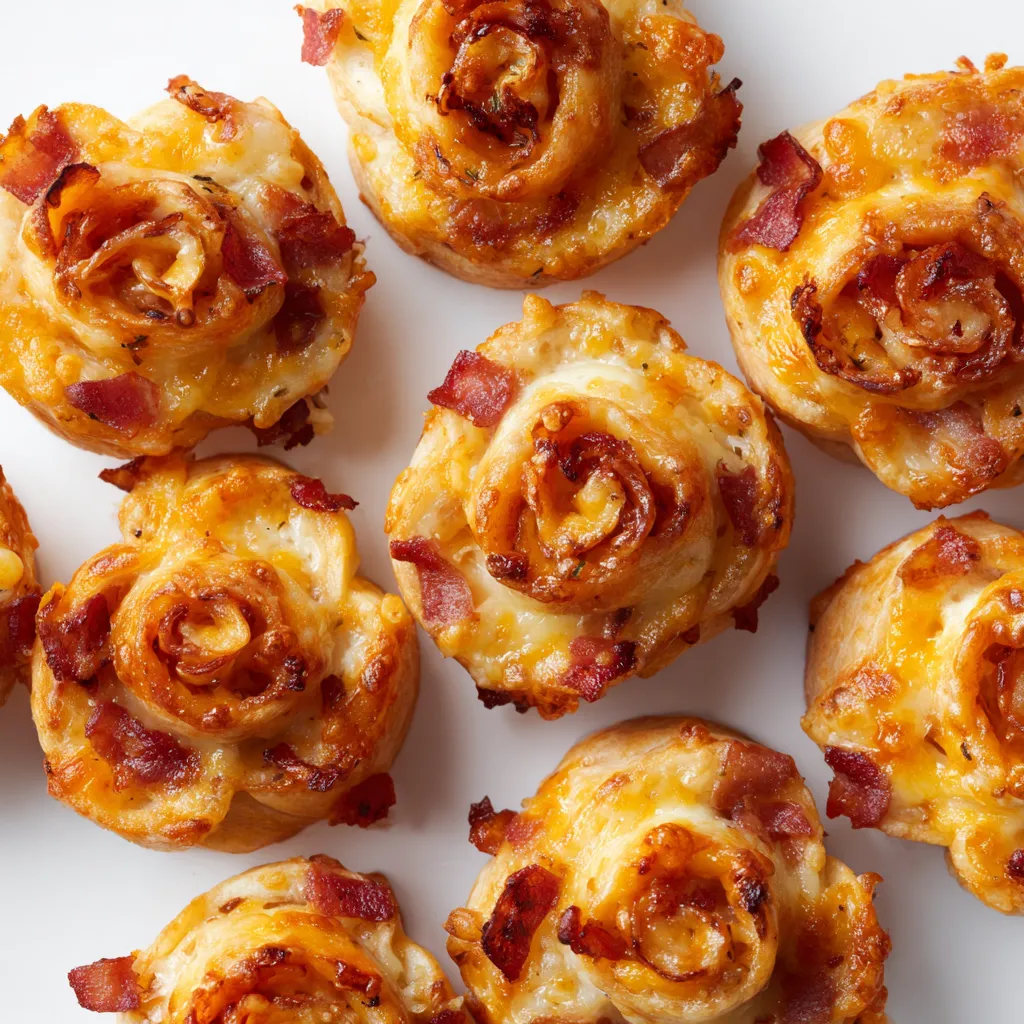
Okay, friend, let’s talk about these show-stopping Red Pizza Roses. These aren’t just any pizza; they’re a culinary work of art, transforming a simple comfort food into something truly special. Imagine perfectly swirled roses, each petal a layer of cheesy, saucy goodness. They’re surprisingly easy to make and are guaranteed to impress, whether you’re planning a romantic dinner, a fun family activity, or just want to elevate your pizza night.
Why Red Pizza Roses?
Why settle for ordinary when you can have extraordinary? Here’s why I’m so obsessed with these little beauties:
- Visual Appeal: Let’s be honest, they’re gorgeous! The rose shape is unexpected and elegant, instantly making any meal feel more special.
- Delicious Flavor: These aren’t just pretty; they’re packed with flavor. The combination of pizza sauce, cheese, and your favorite toppings, all baked to golden perfection, is irresistible.
- Versatility: You can customize them to your heart’s content! Use different sauces, cheeses, and toppings to create a unique flavor profile every time.
- Fun to Make: Assembling these roses is a fun and engaging activity, perfect for getting kids involved in the kitchen.
- Perfect for Any Occasion: From Valentine’s Day to a casual weeknight dinner, Red Pizza Roses are always a hit.
Gathering Your Ingredients: The Foundation of Flavor

Before we start crafting these edible roses, let’s make sure you have everything you need. Quality ingredients are key to achieving that perfect balance of flavor and texture.
The Dough: Your Canvas
You have a couple of options here:
- Homemade Pizza Dough: If you’re feeling ambitious (and trust me, it’s worth it!), making your own dough is the way to go. The flavor is unparalleled, and you have complete control over the ingredients. I have a wonderful Homemade Pizza recipe that will give you that perfect crust.
- Store-Bought Pizza Dough: For a quicker option, store-bought pizza dough works perfectly fine. Just make sure it’s fresh and not too sticky. Let it sit at room temperature for about 30 minutes before using to make it easier to work with.
The Sauce: The Heart of the Rose
The sauce is where you can really let your creativity shine. Here are a few ideas:
- Classic Marinara: A simple, homemade marinara sauce is always a winner.
- Spicy Arrabbiata: Add a kick with some chili flakes for a fiery twist.
- Pesto: For a fresh and vibrant flavor, pesto is a fantastic choice.
For the “red” in our Red Pizza Roses, stick with the marinara or arrabbiata to achieve the best color.
The Cheese: The Binding Beauty
Cheese is essential for that gooey, melty goodness. Here are my favorites:
- Mozzarella: The classic choice for pizza, mozzarella melts beautifully and has a mild flavor that complements other ingredients.
- Provolone: Adds a slightly sharper and more complex flavor than mozzarella.
- Parmesan: A sprinkle of Parmesan cheese adds a salty and savory touch.
Toppings: Your Personal Touch
This is where you can really get creative and customize your Red Pizza Roses. Here are some ideas:
- Pepperoni: A classic pizza topping that adds a salty and spicy kick.
- Mushrooms: Earthy and savory, mushrooms are a great addition to any pizza.
- Bell Peppers: Adds a pop of color and sweetness.
- Olives: For a salty and briny flavor.
- Onions: Adds a savory and slightly pungent flavor.
- Fresh Herbs: Fresh basil, oregano, or thyme add a burst of flavor and aroma.
Step-by-Step Guide to Crafting Red Pizza Roses
Alright, let’s get down to business! Here’s a detailed guide to creating these stunning Red Pizza Roses:
Step 1: Preparing the Dough
- If using homemade dough: Follow your favorite recipe (mine’s linked above!) and let the dough rise according to the instructions.
- If using store-bought dough: Let the dough sit at room temperature for about 30 minutes to make it easier to work with.
- Roll out the dough: On a lightly floured surface, roll out the dough into a large rectangle, about 1/8 inch thick. The thinner the dough, the easier it will be to roll into roses.
Step 2: Layering the Flavors
- Spread the sauce: Evenly spread your chosen pizza sauce over the entire surface of the dough, leaving a small border along the edges.
- Add the cheese: Sprinkle a generous layer of mozzarella cheese over the sauce.
- Add the toppings: Arrange your chosen toppings over the cheese. Be careful not to overload the dough, as this will make it difficult to roll.
Step 3: Rolling into Roses
- Roll it up: Starting from one long edge, tightly roll the dough into a log.
- Slice the roses: Using a sharp knife, slice the log into 1-inch thick rounds. Each round will be a pizza rose.
- Arrange the roses: Place the pizza roses cut-side up in a greased muffin tin or on a baking sheet lined with parchment paper.
Step 4: Baking to Perfection
- Preheat the oven: Preheat your oven to 375°F (190°C).
- Bake the roses: Bake for 20-25 minutes, or until the roses are golden brown and the cheese is melted and bubbly.
- Cool slightly: Let the roses cool slightly before serving.
Tips and Tricks for Pizza Rose Perfection
Like any recipe, there are a few tricks to ensure your Red Pizza Roses turn out absolutely perfect.
Dough Handling: The Key to Success
- Don’t overwork the dough: Overworking the dough can make it tough. Handle it gently and avoid kneading it too much.
- Use enough flour: Make sure your work surface is well-floured to prevent the dough from sticking.
- Let the dough rest: Allowing the dough to rest at room temperature makes it easier to roll out and work with.
Topping Tips: Less is More
- Don’t overload the dough: Too many toppings can make the roses difficult to roll and bake evenly.
- Chop toppings finely: Finely chopped toppings will distribute more evenly and make the roses easier to slice.
- Consider moisture content: Avoid using too many watery toppings, as this can make the dough soggy.
Baking Secrets: Golden Brown Goodness
- Use a preheated oven: A preheated oven ensures that the roses bake evenly and the crust becomes crispy.
- Monitor the baking time: Baking times may vary depending on your oven. Keep an eye on the roses and adjust the baking time as needed.
- Use a muffin tin: Baking the roses in a muffin tin helps them maintain their shape and prevents them from spreading out too much.
Variations and Creative Twists
The beauty of Red Pizza Roses is that they’re incredibly versatile. Here are some fun variations to try:
Heart-Shaped Pizza Roses
Looking for an extra touch of romance? Try making Heart Shaped Pizza Roses! Simply use a heart-shaped cookie cutter to cut out the dough before rolling it into roses.
Mini Pizza Roses
For bite-sized appetizers, make mini pizza roses! Use a smaller cookie cutter or simply slice the dough into thinner rounds.
Different Sauces and Cheeses
Experiment with different sauces and cheeses to create unique flavor combinations. Try using pesto, Alfredo sauce, or a blend of different cheeses like provolone, Gruyere, and Parmesan.
Vegetarian Pizza Roses
For a vegetarian option, load up on veggies like mushrooms, bell peppers, onions, olives, and spinach.
Sweet Pizza Roses
Believe it or not, you can even make sweet pizza roses! Use a sweet dough and fill them with Nutella, chocolate chips, and marshmallows.
Serving Suggestions and Pairings
Red Pizza Roses are delicious on their own, but here are some serving suggestions and pairings to take your meal to the next level:
Appetizers
Serve them as appetizers at a party or gathering. They’re sure to be a crowd-pleaser!
Main Course
Pair them with a side salad for a complete and satisfying meal.
Dipping Sauces
Serve them with dipping sauces like marinara, ranch, or garlic butter.
Wine Pairings
Pair them with a light-bodied red wine like Pinot Noir or a crisp white wine like Sauvignon Blanc.
More Delicious Recipes to Explore
If you’re looking for more fun and creative recipes, be sure to check out these:
- Mini Grilled Cheese Hearts: Perfect for a quick and easy lunch or snack.
- Caprese Dip: A fresh and flavorful dip that’s perfect for summer.
- Chocolate Peanut Butter Valentine Hearts: A decadent dessert that’s sure to satisfy your sweet tooth.
Troubleshooting Common Issues
Sometimes, things don’t go exactly as planned in the kitchen. Here are some common issues you might encounter when making Red Pizza Roses and how to fix them:
Dough is Too Sticky
Problem: The dough is too sticky and difficult to work with.
Solution: Add more flour to your work surface and your hands. Be careful not to add too much, as this can make the dough tough.
Roses are Spreading Out
Problem: The roses are spreading out too much during baking.
Solution: Use a muffin tin to help them maintain their shape. You can also try chilling the roses in the refrigerator for 15-20 minutes before baking.
Toppings are Falling Off
Problem: The toppings are falling off the roses.
Solution: Make sure you’re not overloading the dough with toppings. You can also try pressing the toppings into the cheese slightly to help them adhere better.
Crust is Burning
Problem: The crust is burning before the cheese is melted.
Solution: Lower the oven temperature slightly and bake for a longer period of time. You can also cover the roses with foil during the last few minutes of baking to prevent the crust from burning.
Storing and Reheating Your Creations
If you have any leftover Red Pizza Roses (which is unlikely!), here’s how to store and reheat them:
Storing
Let the roses cool completely before storing them in an airtight container in the refrigerator. They will keep for up to 3 days.
Reheating
To reheat, preheat your oven to 350°F (175°C) and bake for 5-10 minutes, or until heated through. You can also reheat them in the microwave, but they may become slightly soggy.
Final Thoughts: Enjoy the Process!
Making Red Pizza Roses is more than just following a recipe; it’s about creating something beautiful and delicious with your own hands. Don’t be afraid to experiment with different flavors and toppings, and most importantly, have fun! With a little practice and patience, you’ll be creating stunning pizza roses that will impress everyone who tries them. So, gather your ingredients, put on some music, and get ready to unleash your inner pizza artist! Happy baking!
What makes Red Pizza Roses special compared to regular pizza?
Red Pizza Roses transform simple pizza into an elegant and visually appealing dish. The rose shape is unexpected and makes any meal feel more special, combining delicious flavor with versatility and fun.
What are some topping ideas for Red Pizza Roses?
You can get creative with toppings! Some ideas include classic pepperoni, earthy mushrooms, colorful bell peppers, salty olives, savory onions, and fresh herbs like basil or oregano.
What can I do if the pizza dough is too sticky when making Red Pizza Roses?
If the dough is too sticky, add more flour to your work surface and hands. Be careful not to add too much, as this can make the dough tough. Letting store-bought dough rest at room temperature for 30 minutes also helps.
How should I store leftover Red Pizza Roses?
Let the roses cool completely before storing them in an airtight container in the refrigerator. They will keep for up to 3 days.
Red Pizza Roses
Ingredients
Equipment
Method
- Preheat oven to 375°F (190°C).
- If using store-bought dough, let it sit at room temperature for 30 minutes.
- On a lightly floured surface, roll out the dough into a large rectangle, about 1/8 inch thick.
- Evenly spread the marinara sauce over the dough, leaving a small border.
- Sprinkle mozzarella, provolone, and parmesan cheese over the sauce.
- Arrange pepperoni, mushrooms, bell peppers, olives, and onions over the cheese.
- Starting from one long edge, tightly roll the dough into a log.
- Using a sharp knife, slice the log into 1-inch thick rounds.
- Place the pizza roses cut-side up in a greased muffin tin or on a baking sheet lined with parchment paper.
- Bake for 20-25 minutes, or until the roses are golden brown and the cheese is melted and bubbly.
- Let the roses cool slightly before serving. Garnish with fresh basil.


